Peacock ATCs!

This was one of those projects that started with a vague idea and I just followed where all the trials and mishaps took me! The ATCs aren’t exactly what I had in mind, but I’m still content with what came out of the process!

Peacock ATC set!

I made this ATC set for MarciLB’s ATC Swap over at scrapbook.com! I’m also going to be entering them in to Simon Says Stamp’s Monday Challenge “Distress It.”

These are a rather straight forward process, a lot of Cameo sketch pen work and cutting, followed by a lot of coloring!

For the ‘green’ of the peacock’s tail I mixed Peeled Paint & Lucky Clover Distress Oxides on my work surface with some water & used my water brush to paint!

For the ‘stone’ I used Weathered Wood & Pumice Stone Distress Crayons and blended them.

After the Crazing Distress Collage Medium was dry, I used a blending tool to add the Frayed Burlap Distress Ink to the surface.

Cut Files:

  • All cut files came from the Silhouette Store.

Product List:

  • Silhouette Cameo & Pen holder with uni-ball gel pen, micro line, with “uni Super Ink.” I seriously love this pen, it makes nice, fine lines, and it holds up to water!
  • Watercolor paper
  • the green background paper is from an OLD K & Company stack from their “Designer Paper” series. And I mean OLD, like probably 2009, and in scrapbook years, that’s ANCIENT!! LOL!!
  • McGill Paper Blossom Tool Kit – Ball Tools
  • Ranger Glossy Accents, water pen (nib)
  • Tim Holtz – round blending tool, Distress Collage Medium: Crazing, Distress Collage Brush, Distress Crayons: Weathered Wood & Pumice Stone, Distress Oxides: Peacock Feathers, and Peeled Paint & Lucky Clover mixed together, Distress Ink: Frayed Burlap, and Distress Marker: Wild Honey
  • Vicki Boutin Acrylic Paint Set 2: “Saltwater Taffy” used
  • PrismaColor Markers (on the flowers)

Let’s Go On An Adventure

Let’s Go On An Adventure Layout!

My oldest son in 2006, when he was 7 1/2, going exploring in my mom & dad’s backyard with his brother, using the “Explorer Kit” that my youngest had received for his birthday in 2005!

This week’s Monday Challenge over at Simon Says Stamp is “Distress It.” While I may not have a traditional “distressed” look, I did use some wonderful Distress Oxides on here!

Over at scrapbook.com I am hostess to the “Ugly Paper Challenge.” I first did the challenge back in August 2011 with the, I believe, original hostess. Then in 2012 (I think) the second hostess took over, and in March 2015 I took it over! So, as far as I know, I am the third hostess of the challenge. I haven’t done the challenge every month since I first found it (with the previous hostesses), but I have always loved the challenge! In short, two “ugly” papers and one (or more!) “ugly” embellishment(s) are mailed to another player (I give out addresses!) at the beginning of the month, and players have until the end of the month to create their layouts! The papers have to still be recognizable, and the embellishment is optional (it counts as two extra votes at the end of the month!). Now, this isn’t to say any particular papers or embellishments are “ugly,” but the combination given is! Most of the time anyhow! The challenge is receiveing a combination that you may have never even considered putting together on your own, plus you are receiving papers that may not be your “style.” Anyhow, I just wanted to make it be known that “ugly” is a subjective term, and I have received (on more than one occassion) papers that were wonderful, even though the sender didn’t think so!

Now that that’s out of the way, on to the details about the layout!

This is a picture of the papers & embellishments I received for the month of July:

The papers I received in the “Ugly Paper Challenge” over at scrapbook.com

Instantly I knew what was going to happen to that green paper! I already had a set of photos in mind I wanted to scrap when these arrived, and it was lucky for me that green paper just screamed “turn me into tropical leaves!”. The floral paper, well that was going to have to be shaped to my will!

A cut file and some Shimmerz turned my flowers into clouds!

As you can see, that floral paper became the outlines for the clouds! I used some Shimmerz: AcriTonez: 3 Sheets To The Wind and some Shimmerz: Anchor’s Away! It did a good job of hiding the flowers, which would have just look weird on this layout!

Some Peeled Paint Distress Oxide helped my green grass paper become tropical leaves!

With the green grass paper I cut out my leaves and put on a light coat of Peeled Paint Distress Oxide, and spritzed with water to “activate”!

Close-up of the embellishment cluster at the bottom.
Another shot showing more of the top of the photo embellishments!
Close-up of the title area! I love how the Distress Oxides came out on “Adventure!”

Cut Files List:

Product List:

  • Shimmerz: AcriTonez: 3 Sheets To The Wind
  • Shimmerz: Anchor’s Away
  • Silhouette Cameo
  • Distress Oxides: Peeled Paint & Faded Jeans
  • American Crafts – Starshine Collection- Cardstock Stickers – Accent and Phrase
  • Becky Higgins – Project Life – High Five Edition Collection – Chipboard Stickers
  • Bella Blvd – Ciao Chip – Self Adhesive Chipboard – Words – Adventure
  • Pink Paislee – Fancy Free Collection – 12 x 12 Double Sided Paper – Paper 06
  • Hip Kit Club Exclusives:
  • Paper: Medowbrook “Touch The Sky” (inside clouds) and “Starlit Sprinkle” (blue/white dot under photo), and The Happy Life “Ombre Sky” (background). All designed by Kim Watson.
  • All the puffy stickers
  • The teal Alphas
  • In addition to the Hip Kit products already mentioned, everything else came from Hip Kit Club Kits. I don’t know which ones, but I know they are from between March 2016 and July 2016. Not all products may be Hip Kit Club Exclusives, but I don’t have the packaging for them anymore so I can’t give specifics!
  • Summer Hello Cards!

    Summer Hello Cards – Simon Says Stamp July Card Kit!

    Just a couple of straight forward cards I made using the July Card Kit from Simon Says Stamp! The card on the right was inspired by Heather Hoffman’s card shown on the inspiration/idea insert that comes in the kit! These cards also fit nicely into the Simon Says Stamp Wednesday Challenge this week, and MarciLB’s “Tis the Season: SUMMER” challenge over at scrapbook.com!

    Shaker Card! The splatters are Distress Oxides, and the pink for the sentiment is Lawn Fawn!


    I used a circle thinlet to cut the circles in the top and underlying foam for the shakers!

    This one was 100% inspired by the card done by Heather Hoffman shown on the inspiration/idea insert in the kit!

     Product List:

    • From the Simon Says Stamp July Card Kit: SSS “Sea You Soon” stamp set, SSS “Moonshine” Confetti, acetate, printed paper from Echo Park’s “Summer Dreams” collection, and the “Doll Pink,” “Sunshine,” and 120# White cardstock.
    • a la mode clear embossing powder
    • Lawn Fawn “Plastic Flamingo” dye ink
    • Tim Holtz: “Retro Circles” Embossing Folder, Distress Oxide –  “Salty Ocean” and “Peacock Feathers,” and Distress Embossing Ink Pad (Clear)
    • Ranger Glossy Accents and Super Fine, White Embossing Powder
    • a bit of hemp twine
    • the white, vellum looking bit for the banner isn’t actually vellum, but I have no idea what it is or where it came from! I kept it a long time ago because it was rather pretty, but I don’t remember how I aquired it!

    be your own sunshine

    I saw a piece of paper (I’ll show that later) that inspired the coloring of this tag. Plus, Simon Says Scrap’s current Wednesday challenge is “Summer Sunshine.” Add to the mix a quote I saw that said, “Sometimes you have to be your own sunshine,” and a tag was born.

    The flowers didn’t come out exactly how I had hoped, but sometimes that just happens!

    I started out with a piece of cardboard cut to a size 12 tag (10 1/2″ x 5 1/4 I think…I have a template so I don’t always have to measure or remember!) and I coated it thickly with white acrylic paint.

    My tag base

    After that I started gathering supplies I thought I might use and picked out colors I thought could be used to try and recreate the color and design of this piece of Echo Park paper! (I received mine in the July Card Kit from Simon Says Stamp, now to make a card with it!)

    The paper that inspired it all!
    Smooshing paint into all the crevices!

    The honeycomb and riveted metal are from using Amazing Casting Resin in Tim Holtz’s embossing folders (Watch a technique video here!). The flourish’s are from a flourish circle I had cut out a few years ago with my Cameo. It was multiple layers of cardstock that didn’t get glued together quite right, and was painted a light pink. I finally decided it was time to either use it or toss it! And, all of the gears on this project came from the Silhouette store.

    Lots of ink & paint & Metallique Wax & Perfect Pearls on here!

    After I painted everything, added some “Old Silver” Prima Metallique Wax randomly then I went back over with matching/coordinating Distress Oxides. After all that was dried I used a Crafter’s Workshop 12 x 12 Template (“Sunburst”) for the rays, and a circle stencil I made a while back for the…umm, circles.

    All the shine on the gears for the “sun” is from Perfect Pearls “Perfect Pearl.” The sun rays are Delicata “White Shimmer” Pigment Ink.
    More Perfect Pearls for the circles!

    Lots of “mulberry” type flowers sprayed with a variety of colors! For the oranges I mixed “Carved Pumpkin” Distress Stain with some Perfect Pearls “Perfect Pearl” and “Pewter.” The different shades of yellows and oranges is due to the original colors of the flowers. The pink flowers are from Shimmerz Coloringz “Pink Stilettos,” and the mint is from Heidi Swapp’s Color Shine “Sweet Mint.”

    Product List:

    • Silhouette Cameo
    • Amazing Cast Resin
    • Pink Paislee: Take Me Away Collection: Thickers with Foil Accents: Phrases: “Dream”
    • Hip Kit Club Exclusive Alpha (May 2017 Main Kit)
    • Shimmerz: AcriTonez – Pinkadelic; Coloringz – Pink Stilettos
    • Perfect Pearls: Perfect Pearl & Pewter
    • Tsukineko Delicata: White Shimmer
    • White acrylic paint
    • Heidi Swapp Color Shine: Sweet Mint
    • Tim Holtz Distress Paint – Carved Pumpkin & Cracked Pistachio; Distress Spray Stain – Carved Pumpkin; Distress Oxide – Wild Honey, Cracked Pistachio, & Picked Raspberry; Embossing Folders – Riveted Metal & Honeycomb
    • Ranger Mini Mister
    • Prima Art Alchemy Metallique Wax: Old Silver
    • “Mulberry” type flowers

    Winter Wonderland

    Winter Wonderland

    I was inspired by the “Sizzix Christmas In July” Challenge over at scrapbook.com to start some Christmas projects early! There was a lot of fussy cutting involved, but it was worth it in my opinion! Those birds and houses (Crate Paper “Snow and Cocoa” line) are just too darn cute!

    I don’t know if I should classify this as a card or as decoration, so I’m going to call it #Card_Deco! It put me in mind of my childhood. My parents had a string that hung across the beam in our living room, and every year they would hang the Christmas cards we received on it. Friends and family became part of our Christmas decor!

    The very front of the card is rather straight forward! The “Wonderland” piece is from Crate Paper, the card stock is American Crafts, everything else are Hip Kit Club Exclusives!
    Lots of fussy cutting found here (well not necessarily “lots,” but for me it is!) And if I haven’t said it before, I’ll say it now, I am IN LOVE with the Distress Oxides! I’ve had all these papers since November/December (2016), but I hadn’t figured out exactly how to use them. Apparently they were waiting for Tim Holtz’s Distress Oxides!

    That little fawn was cut from some scrap white card stock I had using the “Retro Deer” die from Simon Says Stamp. I just trimmed off the antlers and added some spots so he could match his Mama! (Hip Kit Club Exclusive Die Cuts – the doe & the mushrooms)
    Winter Wonderland CarDeco closed and ready for an envelope!

    Product List:

    • The card base/design I created myself in Silhouette Design Studio & used my Cameo to cut the pieces out.
    • American Crafts “Lollipop” card stock
    • Hip Kit Club Exclusive Papers & Die Cut Pack
    • Crate Paper “Snow and Cocoa” Collection (“Wonderland” and all the fussy cutting!)
    • Simon Says Stamp “Retro Deer” die for the fawn (I just trimmed off the antlers & added some spots!)
    • Tim Holtz Mini Snips, Mini “Woodland” Stencil (Mini Stencil Set #21), Distress Grit Paste, Distress Glitter “Clear Rock Candy,” Distress Marker “Tumbled Glass,” and Distress Oxides “Iced Spruce,” “Worn Lipstick,” “Fossilized Amber,” and “Cracked Pistachio.
    • Ranger “Opaque Matte” Texture Paste, Water Pen (Nib), & Blending Tools.

    Christmas Cards Set!

    Getting a head start with my Christmas Cards!

    Just because it’s 110 degrees outside doesn’t mean I can’t do Christmas! After all, in the Southern Hemisphere of this big blue marble we call home, Christmas is a summer holiday!

    Used my Silhouette Curio to write & fill in the greeting!

    That gold bow came in the Fuse (Gold? I think) Kit!

    Cute little deer, glitter paper, and twine!

    Love the retro Santa paper and “Swell Christmas” stamp set from Simon Says Stamp! (I fussy cut Santa out of watercolor paper after stamping & embossing!)

    Product List:

    • All of the card stock, printed papers (except the paper for the red & white deer), and glitter paper came from the Simon Says Stamp Limited Edition 2016 Holiday Card Kit, as did the deer die (“Retro Deer”) and the stamp set (“Swell Christmas”).
    • The paper for the red & white deer is from Me & My Big Ideas, and it’s so old I couldn’t even find it using the UPC code!!
    • Ranger Enchanted Gold Embossing Powder
    • Tim Holtz Mini Snips, Distress Embossing Ink, Distress Ink: Festive Berries, Antique Linen, and Tattered Rose, Distress Oxide: Fired Brick, and Vintage Photo
    • We R Memory Keepers: Fuse Tool & Gold Kit (I think!)
    • Martha Stewart Twine
    • Green & Gold Ribbon: Unknown
    • Sizzix Big Shot (Blue & Teal Starter Kit – for the label dies)
    • My Minds Eye: Christmas on Market Street Puffy Stickers
    • Silhouette Curio

    Christmas Gift Tags Set #2

    Set #2 of my Christmas Gift Tags

    My second set of Christmas Gift Tags, which, like the first set, was set in motion by AZAmy’s & Sizzix’s “Christmas In July Challenge” over at scrapbook.com. Like the first set, the tags, and most of the patterened paper came from the Simon Says Stamp Limited Edition 2016 Holiday Card kit.

    The stamp set used, “Swell Christmas,” is from Simon Says Stamp, and came in the Limited Edition 2016 Holiday Card Kit. The gold embossing powder is also from Simon Says Stamp, and I think it also came in the kit.

    I just started laying bits and pieces on for this tag! The ornament stamps are also in the “Swell Christmas” set.
    I like the idea of making a vintage-ish tag, and decided to use my trusty Tim Holtz tree from my “Happy Everything Blueprints” set! To color in the tree, I used a water brush and Distress Oxides, then to top it off I used the “Christmas Day” stamp from American Crafts! (To splatter the background I used a paint brush and the Distress Oxides)
    Once again, I used stamps from the “Swell Christmas” set! Simon Says Stamp gold embossing powder, some Heidi Swapp Color Shine in Bronze, some Distress Oxides, and some Prima Watercolors!

    Products Used:

    • Simon Says Stamp “Swell Christmas” Stamp Set, gold embossing powder, tags, papers from “Limited Edition 2016 Holiday Card Kit,
    • Tim Holtz “Blueprint Tree” from Happy Everything Blueprints Set & Tiny Attacher
    • American Crafts “Christmas Day” Stamp
    • Simple Stories “December Documented” 6 x 6 paper pad.
    • Ranger Water Brush & Black Archival Ink
    • Distress Marker: Candied Apple
    • Distress Oxides: Fossilized Amber, Iced Spruce, Broken China, Walnut Stain, & Fired Brick
    • Distress Ink: Festive Berries & Tattered Rose
    • Distress Embossing Ink Pad
    • a la mode clear embossing powder
    • Prima Watercolor Confections: Decadent Pies
    • My Minds Eye “Christmas On Market Street” Puffy Stickers
    • Martha Stewart “Scallop Dot” edge punch & red twine
    • Heidi Swapp Color Shine: Bronze
    • Stickles “Joyful”
    • Basic Grey Juniper Berry Embellishment Pack
    • We R Memory Keepers Crop-A-Dile

    Red, White, & Blue ATCs!

    Red, White, & Blue ATCs

    Putting these ATCs together was something else! I had an original idea in mind inspired by the July Challenge over at Creative Embellishments. I really loved the way the elements in the inspiration photo overlapped each other, and I really love how “shiny” the image seemed. Creative Embellishments July Challenge fit quite nicely with Simon Says Stamp’s Monday Challenge of “Red, White, & Blue”, and I thought it would be a good idea to try and create a shiny, red, white & blue, element overlapping ATC for the challenges, and for MarciLB’s ATC Swap over at scrapbook.com. Things didn’t go quite according to plan.

    My initial background was too embossed! I didn’t want it to be quite like that! But, if nothing else, I’m persistent, so I decided to see what I could do with it!

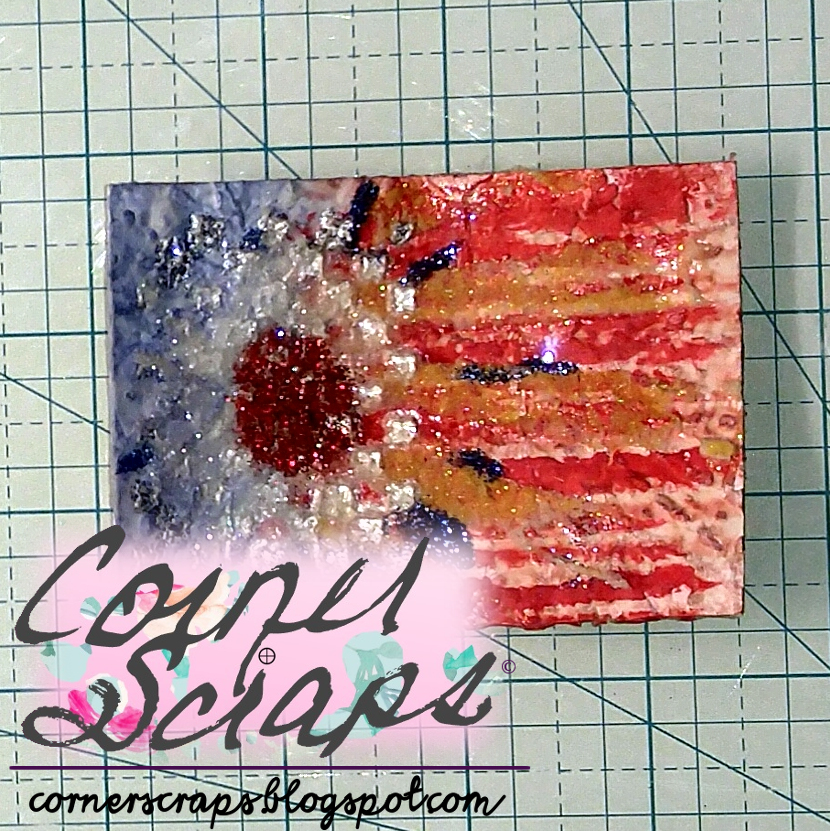
    Initial Background. Thick watercolor paper, coated with white acrylic paint, embossed using Tim Holtz’s “Cracked,” striped with Tim Holtz’s “Stripes” stencil & Distress Oxide Fired Brick, and colored with Distress Oxide Faded Jeans for the blue.

    I decided to get Mixed Media crazy! I added Candied Apple Distress Paint stripes, I threw down a layer of Mod Podge, which “intensified” the Distress Oxides underneath, I added some Prima Snowflake Paste for those rays using Tim Holtz’s “Ray” stencil, and colored them with Shimmerz Vibez “Glorious Day.” If that wasn’t enough, for the “stars” I used Shimmerz Dazzlerz “Spun Sugar” and Echo Park’s “Beach Towel” stencil. About now I was thinking I should give up and start over! But, as I said, I’m persistent (some may say overly stubborn, but they’re wrong! LOL). Anyhow, I decided that I should cover some of my “flag” with a firework (as so originally inspired by the July Challenge at Creative Embellishments) and I dug out my glitter. (I have a great dislike for glitter, but I was getting desperate!)

    What better way to adhere that glitter than with some Transparent Gloss Texture Paste from Ranger “squished” through a temporary stencil I made with some scrap card stock and a “starburst” cut file from Silhouette? In hindsight, there probably are better ways! Oh. My. Gosh. Now I just have too much everything!

    Well, that’s just too much … EVERYTHING!

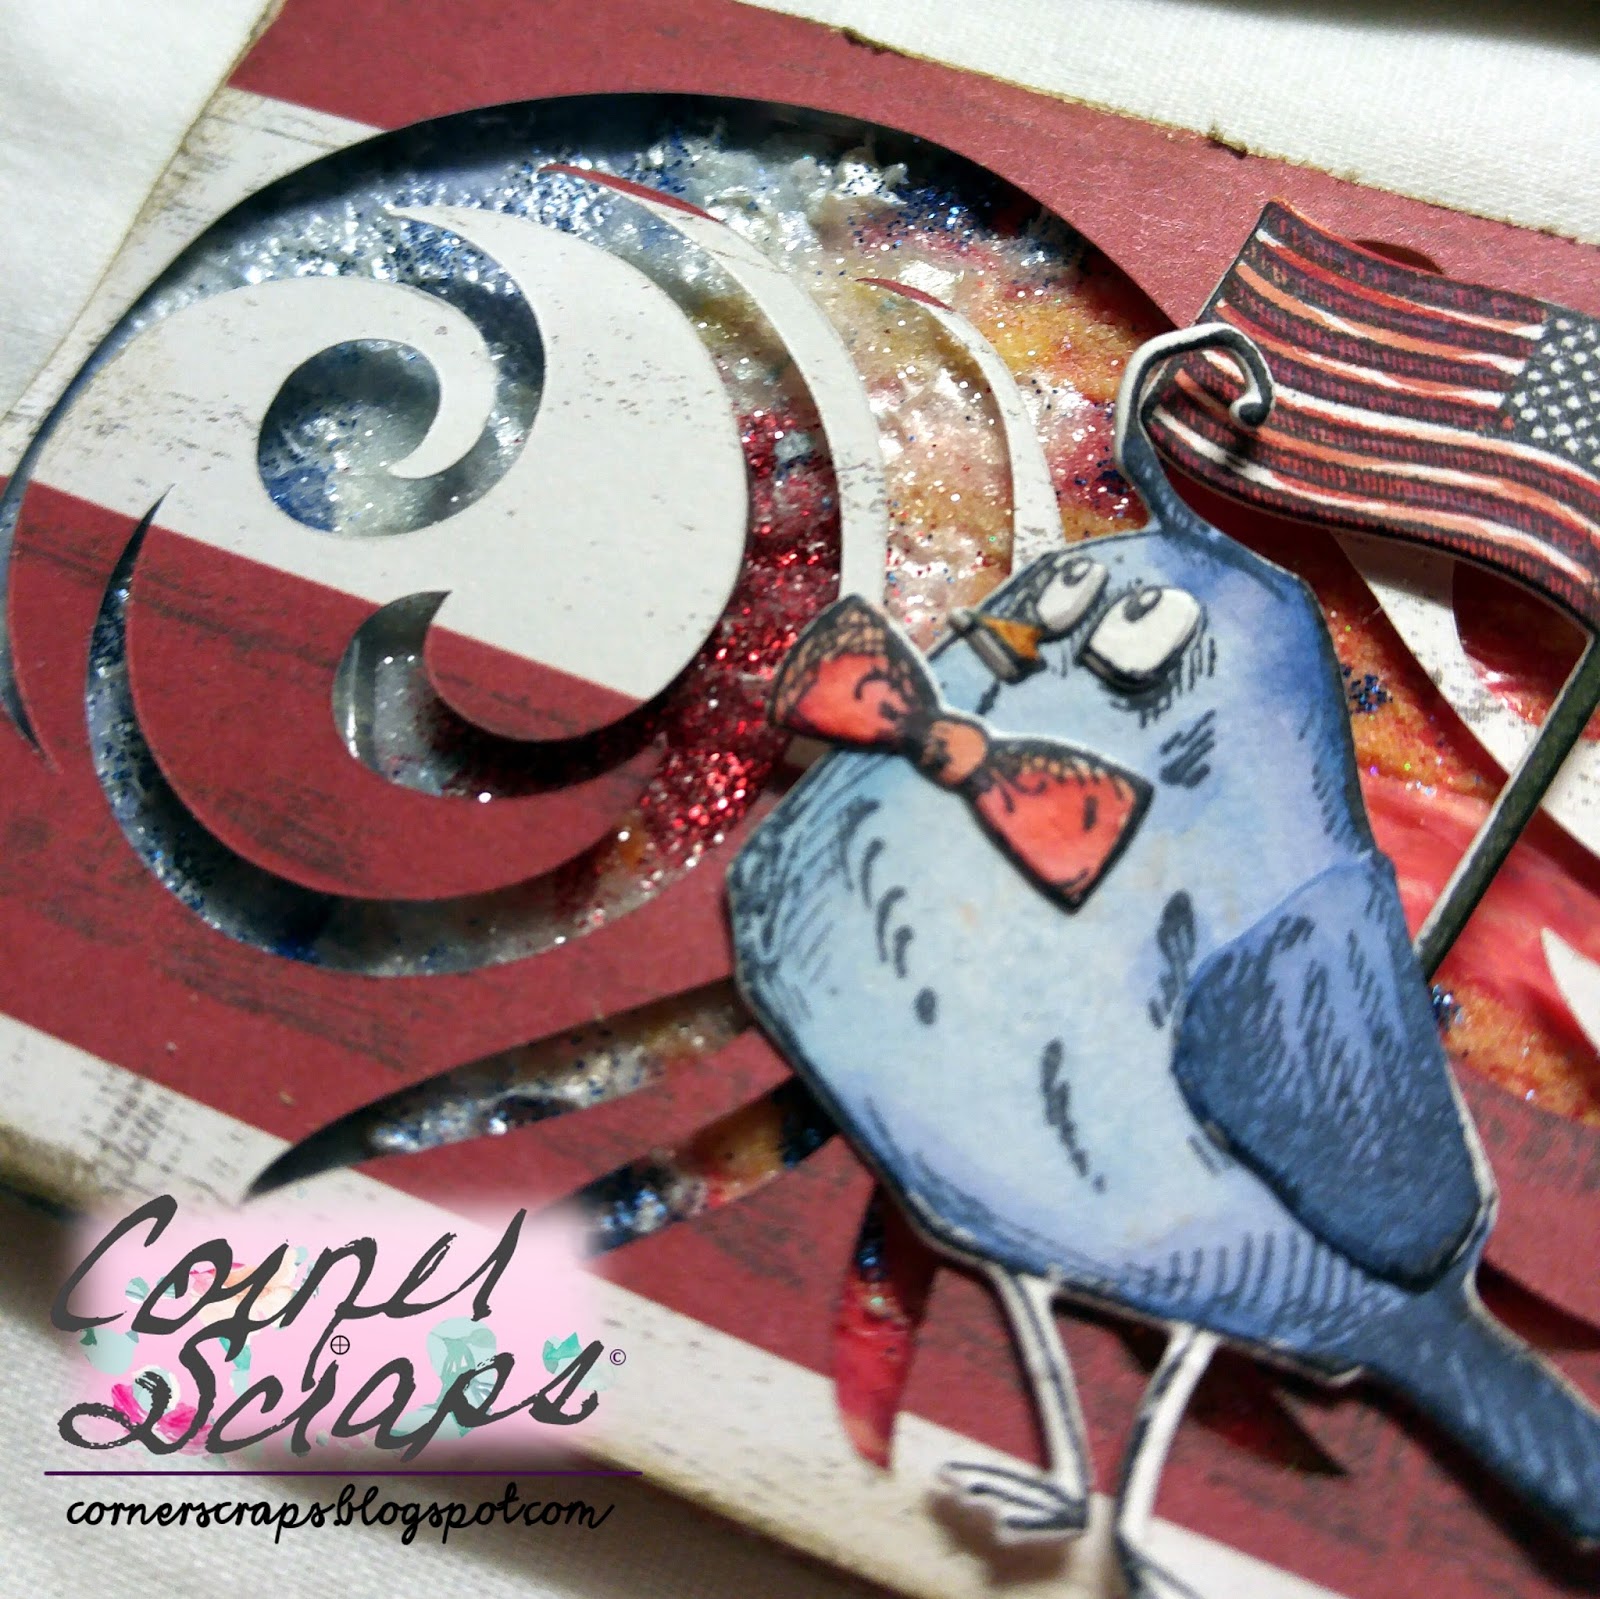
    I actually threw the ATCs in the trash at this point, I just didn’t know what else to do! But, as I was sitting there thinking about what items to keep out for the next try I saw an old Tim Holtz Mask “Flourish” just hanging around collecting dust, and I had an idea! At first I was going to use the mask, but I hadn’t worked out what I would use to cover the undesirable areas. Then, as I sat there staring at the mask over the ATC next to my pile of scrap pieces of Simple Stories “Stars & Stripes” a firework went off in my mind! And the following picture is what that firework sparked!

    Using my hot glue gun I stuck the cuts to the ATCs, used the sanding block to distress the edges, and inked them up with some Frayed Burlap Distress Ink! There was still a little too much “stuff” showing, and that’s when I decided to enlist the help of a little birdie!

    Flourish cut file from the Silhouette Store!

    Little Birdie (Tim Holtz’s Mini Bird Crazy & Things) to the rescue!
    Persistence paid off!

    Product List:

    • Silhouette Cameo: Used to cut the flourish which is from the Silhouette Store.
    • Sizzix Big Shot
    • Simple Stories: Stars & Stripes “Independence Day”
    • Tim Holtz: Mini Bird Crazy & Things Stamps & Dies
    • Tim Holtz Sanding Grip
    • Tim Holtz Distress Oxides: Faded Jeans, Broken China, Fired Brick
    • Tim Holtz Distress Ink: Frayed Burlap
    • Tim Holtz Distress Markers: Picket Fence, Ground Espresso, Candied Apple, & Carved Pumpkin
    • Tim Holtz Distress Paint: Candied Apple
    • Tim Holtz Distress Collage Medium: Crazing
    • Tim Holtz Stencils: Rays & Stripes
    • Echo Park Stencil: “Beach Towel”
    • White Acrylic Paint
    • Shimmerz Dazzlerz: Spun Sugar
    • Shimmerz Vibez: Glorious Day
    • Mod Podge Paper: Gloss
    • Prima Snowflake Paste
    • Ranger Texture Paste: Transparent Gloss; Black Archival Ink, Water Pen, & Glossy Accents
    • Martha Stewart Glitter: Crystal, Lapis Lazuli, & Tourmaline

    Teal(ish) Flower ATCs

    Teal(ish) Flower ATCs

    Over at scrapbook.com “MarciLB” hosts a monthly ATC swap with four categories. For July, “Flowers” was one of those categories, and these are the ATCs that popped into my little head! I’m also entering in the Simon Says Stamp Wednesday “Anything Goes” Challenge! The background is some thin, self-adhesive cork that I didn’t even remember owning until I went digging through my stash looking for inspiration! (I believe I bought it at Hobby Lobby)

    That “fishnet” ribbon got a total make-over! I’ve had it for years, and had used the majority of it previously. It was originally a dark teal and green with glitter. I changed that. I could have worked with the dark teal piece, but I didn’t have enough for all four ATCs! I slapped on some Tim Holtz Distress Grit-Paste pressed the ribbon into it and used Tim Holtz’s Tiny Attacher to hold the ends in place. After it dried I started painting the background with white acrylic paint! I used paint instead of gesso because it is thicker, and I needed coverage! (As for the origins of the ribbon, I know I received it in one of my first kits from “Birds of a Feather,” and I received kits for close to 18 months I believe. Unfortunately as of February 2016 kits were no longer offered.)

    Some old bits of fishnet “ribbon” that got a make-over!

    The flowers are made up of a combination of Prima E-line flowers and flowers from Prima’s Wildflower Pillar Pack. The gems came in the same kit as the ribbon.

    A closer look at the flower cluster!

    Those two metal filigree pieces are even older that the ribbon and gems! After I added them I painted them with the white acrylic paint as well.

    After everything was glued down and coated with some acrylic paint (The gems are the only parts I didn’t put paint on!) I started spritzing on some Heidi Swapp Color Shine in “Tinsel” and “Sweet Mint,” and some Shimmerz Vibez “Jeni B Bleu.”

    List of Products:

    • White acrylic paint
    • Tim Holtz Distress Grit-Paste
    • Heidi Swapp Color Shine: Tinsel and Sweet Mint
    • Shimmerz Vibez: Jeni B Bleu
    • Prima Flowers: white E-line mix and Wildflower Pillar Pack
    • Unknown: Filigree, ribbon, gems
    • Cork Background: Probably from Hobby Lobby