Faces of You-May 2021 More Than Words Challenge

Hey, all! Welcome back to my little corner!

Today I am bringing you a (redone) layout. I originally did “Faces of You” 10+ years ago, and of all the layouts I’ve done, this is one I remembered! (Seriously, when looking for the layout I came across too many layouts I have no recollection of!) Anyhow, when I saw that this month’s More Than Words Challenge was “Faces & Kraft,” I knew I’d (finally) redo “Faces of You.” (I have grand plans to redo most of my layouts from when I first started scrapbooking.)

20210523_111810-wm


Process video:


May2021MTWMain


Here is my original layout. I thought I was really getting fancy by adding stitching & ribbon! And, my goodness, there is almost some pattern going on with the light paper and the circles on that ribbon; I even overlapped the photos some! I remember when I started I was, more or less, afraid of colors and patterns! It was all too new. I didn’t add mediums; I didn’t even own mediums beyond a few to Tim Holtz’s Distress Ink pads, in varying shades of brown! A lot has changed since my early days.

20210516_131835-wm


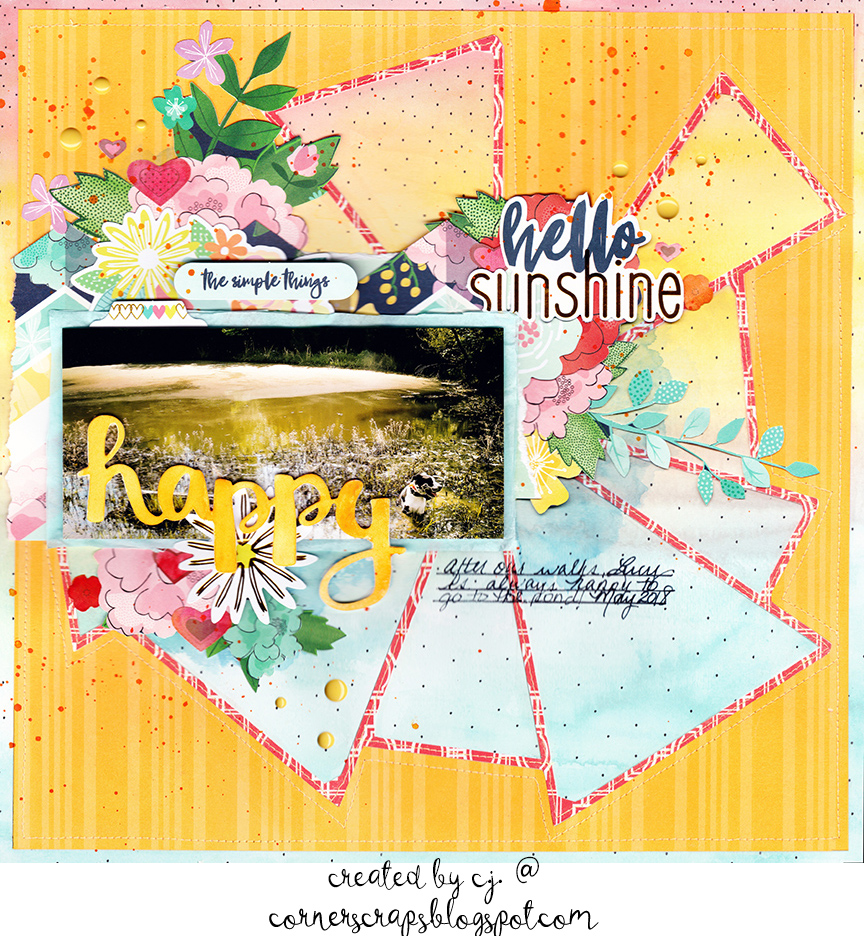
And now, I have layers, embellishments of all kinds, mediums, and colors galore! Instead of being “afraid” of using “too much” I try to use as much as I can so I can work through my stash!

20210523_135201-wm


20210523_111821-wm

So many layers! I have my photos on foam, and the torn papers lifted with foam so the frame wouldn’t leave a weird lump.

20210523_111855-wm

I discovered long ago that I really LOVE cutting frames apart and having them look bigger than they actually are. It turns out, scissors are my friend, and I don’t have to be nervous about altering items!

20210523_111951-wm

I just used some white texture paste with my Fabrika Decoru stencil and used some Distress Oxide sprays as my paint!

20210523_111909-wm

I went through my stash, pulled out a lot of different choices, and eventually worked out what I wanted to add to this layout!

Thank you for joining me here, I hope you enjoyed this remake of one of my original layouts and it inspires you to be more daring with colors and mediums or to redo something!

Stay Crafty, Friends

Red heart C.J.


Products:

Project Life “Kraft Edition,” The Paper Studio “Everyday Kraft,” Ranger-Tim Holtz Distress Oxide Sprays “Evergreen Bough,” “Pine Needles,” “Candied Apple,” & “Wild Honey,” Fabrika Decoru “Leaves” Stencil (FDTR 162), Maggie Holmes “Chasing Dreams” Ephemera, Maggie Holmes “Willow Lane” Frame, Pretty Little Studio “Sunny Memories” Fresh Phrases, Echo Park “The Story of Fall” Enamel Dots, AC Shimelle “Box of Crayons” Stickers/Folder, Teresa Collins “Summer Stories” Die Cut Borders, Pink Fresh Studio “Life Noted” Puffy Alpha Stickers, Pink Fresh Studio “Escape the Ordinary” Chipboard Stickers, Fancy Pants Designs “Off to School” Sticker Sheet, Queen & Co Alphabits “Orange,” Hip Kit Club Stickers, Prima-Finnabair Clear Gesso, TCW Light & Fluffy Modeling Paste, Fabri-Tac, Art Glitter Glue, Variegated Thread, Unknown Red “XOXO” Frame

Best Bed Ever!

Hey, all! Welcome back to my corner!

For my final project for the month of April, I have a layout that will (most likely) be getting mounted in a shadow box. I couldn’t resist turning this photo of my husband & our granddaughter into a star filled project! This project is full of dreamy blues for the Creative Embellishments April 2021 Challenge – Monochrome & Washi (I have Tim Holtz Tissue Tape along the edges!).

20210427_075117-EDIT-WM

Check out my video to see how this came together!

Video:

monthly_challenge
AP-CHAL-224x300

20210427_075227-EDIT-WM

I used a sheet of Fabrika Decoru Golden Mini Drops Mysterious Garden Sky 12×12 paper as my base for my starry sky. Then added some stenciled stars and some “Unicorn’s Hair” Sparks splatters for even more of a dreamy, starry sky.

20210427_075150-EDIT-WM 20210427_075247-EDIT-WM
20210427_075127-EDIT-WM 20210427_075221-EDIT-WM

Under and around the photo I have resin pieces from the Finnabair Stars & Moons Mould, chipboard and flair/buttons from Creative Embellishments, white gardenias from ASC Supplies, dusty blue and white roses from ReneaBouquets, and some glass glitter from Darice. All working with a variety of paints from Finnabair, some Old White Matte Wax, and Nuvo gold gilding flakes.

20210427_075140-EDIT-WM

Thank you for joining me here in my corner! I hope you enjoyed this project and it inspired you to go get your craft on!

Red heart C.J.


Products:

Creative Embellishments Music Note Borders & Music Bar Flair; ReneaBouquets Mini Dusty Blue & Ivory Roses; Hip Kit Club Stars Stencil; ASC Supplies White Gardenia’s; Prima-Finnabair Stars & Moons Mould, Clear Gesso, Matte Wax “Old White,” Metallique Paint “Royal Blue,” Opal Magic Paint “Yellow-Blue,” Sparks Paint “Unicorn’s Hair,” Fabrika Decoru Golden Mini Drops Mysterious Garden Sky (UAH 18); Ranger-Tim Holtz Distress Oxide “Weathered Wood;” Ranger Dina Wakley Media Black Gesso; Ranger Blending Tool; Ranger Sticky Embossing Powder; Nuvo “Radiant Gold” Gilding Flakes; idea-ology – Tim Holtz Tissue Tape “Symphony;” Darice Glass Glitter “Vintage Gold;” LineCo PVA Glue, JudiKins Diamond Glaze, Liquitex Matte Super Heavy Gel, Amazing Cast Resin (White); Pro Marine Supply Epoxy (Clear)

Spring Perfect-April 2021 MTW Main Challenge

Hey, all! Welcome back to my little corner!

Today I’m bringing you a layout I did for the April 2021  More Than Words Challenge, “Perfect & Sketch.”

20210417_095753-EDIT-WM

To create this layout I used Mintay’s “Secret Place” paper pack, a perfect fit for a soft, spring layout! Spring is one of my favorite seasons, the flowers bloom, birds are singing, and the Earth is waking up. Plus, it’s not too hot or cold! I love this photo, courtesy Fielder Photography. I think it captures spring perfectly with the fresh green and new flowers blooming. Check out my video below to see what I did.


Video:


April 2021 Main new

April 2021 MTW Challenge


20210417_095810-EDIT-WM 20210417_095854-EDIT-WM

To create the stitched background rectangle seen on the sketch, I used my “Ornate Lace” Finnabair stencil, some TCW texture paste, and Tim Holtz’s “Kitsch Flamingo” Embossing Glaze, then added stitching using a gold metallic thread.

20210417_095934-EDIT-WM 20210417_095829-EDIT-WM

In the photo on the left, you can see some of the splattering I did using Tim Holtz’s “Kitsch Flamingo” & “Shabby Shutters” Distress Oxide Sprays. The photo on the right gives a nice close up of the various elements I used in my clusters; cut apart pieces from the paper pack, printed beautiful board from ReneaBouquets, some gold Thickers leaves, and some beads.

20210417_095926-EDIT-WM 20210417_095918-EDIT-WM

I didn’t “plan” where my beads were going to be glued down, I just sprinkled them on, let them roll into place, and then went back and glued them down; maybe only fine-tuning them a bit. For my title I cracked open a couple of alpha packages I’ve had FOR-EV-ER! and stuck them down into place. I really love overlapping title words when I get the chance!

20210417_095948-EDIT-WM

I must say, I am very happy with how this layout came together and I hope you enjoyed checking it out as much as I enjoyed making it!

Thank you for joining me here in my little corner! See you again soon!

Red heart C.J.


Products:

Mintay “Secret Place,” Ranger-Tim Holtz Distress Oxide Spray “Kitsch Flamingo” & “Shabby Shutters” and Distress Embossing Powder “Kitsch Flamingo,” TCW Light & Fluffy Modeling Paste, ReneaBouquets Printed Beautiful Board Small Tuck It In “Sweet Daisy,” Prima-Finnabair Clear Gesso, “Ornate Lace” Stencil, AC Thickers “Recollection,” Unknown Thickers, Hip Kit Club Alpha – White, Liquitex Matte Super Heavy Gel, Fabri-Tac, JudiKins Diamond Glaze, Art Glitter Glue, Unbranded Beads

World Tiger Day ATCs

Artist Trading Coins – “Unusual Holiday/Celebration” Theme – scrapbook.com June-July ATC Swap, hosted by Marci (you can find her here: Blog: A Scrap from Marci and here: scrapbook.com Gallery)!
Global/World/International Tiger Day – July 29th!
Process Video:
For the image of the tiger I used a free one I found at needpix.com (link below) and then played with editing it until I got something I liked. I can’t really tell you the steps, because sometimes things just happen, and I’m not always sure how I did it! There was some selective color picking and changing though, I can tell you that much!

There isn’t really anything overly complicated on these, just some coloring/watercoloring with some Scribble Sticks, fussy cutting, and gluing! OH! The tigers weren’t fussy cut, I used the print & cut feature of Silhouette Studio with my Cameo 3.

*Original Tiger Image (listed as free) from needpix.com. Tiger Image Direct Link

Products:

  • Hip Kit Club
  • The Happy Life
  • Sunset Blush
  • American Crafts
    • Dear Lizzy
    • Lovely Day
    • Color Me Pretty
  • Heidi Swapp
    • Pineapple Crush
    • Palm Beach
  • Crate Paper
    • Maggie Holmes
    • Chasing Dreams
    • Hello Beautiful
  • Ranger
    • Dina Wakley Media
    • Scribble Sticks
    • Set #1
    • Lemon
    • Lime
    • Magenta
    • Tangerine
  • Set #2
    • Blushing
    • Evergreen
    • Cheddar
    • Ocean
    • Fuchsia
    • Eggplant
  • Tim Holtz
    • Water Nib
  • Prima
    • Water Pens
  • Silhouette
    • Studio
    • Cameo 3
    • Premium Blade

    Altered Box – ReneaBouquet May Swap!

    Altered ‘cigar’ box for the May 2019 ReneaBouquet Facebook Swap!

    **Someone mentioned the word ‘tutorial,’ and I’ll try that here as best I can…

    I do have a computer and a webcam and everything, BUT in early 2018 the power supply on my computer fried itself…I mean there were sparks and everything! And well my computer works well enough-ish, I’m pretty sure the motherboard took some damage because it hasn’t been quite right since (and my webcam tends to overpower it now). All this happened right before we moved almost 2300 miles, so getting my computer back to 100% hasn’t been a priority! (Although dealing with it being like 85% is starting to get on my nerves A LOT!)**

    Ok…the short and sweet “tutorial.”

    I used Art Glitter Adhesive to hold the papers to the wood. The lid has the 13 @rts paper, and the bottom is only wrapped on the sides with the Hip Kit Club paper (the bottom of the box is just white gesso). I used quite a bit of glue, basically “painting” a thin layer where it would be touching the paper and burnishing it down with the edge of my bone folder and some elbow grease. And I let it dry a full day before moving on to the next layer!

    I did not gesso my paper, gesso is wet and I found that to be a risk I didn’t want to take! I used Krylon Workable Fixative as a protective coating before gluing down the Mould pieces, flowers, 7 Gypsies doilies, and ReneaBouquet Grid Beautiful Board. All of these parts, except the Beautiful Board which has it’s own coating, needed gesso before the next step.

    Next I did the bits of embossing.

    Now, the really wet, “please let the glue and Krylon work their best,” part! First, I had to spritz water where I was planning on adding all those Lindy’s & Jaquard powders, then I had to add more water on top of the powders! I did heat dry, and there is more than one layer of powders (Between the layers I used more Krylon Workable Fixative so there would be no reactivation of the lower levels!). I did the same technique along the sides of the bottom, except there was only one layering of powders. And, because I heat dry the powders, it reheated the embossing powder which caused it to push it’s way through in spots!!

    Now, to help everything withstand being used, there is three (I think) coats of (Mod Podge) acrylic sealer. Some is glossy, some is matte. Yes, I did it that way on purpose!

    After all that was dry I added the feet, hinges, and latch, then the butterflies and cabachon.

    *The cabachon is a 50mm dome on top of a piece from Tim Holtz’s Botanical Layers & a ReneaBouquet butterfly, adhered with JudiKins Diamond Glaze. The edges are done with Finnabair waxes, White Gold & Peacock.*

    On the inside of the box I used Mod Podge Vintage to glue the Prima tissue paper in place then let that dry. After the Mod Podge dried I randomly added spots of color with the Finnabair Waxes and coated the edge of the lid and bottom with Finnabair wax. And everything is coated in acrylic sealer to (hopefully) add durability.

    Products:

    • ReneaBouquets
    • Beautiful Board – Grid Elements
    • Butterfly Kisses
    • Delicate Beauty (the black & white butterflies)
  • Magical Miniatures
    • My Romantic Heart (the butterfly under the cabochon)
  • 13 @rts
    • Aqua Flora
    • Countless Love
  • Hip Kit Club
    • Color Dazzel
    • Rainbow
  • Art Anthology
    • Lotus Stencil
  • Lindy’s
    • Magical Shaker
    • Alpine Ice Rose
    • Bratwurst Brown
    • Grab A Guy Gold
  • Jacquard
    • PearlEx
    • Reflex Violet
    • Misty Lavender
  • Emerald Creek
    • Seth Apter
    • Baked Texture
    • Patina Oxide
  • Ranger
    • Big Emboss It
  • 7 Gypsies
    • Architextures
    • Doilies
  • idea-ology
    • Tim Holtz
    • Botanical Layers
  • Prima
    • Finnabair
    • Art Alchemy Wax
    • Vintage Silk
    • Mint Sparkle
    • Peacock
    • Electric Violet
    • White Gold
  • Mould
    • Mechanica
  • Tissue Paper
    • Musica
  • Heavy Body Gel
    • Unknown/Unbranded
      • Cabochon
      • Box feet
    • **I think the box is Darice (Cigar Box)
      • Adventure – Mini Album

        Mini Album for the March Creative Embellishments Challenge!

        This months challenge over on the Creative Embellishments Blog was to “…be inspired by 1 element from the photo below (let us know what it is) and by this quote: ‘Every great adventure requires a first step.'”

        I was inspired by the color! I love using black and white…especially when I just happen to have some lovely black & white papers that need to be used!

        Inspiration photo for the March Creative Embellishments Challenge!
        For the album I cut a thick piece of chipboard to use as a spine with the Creative Embellishment’s 5-page Square Mini Album, and I just had to add the Stars In My Universe Frame (also from Creative Embellishments), with some Rocky Road Baked Texture on it, to the cover!
        Cover
        Inside cover & page 1
        Pages 2 & 3

        Pages 4 & 5
        Pages 6 & 7
        Page 8 and inside back cover
        Products:
        • Creative Embellishments
        • Square Mini Album
        • Stars In My Universe Frame
      • Silhouette
        • Cameo 3
        • Curio
        • Pen Holder
        • Cut Files: Tags & Tabs
      • Ranger
        • Emboss It Dauber
        • Tim Holtz
        • Distress Oxide: Black Soot
      • Emerald Creek
        • Backed Texture
        • Rocky Road
      • Idea-ology
        • Tim Holtz
        • Mini Stapler
      • 13@rts
        • Rose Fields
        • Natural Beauty
        • Letters to Rose
      • Aqua Flora
        • Shades of Black
      • Prima
        • Flirty Fleur Collection
        • Something Floral
        • Pretty Birds
        • So Lovely
      • Crate Paper
        • Maggie Holmes
        • Flourish
        • Charming
      • Hip Kit Club
        • Kim Watson
        • Amber Star
        • Sparkle
      • Pink Paislee
        • Paige Evans
        • Turn The Page 07
      • Simon Says Stamp
        • Black Cardstock
      • American Crafts
        • White Cardstock
        • Thickers
        • Hello Joy
      • We R Memory Keepers
        • Crop-A-Dile & Eyelets
      • Art Glitter
        • Adhesive
      • Simply White Gesso
      • Folk Art Chalkboard Paint
      • Unknown/Unbranded
        • Twine
        • Ribbon/Fiber
        • Black Pen (I’ve had for YEARS…I’m actually impressed it still worked!)

        Happy Layout!

        My Great Dane, Lucy, laying in the pond after an afternoon walk.

        Over at scrapbook.com I host a monthly challenge, “The Ugly Games.” Each month “tributes” are given someone to send two papers and (at least one) embellishment to. The receiver is then challenged with creating a layout using all or part of the papers, as long as they are recognizable, well the embellishment(s) are optional and count towards two extra votes! This isn’t to say the papers are ugly, but the combination is meant to be U-G-L-Y, or at least something that wouldn’t normally be used together! It really teaches one to think about papers differently and how to combine different colors and patterns!

        For the May 2018 Challenge I was sent the following papers and set of stickers:

        The layout they became is at the top of this post and here:

        The cut file used here is “Piece of the Pie,” from The Cut Shoppe (Etsy). I cut the outer edge of the shape in the yellow paper, then the “outline” in the red & white paper! With the stickers I coated them in clear gesso so I could apply watercolors to them, then used the hearts and flowers on the layout!

        Product List: 

        • Hip Kit Club Exclusive Die Cuts 
        • Pentel Water Brush 
        • Clear gesso 
        • American Crafts – Lovely Day Collection – 12 x 12 Double Sided Paper – Up
        • American Crafts – Little By Little Collection – 12 x 12 Double Sided Paper – Li’l Bit
        • American Crafts – Little By Little Collection – Thickers – Hello Joy
        • Echo Park – Summer Dreams Collection – Enamel Dots
        • Scotch ATG – Adhesive Applicator Gun – Pink
        • Sharpie – Fine Point – Writing Pens – Black – 2 Pack
        • Silhouette America – Cameo Version 3 – Electronic Cutting System
        • Silhouette America – Cameo Version 3 – Autoblade
        • Tonic Studios – Tim Holtz – Non-Stick Micro Serrated Scissors – 7 Inches
        • Prima – Watercolor Confections – Tropicals
        • Tonic Studios – Tim Holtz – Mini-Snips – 5 Inches
        • Crate Paper – Chasing Dreams Collection – 12 x 12 Double Sided Paper – Moment
        • American Crafts – Little By Little Collection – 12 x 12 Double Sided Paper – Cultivate Joy

        Christmas Teacup

        My first tea cup art, just in time for Christmas!

        Handle side, side view! This was a learning experience for me, and I learned that I need more Mod Podge to hold down the pieces against the strain of the Crackle Paint! You can also se some of the beautiful Shard Glitter Glass & Microbeads I added to the spoon!

        The other side of the cup. Here I added some of the Microbeads to the pine cone & some Shard Glitter Glass & Microbeads just under the edge of the pine cone. Plus, in the center of the poinsettias are some more Microbeads.

        A closer look at the spoon.

        A closer look at the pine cone!

        One of the poinsettias that has the Microbeads for the center.

        One of the posies I made using the tutorial found at Live The Dream ….

        A closer look at the bottom with the second posie I made.

        A view from the top!

        *The cut file for the teacup, saucer, and spoon can be found at svgcuts.com*

        Product List:

        • Glass Microbeads in Champagne
        • Shard Glitter Glass in Silver
        • Beautiful Board Beautiful Bits – Star
        • Burgundy Roses, Poinsettias, & leaves
      • Hip Kit Club (November 2017 Main Kit)
        • Tis The Season by Kimberly Hutchison
        • Baby It’s Cold Outside (cup exterior)
      • Crate Paper
        • FALALA Collection
        • Twinkle
      • Ranger
        • Tim Holtz
        • Distress Ink
        • Tea Dye
        • Fossilized Amber
        • Seedless Preserves
        • Rusty Hinge
      • Distress Crackle Paint
        • Clear Rock Candy
      • Mini Round Blending Tool
      • Silhouette Cameo
      • Sizzix
        • Big Shot Plus
        • Precision Base Plate
        • Tim Holtz
        • Small Tattered Florals (the one little rosebud!)
      • Spellbinders
        • Shabby Posies
        • Layered Poinsettia
      • Simon Says Stamp
        • Pine Needles Trio
      • Poppy
        • Small Blooming Poinsettia
      • Mod Podge
        • Paper – Gloss
      • Beacon Fabri-Tac
      • Judi-Kins Diamond Glaze
      • White Card stock – American Crafts I think
      • Mulberry Bear 2
        • “Grass Green” Mulberry Paper – Pine Needles
      • The Paper Studio
        • White “Handmade” Paper (white poinsettias, posies, & rosebud)
      • Prima
        • Finnabair
        • Metallique Wax – Old Silver
        • Silicon Brushes – 1″ & 2″
      • 99¢ Store finds
        • Pine cones
        • Bottle brush tree
        • Green bead garland
      • Unbranded/Unknown
        • Stamen in large white poinsettia & posies
        • Holly berries (frosted red & green & red)

        Smile!

        Smile layout, featuring your truly!

        Over at scrapbook.com there is the “Round Robin” challenge, which is basically how it sounds. Inspiration is posted, in the case of this month, a lovely autumn themed image with the quote “Even though we can’t have all we want, we ought to be thankful we don’t get what we deserve” on it. So, it inspired me this way: I am 4 1/2 years old in this photo, and obviously upset about SOMETHING which I’m sure at the time was because I didn’t get what I wanted or didn’t get my way, hence why I linked this photo with the quote. And, I also threw in some leaves and I have mostly autumn colors on this layout. So there you have it, my Round Robin layout! Now it’s week two’s turn to be inspired by my layout!

        This layout is also going to be entered in the Stuck?! Sketches November 1st sketch challenge, which is to use the following sketch! Instead of three photos, I cut one photo into three pieces! I also flipped the sketch on its head for my layout!

        Stuck?! Sketches Nov. 1, 2017 Sketch

        Product List:

        • Shimmerz 
        • Vibes: Mango Tango 
        • Inklingz: Old Yeller 
        • Creameez: Lapis Dance 
      • Hip Kit Club 
        • Harvest Dreams: Warm & Fuzzy 
      • Elle’s Studio 
        • Black Letters & Numbers Sticker Sheet
      • American Crafts
        • Star Gazer Collection
        • 12 x 12 Double Sided Paper – Make a Wish
      • Crate Paper
        • Gather Collection
        • Ephemera
      • Pinkfresh Studio
        • Escape the Ordinary Collection
        • 12 x 12 Double Sided Paper – Transform
        • Chipboard Stickers
        • Ephemera Pack with Foil Accents
      • Prima
        • Finnabair
        • Art Basics – Mixed Media Silicone Brush – 2 Inch
      • Ranger Ink
        • Tim Holtz
        • Water Brush – Detailer Brush Nib
      • Sharpie – Fine Point – Writing Pen
      • Teresa Collins
        • Daily Stories Collection
        • Cardstock Stickers – Alphabet and Label
      • Tonic Studios 
        • Tim Holtz
        •  Mini-Snips – 5 Inches
      • Orange & White Twine … umm, I kinda threw the wrapper in the trash! 
      • White tissue paper 
      • Clear Gesso 
      • The pink gems I got in a Birds of a Feather Kit back in 2014 … I think