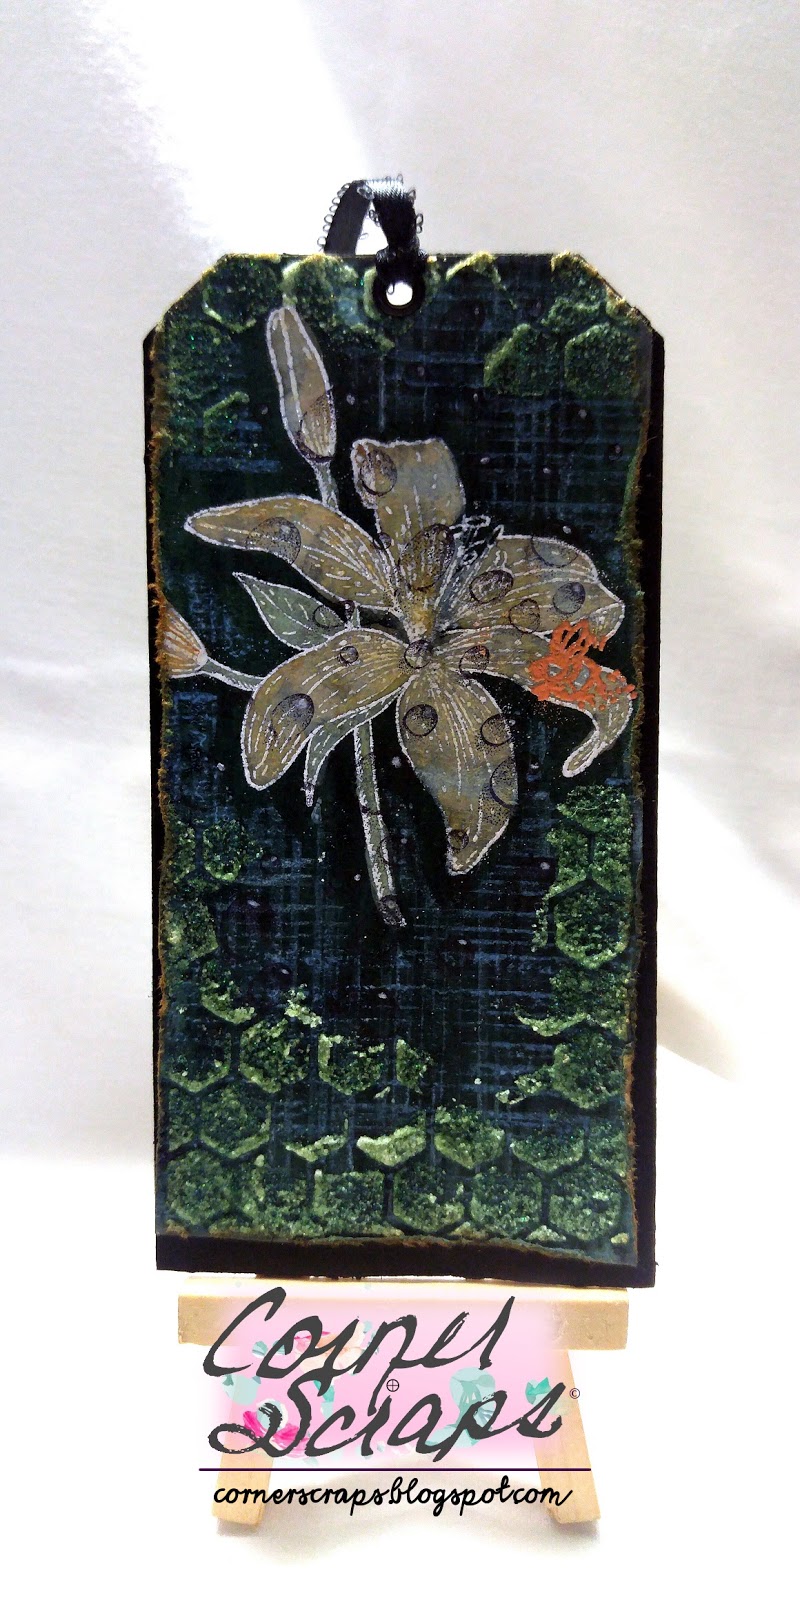
Merry Christmas!

Merry Christmas!
All folded up!

All of the cuts came from the Silhouette Store (the card base, the card panels, and the poinsettia).
Product List:

  • Glossy Accents
  • Bazzill Basics Silver Foil Cardstock
  • Seed beads I’ve had forever!
  • Pink Paislee “Merry & Bright” stickers
  • The deer paper is from Me & My Big Ideas – no name given
  • Silhouette Cameo 

Poinsettia Christmas Card!

Poinsettia Christmas Card!

I created the card base myself using Silhouette Studio. It’s a 6″x6″ flip fold. The colors aren’t exact because everything is so shiny getting the right angle was rough, it kept trying to reflect my camera, which really stood out since it’s pink! All of the poinsettia cuts came from the Silhouette Store. The biggest poinsettia is cut from a silver card stock and I used some red seed beads & Glossy Accents for the center. The rest of the poinsettias were done last year on water color paper, and I used Distress Spray Stain “Candy Apple” with some “Pewter” Perfect Pearls mixed in for the red poinsettias, and for the silver ones I used Heidi Swapp “Tinsel” Color Shine. The centers of the red and small silver poinsettias is some Glossy Accents that I used to “hold” a layer of Stickles “Gunsmoke” up (Stickles tend to dry flat, and Glossy Accents tend to dry 3D!). After all the flowers were in place I popped in a few little bells from Basic Grey’s “Juniper Berry” embellishment pack.

This angle shows the colors the best!
Colors aren’t exact here, but I had to lighten the photo a bit so the print on the card stock would show up!

Colors aren’t exact here either, I had to lighten this photo a bit too so the print on the card stock would show up!

 Product List:

  • Hot Off The Press – Paper Pizazz – “Black Silver Floral Foil”
  • -Me & My Big Ideas – The deer print paper, didn’t have a “name” on it.
  • Heidi Swapp – Color Shine – “Tinsel”
  • Tim Holtz – Distress Spray Stain – “Candied Apple”
  • Ranger: Glossy Accents, “Gunsmoke” Stickles, “Pewter” Perfect Pearls, Mini Mister
  • Silhouette Cameo
  • BasicGrey – Juniper Berry – Embellishment Pack
  • Red sead beads I’ve had forever!
  • Bazzill Basics – 12 x 12 Silver Foil Cardstock
  • McGill – Paper Blossoms Collection – Tool Kit

Flora & Fauna Pocketletter!

“Flora & Fauna” Pocketletter!

Another Pocketletter done for the swap, hosted by “bonprof,” over at scrapbook.com! The theme (my partner and I chose) this month was “Flora & Fauna,” which gave me a chance to use up some of my stash of Pink Paislee’s “Cedar Lane” collection, along with a few other products! (But it’s almost all from the “Cedar Lane” collection!)

The Pocketletter outside the protector!

Product List:

  • Thickers “Fitzgerald” 
  • Pink Paislee “Cedar Lane”
  • Ephemera
  • Washi Shapes
  • Puffy Stickers
  • Papers: “Market Square,” “Town Square,” “5th Avenue,” “Riverside Lane,” and “Cedar Lane.”
  • Amy Tangerine “Better Together” Rub-ons
  • Basic Grey “Saturday Morning” Cork Sticker
  • We R Memory Keepers Fuse Tool Kit “Aqua,” and Fuseables “Mint” Ruffle Strip
  • We R Memory Keepers Crop-A-Dile & Case 
  • DCWV Tassel 
  • Random beads, charm, and ribbons
  • explore

    explore layout

    Whew! After fighting bronchitis for over two weeks I finally finished the last layout I (mentally) started!

    It did work out though that this weeks Wednesday Challenge over at Simon Says Stamp was to “Splatter It”! It worked out because I was working on layout this morning and I was thinking of what else to add, and when I saw the challege I thought, “That’s a good idea”!!

    I used some Peeled Paint Distress Oxide on the title and to highlight the cardboard a little!
    I used the “packaging technique” to add Peeled Paint and Iced Spruce Distress Oxides to my background!

    Product List:

    • Tim Holtz – Distress Oxide: “Peeled Paint” & “Iced Spruce”; Alcohol Ink: “Lettuce” & “Gold”; Sanding Block; “Tracks” Stencil; and “Expedition” Ephemera
    • Pink Paislee: Cedar Lane: Greenspace
    • A bit of scrap Core’dinations green cardstock
    • A piece of corrugated cardboard
    • Ranger Texture Paste
    • Bo Bunny Chunky Charms: Clear Arrows & Circles
    • American Crafts: Shimelle: Stickers
    • Bella Blvd – Ciao Chip – Self Adhesive Chipboard – Words – Adventure
    • Hip Kit Club Exclusive Puffy Stickers
    • Shimmerz Paint: Celery 
    • Flair from {A Flair For Buttons}

    Brain Freeze!

    Oh what fun you do, Brain Freeze
    This layout encompasses multiple challenges! First, it will be entered into the Stuck?! Sketches July 15, 2017 Challenge! The challenge for the second half of July was to use the following sketch designed by Laura Whitaker. For my layout, I decided to rotate the design counter-clockwise, which I thought worked better for me, especially since I have a longer title. This layout is also going to be entered in the July Sewing Challenge, July 5 Ingredients + Challenge, July Music Inspiration Challenge, July Hoarders Challenge, and the July Foodies Challenge over at scrapbook.com. Whew! That’s a lot of Challenges for one little ol’ layout!
    July 15, 2017, Stuck?! Sketches Challenge Sketch designed by Laura Whitaker.
    Now, to try and explain the challenges over at scrapbook.com! For the Music Inspiration Challenge, I was tasked with finding inspiration for my layout using a song chosen for me. My song was “You Make Me Wanna” by Usher. I’ll tell the truth, I never listened to the song, I read the lyrics over on A to Z Lyrics and I knew I’d never be able to handle actually hearing it! It’s just nowhere near the type of music I listen to! When I first thought up what photo I wanted to use, I was originally going to have my title based off the title of the song, and was going to have it be “You Make Me Wanna Scream,” but there is an Ozzy song (“Let Me Hear You Scream”) that has a very similar line. I just couldn’t connect Ozzy & Usher in my mind!! So then I decided to incorporate “This is what you do,” which is a line found over and over in the song! And I actually had “This is what you do, Brain Freeze” on the layout…but it just didn’t look right! I came across the “Oh What Fun” banner, laid it on the layout, and decided the title was going to be “Oh What Fun You Do, Brain Freeze,” because now it was a sarcastic title, and I speak fluent sarcasm! Whew, all that to use two words from the song!
    For the 5 Ingredients+ Challenge, I had to incorporate yellow, button(s), smile, circle(s), and border, which I did. The Sewing Challenge had a twist of using red, white, and/or blue thread, I used blue and white (had to use at least two for the twist). The Foodie Challenge is to do a layout involving food, and the Hoarders Challenge is to use hoarded items on your layout (I believe everything I used is at least a year old)!
    The journaling reads:
    “We were having root beer floats one evening & I looked over & saw this face! I said it was too bad I didn’t have my camera ready and decided to get prepared in case it happened again! …It did, on the next bite! I asked if you were doing it on purpose so I could get a photo, and you said ‘NO!!'”
    I love layering! The cut file is a free file from Paper Issues called Peek-A-Boo Circles.
    Yes, adding the “#smile” was more sarcasm (as well as a requirement for the 5 Ingredients+ Challenge)!
    Like I said, I love layering! And I love layering titles and mixing fonts!
    Product List:
    • The tag under the photo is from Studio Calico
    • The papers “filling in” the circle cuts come from:
    • Pink Fresh: Felicity line, or
    • Pink Paislee : Paige Evans: Paper 06 from the Fancy Free Collection or,
    • Elle’s Studio: Little Moments: Details or,
    • Hip Kit Club Exclusive: Medowbrook: Notes From Home
    • Hip Kit Club Exclusive: Medowbrook: Diamond Shine
    • Webster’s Pages: Allison Kreft: Recorded: This & That
    • Teresa Collins – Summer Stories Collection – Border Strips with Glitter Accents
    • Thickers: Junebug: Charcoal
    • Tim Holtz: Big Chat
    • Thickers: Junebug: Charcoal
    • October Afternoon: Daily Flash: Story Book
    • Hip Kit Club Exclusive Alphas
    • Hip Kit Club Exclusive Washi Tape
    • Hip Kit Club Exclusive Puffy Stickers
    • Dear Lizzy Date Stamp
    • Ranger Jet Black Archival Ink
    • Sharpie Fine Point
    • Simple Stories – Sunshine and Happiness Collection – Decorative Brads
    • Crate Paper – Gather Collection – Thickers – Chipboard Accents – Blessed
    • Silhouette Cameo
    • All other products no longer have their packaging.

    Tiger Lilly!

    Tiger Lilly

    Sometimes I just experiment, I get “I wonder…” and “What if…” thoughts in my head and I have to try them out! Sometimes I experiment because I have a shiny new product to try out! In the case of this tag, it was a little of both!

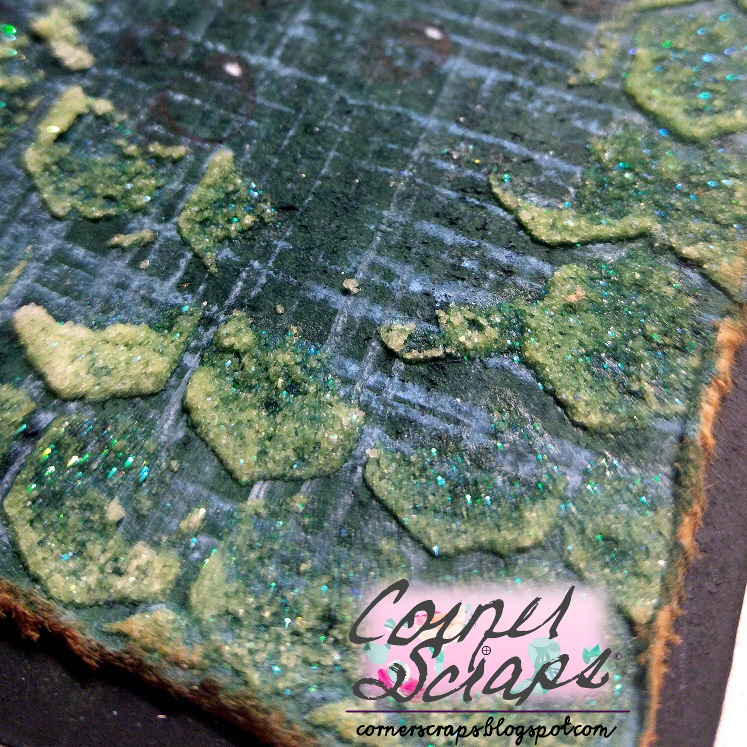
    I had cut out tags the other day using my Cameo, and I decided I wanted to coat them in dark colors. One was done with black acrylic paint, and the other (the top one) was done with some Tattered Angels – Plain Jane Collection – Stained Glass – Semi Matte Glaze – Green. I’ve had the bottle for about three years now, I forgot I owned it!

    Well, I live in a dry climate, and I basically had some goo in a bottle at this point, but I decided to see if I could rehydrate enough to use one last time. After adding some water & rubbing alcohol I managed to get some lumpy green liquid in a bottle! LOL! It was just enough to coat a tag.

    At this point I wasn’t sure what to do with my newly coated tags, so I went browsing through my stamps and when I came across my Penny Black Tiger Lilly I decided to practice using my Distress Oxides on a dark background!

    Love the “Water Droplets” created by Ryn at Designs by Ryn!

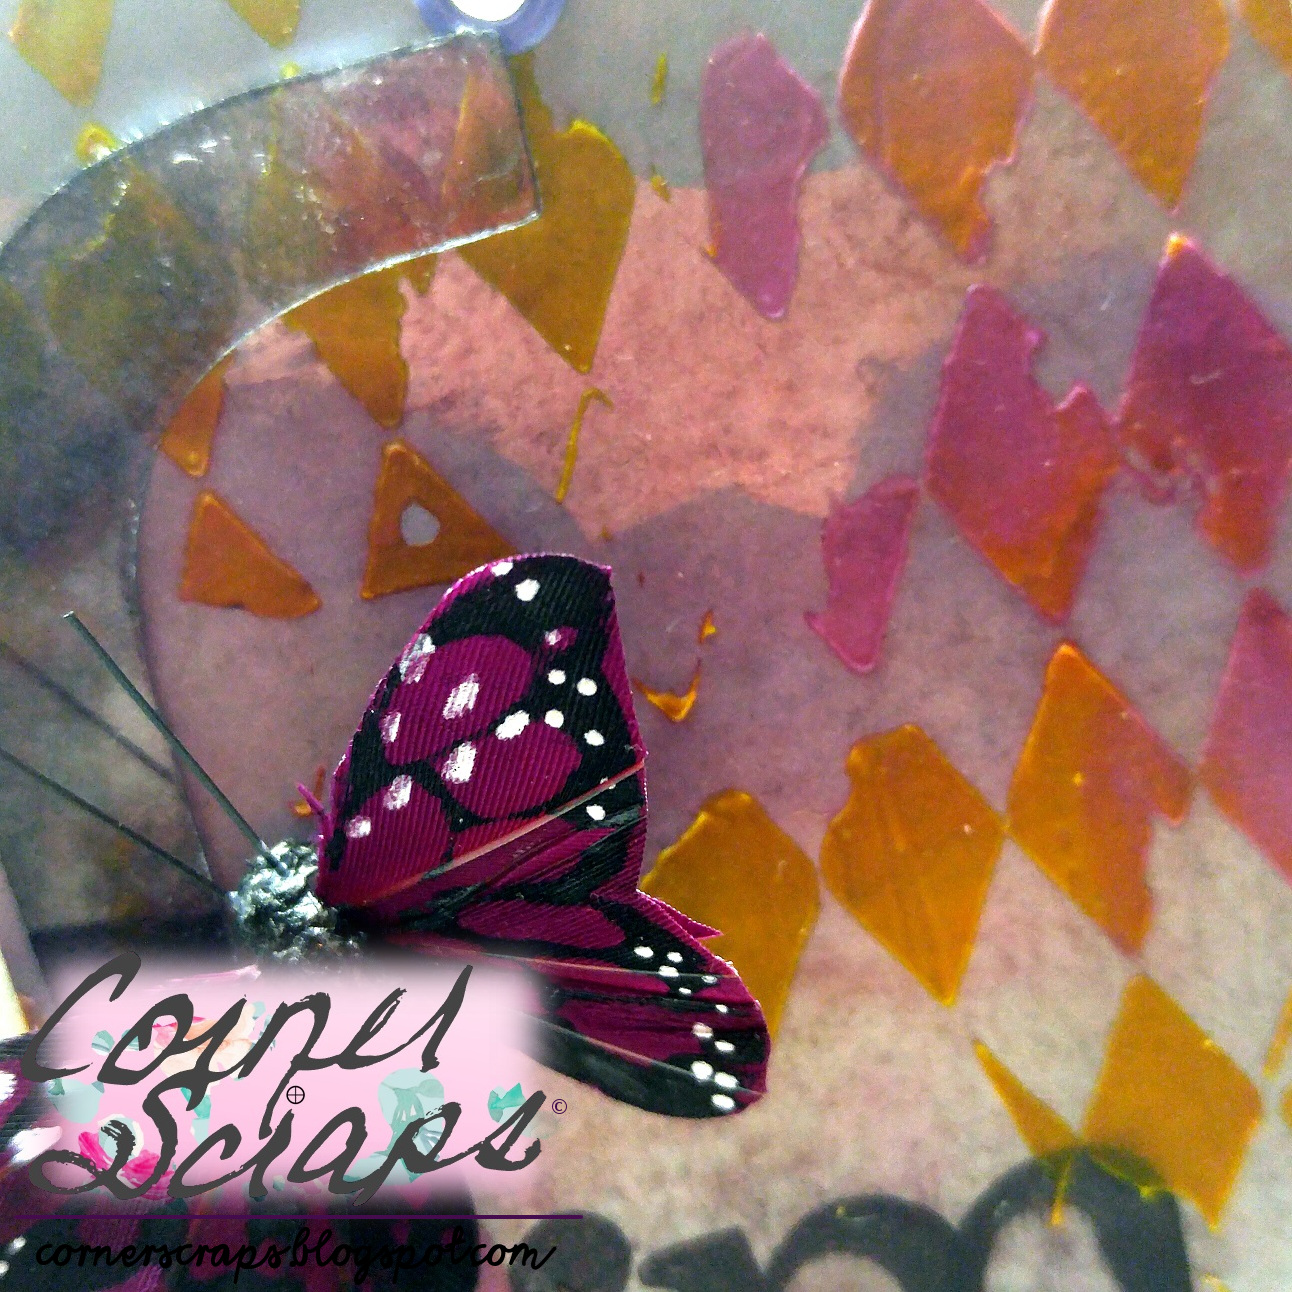
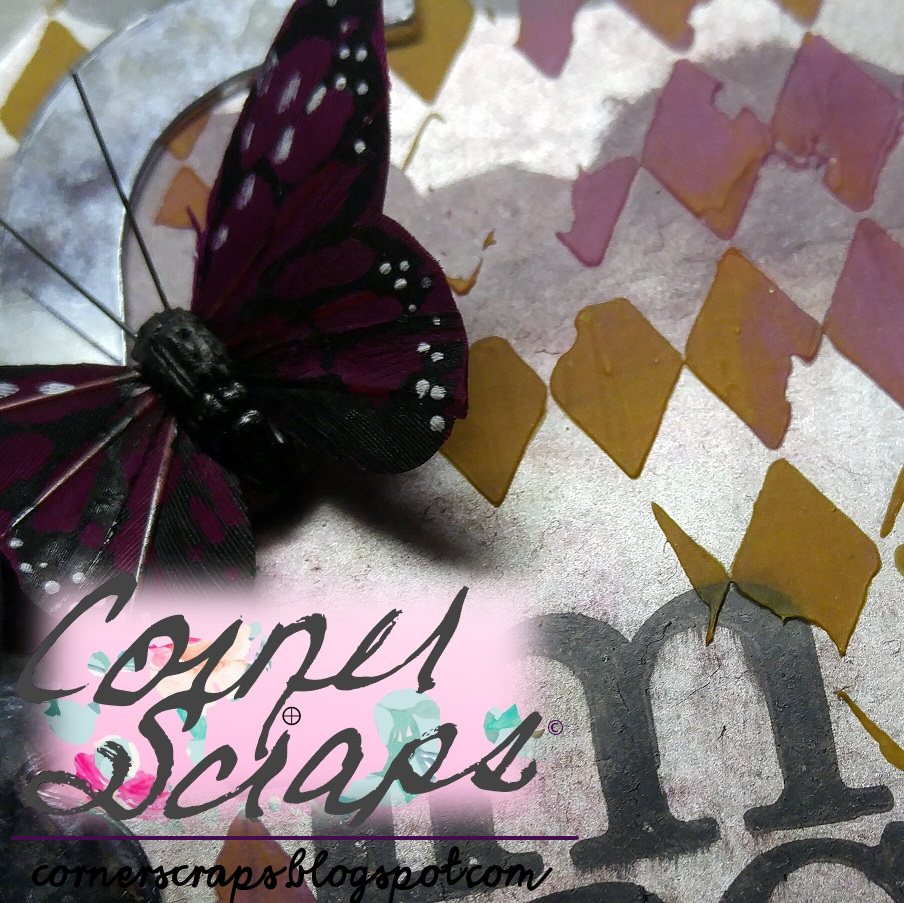
    When I get to experimenting I have a tendency to do things rather backwards. I stamped and colored my Tiger Lilly, then decided I needed to add more to the tag! I used some scrap plastic to make a quick mask for the Tiger Lilly so I could add some plaid to the background with more Distress Oxides and Tim Holtz’s “Stripes” ATC stamp for the Simon Says Stamp Wednesday Challenge! Then I decided to use my “Water Droplets” stamp by Ryn at Designs by Ryn to see how those droplets would look on a dark background as well! I like it personally, and I’ll be sharing/entering this tag in Ryn’s monthly challenge!

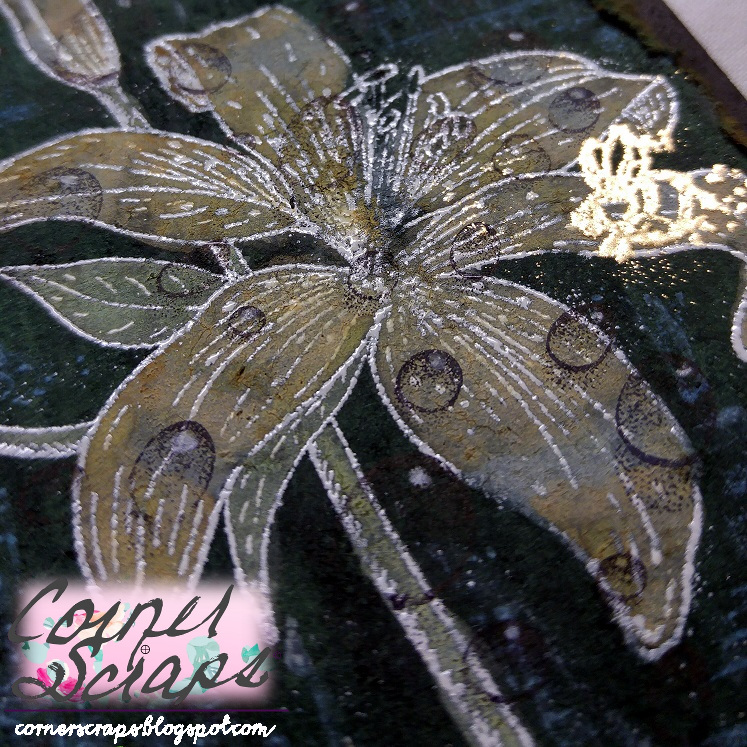
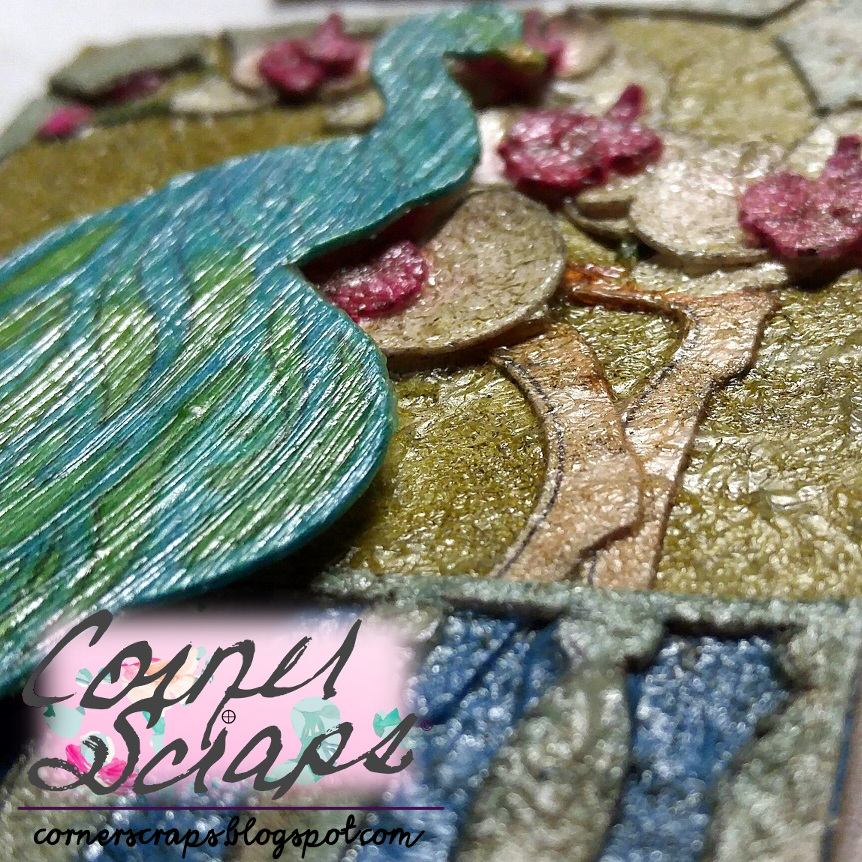
    You can really see those water droplets here across the flower!

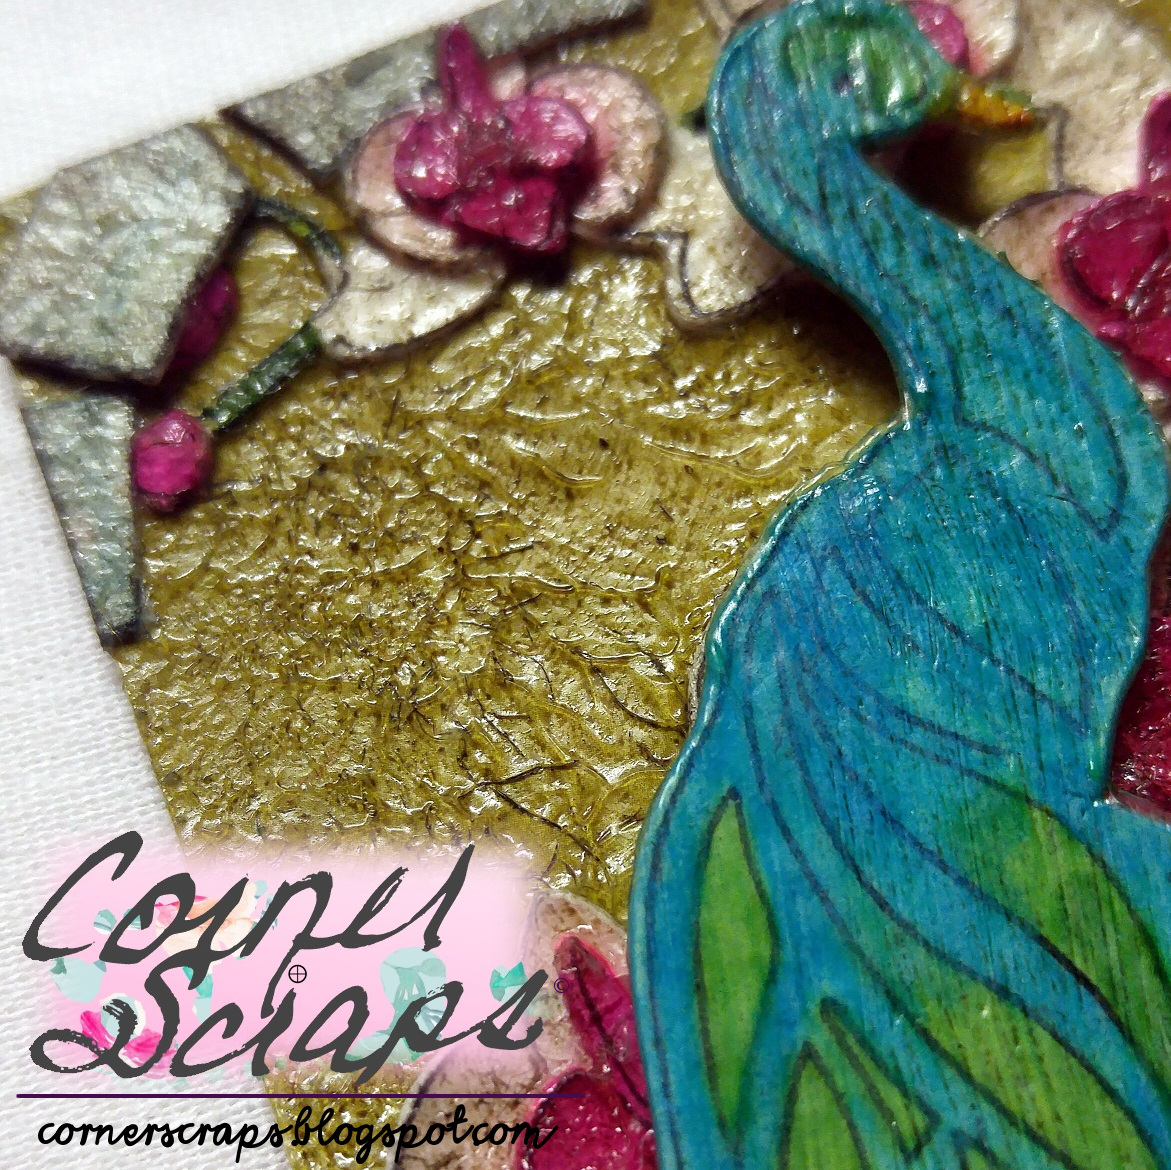
    I still wanted more on the tag, I thought there was too much empty space! I decided to at some stenciling!! Now, because Distress Oxides are a pigment and dye ink hybrid, the Snowflake Paste by Prima activated the dye ink and absorbed it! (I planned on this happening!!) Now I had some shiny, greenish honeycomb on my tag! And to keep the paste off my water droplets? Artist’s tape. As the final touch I added the little bee and embossed it in Ranger’s Gold Embossing Powder!

    That Snowflake Paste absorbed some of the colors from the Distress Oxides underneath!

    Product List:

    • Water Droplets” stamp created by Ryn at Designs by Ryn!
    • Tattered Angels – Plain Jane Collection – Stained Glass – Semi Matte Glaze – 1.35 Ounce Bottle – Green
    • Silhouette Cameo
    • Prima Snowflake Paste
    • Ranger Water Brush (nib), White Embossing Powder, Gold Embossing Powder, and Jet Black Archival Ink.
    • Tim Holtz “Stripes” ATC Stamp, Honeycomb Stencil, Paper Distresser, Distress Embossing Ink, Distress Ink – Picket Fence, and Distress Oxides – Spiced Marmalade, Fossilized Amber, Antique Linen, Frayed Burlap, Peeled Paint, Iced Spruce, Cracked Pistachio, and Broken China.
    • A PrismaColor White Colored Pencil
    • Unknown on that little bee stamp
    • Penny Black Tiger Lilly Stamp
    • I used one of the black eyelets that came with my Pink Crop-A-Dile & Case!!

    imagine {tag}

    imagine tag!

    Ok, I have this ‘thing’ where I have decided to go back to 2007 and complete all of Tim Holtz’s “12 Tags of …” series’. I started doing the “12 Tags of 2015” with January 2015 and finish all of the tags for 2015 & 2016! I was heart-broken when it was announced that there would not be a 12 Tags of 2017! I mean really, after 10 years of tags?!?! Ok, I get it, 10. Years. Of. Tags! At the rate I’m going it may be 2027 before I am “caught-up”! Anyhow, this is my tag inspired by #5 of “12 Tags of 2007”. Basically, it was “use alcohol ink,” somehow I turned it into “use alcohol ink on Yupo, and to keep things interesting toss in some Distress Oxides & pastes!” And wait, and wait, and wait for everything to dry (can’t heat Yupo, it makes it expand … or so I read, didn’t really want to test it!). Then proced to NEVER touch the surface of the tag, because it’s Yupo, and everything “floats” on the surface. (Maybe I’ll add some sealer today…)

    Black Soot Distress Oxide for “imagine,” Shimmerz Paste-eez Hold the Mustard & Raspberry Sherbet with Tim Holtz’s “Harlequin” stencil.

    The clouds are stamps from Simon Says Stamp’s “Sea You Soon” set.

    My Garden Friends butterfly!

     Product List:

    • Legion Paper Yupo
    • Ranger Glossy Accents, Blending Tool, Replacement Felt, Alcohol Blending Solution, and Alcohol Inks: Cranberry, Eggplant, Silver, Gold, and Pearl.
    • Tim Holtz Distress Oxide: Cracked Pistachio, Worn Lipstick, Seedless Preserves, and Black Soot. 
    • Tim Holtz “Harlequin” Stencil
    • Simon Says Stamp “Sea You Soon” set
    • Heidi Swapp “imagine” stamp
    • Shimmerz Paste-eez: Hold the Mustard & Raspberry Sherbet
    • Some homemade alcohol inks: black & blue-ish ones
    • My Garden Friends Butterfly
    • Bo Bunny Chunky Charms: Clear Arrows & Circles

    enjoy the journey

    I did this set of ATCs for MarciLB’s ATC swap over at scrapbook.com! The category for this set was travel, and while going through my supplies looking for inspiration I came across Tim Holtz’s “Blueprint Compass” stamp & die set and I had my idea! I’m also entering them into Simon Says Stamp’s Monday Challenge “Distress It.”

    The background of everything is a pattern from the Silhouette store. In it’s original form it is a much lighter shade of tan/brown … parchment-y … whatever! LOL! But I used the built-in Image Effects tools of Silhouette Studio (I have the Designer Edition) to change it more to my liking! And, actually I did it two different shades and then printed it out on some self-adhesive paper. After I printed it, I put *some* Mod-Podge Acrylic sealer on so the printer ink wouldn’t run (as bad) when I spritzed the images with water after using Distress Oxides! Other than all that, it’s a rather straight forward cut & glue project!

    Close-up of one of the ATCs
    Layering and edge distressing!

     Product List:

    • Tim Holtz  Sizzix Blueprint Compass Framelit & Stamp set, idea-ology Game Spinners and sanding block, Tonic paper distresser, and Ranger Distress Oxides Salty Ocean, Frayed Burlap, & Antique Linen.
    • Sizzix Big Shot & precision baseplate
    • We-R-Memory Keepers Crop-A-Dile
    • Mod-Podge Acrylic Sealer
    • self-adhesive paper
    • chipboard (it’s what I stuck the paper to before stamping & cutting)

    Peacock ATCs!

    This was one of those projects that started with a vague idea and I just followed where all the trials and mishaps took me! The ATCs aren’t exactly what I had in mind, but I’m still content with what came out of the process!

    Peacock ATC set!

    I made this ATC set for MarciLB’s ATC Swap over at scrapbook.com! I’m also going to be entering them in to Simon Says Stamp’s Monday Challenge “Distress It.”

    These are a rather straight forward process, a lot of Cameo sketch pen work and cutting, followed by a lot of coloring!

    For the ‘green’ of the peacock’s tail I mixed Peeled Paint & Lucky Clover Distress Oxides on my work surface with some water & used my water brush to paint!

    For the ‘stone’ I used Weathered Wood & Pumice Stone Distress Crayons and blended them.

    After the Crazing Distress Collage Medium was dry, I used a blending tool to add the Frayed Burlap Distress Ink to the surface.

    Cut Files:

    • All cut files came from the Silhouette Store.

    Product List:

    • Silhouette Cameo & Pen holder with uni-ball gel pen, micro line, with “uni Super Ink.” I seriously love this pen, it makes nice, fine lines, and it holds up to water!
    • Watercolor paper
    • the green background paper is from an OLD K & Company stack from their “Designer Paper” series. And I mean OLD, like probably 2009, and in scrapbook years, that’s ANCIENT!! LOL!!
    • McGill Paper Blossom Tool Kit – Ball Tools
    • Ranger Glossy Accents, water pen (nib)
    • Tim Holtz – round blending tool, Distress Collage Medium: Crazing, Distress Collage Brush, Distress Crayons: Weathered Wood & Pumice Stone, Distress Oxides: Peacock Feathers, and Peeled Paint & Lucky Clover mixed together, Distress Ink: Frayed Burlap, and Distress Marker: Wild Honey
    • Vicki Boutin Acrylic Paint Set 2: “Saltwater Taffy” used
    • PrismaColor Markers (on the flowers)