Hey, y’all! The year is coming to a close, but that means a whole new year of Tres Jolie Kits to look forward to! YAY!!!
For my last project of 2022, I used this month’s Scrapbooking Kit – along with my stash of junk journaling materials – to create two Christmas journals. Each journal has envelopes, tuck-ins, flips, and loads of pages for journaling your Christmas thoughts and memories. And even though Christmas 2022 has passed, you can still create a memory journal while we are in that awkward time between Christmas and the New Year when it’s questionable if we are sure what day it is!!
Did you have a friend and/or family gathering? You could have everyone who attended write what they remembered about Christmas! Did people travel from various distances? Just send it around in the mail or have them write letters you can glue or clip to the pages!
Check out my overview video where I give some details of what went into these journals:
The two journals are very similar – it was just a matter of what signatures were added to which cover after I decided I had more than enough to create two journals. I used some canvas-type fabric on the covers, and some mulberry paper to cover the spines. On the journal with “Memo” on the cover, I inked the mulberry paper and added some ink splotches to the printables. For the closures, I just stitched together layers of ribbons and fabric scraps to create a wrap.
I digitally create some Christmas-themed end papers for my journals and attached them in a non-traditional way by either cutting or tearing the side that isn’t attached to the cover gluing it down to the first page of the journal.
For added texture and to fit with the “put together” and “vintage” style, I would just stitch my printables straight to the pages I wanted them on.
I used a few black tags from my stash and added some layers of the various papers from the Simple Stories papers in the kit, created tuck-in spots using some of the Simple Stories ephemera and backed a few of the cut apart Simple Stories cards with pieces of hanging file folder!
I have a variety of paper and pages throughout the journals created using patterned paper, printables, and some original vintage pages. I also created and added some homemade glassine using the method I learned from Nik the Booksmith. I also created a couple of Nik’s “Raggedy” inserts into the journals made up of a cardstock base and a variety of ephemera stitched and glued on.
I created my own vintage style, Christmas-themed labels to add in, and even decided I needed a custom Bookbinders Label to add to both journals. You can grab up a free printable with some Christmas-themed labels on them over on my Flickr!
Thank you for joining me here today! I hope you enjoyed these journals and that they gave you an idea of what you can make using this month’s Scrapbooking Kit!
Warm Wishes for a Safe and Happy New Year!
Stay Crafty, Friends
Did you get a kit? Share what you made in our Facebook Group!
Hey, y’all! Have you checked out the Tres Jolie Kit Club September Scrapbooking Kit yet? Seen this month’s mood board? Both are fabulous! The kit has the “Gilded Steampunk” Collection from 3 Quarter Designs – the perfect fit for the “Shabby Steampunk” mood board challenge!
Now, I love, L-O-V-E, Steampunk, and while I’m not a 100% Shabby Chic type of person, there are aspects I really love about that style too. This week, for my mood board inspired project, I have a Shabby-Steampunk Top Hat I created using a cut file I designed, the “Gilded Steampunk” Collection from the kit, a couple of moulds, and lots of mediums from my stash – quite a few that are from previous Tres Jolie Kits!
It wasn’t until I was editing the video that I realized this project isn’t all too “complicated.” The majority of the time spent working on it was really just “busy work” – i.e. rolling clay, gluing, painting, etc. Once I had my base together, and finally figured out where this hat was headed, it went together rather smoothly! Check out my video and see what I mean!
Don’t forget to join the Tres Jolie Mood Board Challenge this month! Make sure to place your entry in the September 2022 Challenge folder on the Tres Jolie Kit Club Café Facebook page by 11:59pm CST on September 30, 2022, for your chance to win a prize!
Alright! Time to get talkin’ about this Shabby-Steampunk Top Hat!
The first thing to do was to put my base together. There aren’t too many pieces – I tried to keep it as simple as possible while creating the size I wanted while using my 12” x 12” cutting mat and cardstock. There really is only one way everything fits together, but I have included a photo for reference using the cut file.
After my cardstock base was together, I added some black gesso to all of the areas that I thought may or may not get covered by the patterned paper pieces – I did it mostly because I had used white cardstock, if I had used a darker cardstock or a coordinating cardstock, I don’t know if I would have added the gesso. However, it did also give a little extra stiffness to the base, so that was a bonus I hadn’t really thought of! And, even though it is no longer noticeable, I also added a layer of “Halo Pink Gold” Metallic Paint on top of the black gesso – just to be prepared in case any of those areas didn’t get covered in the later stages.
I didn’t know exactly what I wanted to do for the inside of the hat, I just knew I didn’t want to just give it a coat of paint. Finally, I decided to see if I could do a paint pour – on some tissue paper – to create a liner! It was messy, but it worked! And I was able to use that paint pour on the inside, sides. For the inside top, I just mixed up a little more to pour and dumped it right in.
I wanted to get as many pieces ready for assembly as possible before sitting down to start the process, so I used some leather-effect polymer clay to create the “leather” underside of the brim and I used some metallic and glitter polymer clay in a couple of embossing folders to create the sheets of “metal” to fill between the leather-clay and to use along the outer edge of the brim.
The final set of pre-assembly pieces I made were the patterned paper panels and the pink band for the hat. For the pink band, I just cut the half-sheet from the paper pack in half and connected the ends to make one long strip.
For the top, side, and brim patterned paper panels, I partly eyeballed, partly measured approximately where the cut would be – especially for the pieces that have the mannequins, hot air balloon, etc. – and cut them all out. Much like the base pieces, there are not a lot of ways for the pieces to fit all together, but I will add a reference photo here for the panel locations on the base.
As I sat staring at all my pieces, trying to decide how to use those chipboard and cut-apart pipes, I thought of windows; little steampunk windows to see the “inner workings” of the hat. I grabbed up some circle dies, picked a few places around the brim and on top of the hat, and cut the circles out of the patterned paper.
I used a couple of stencils with a couple TCW Stencil butters to add some dimension and texture to the circles I cut out, coated the chipboard pipes in copper embossing powders, and added some Beads In A Bottle to create a little dimension and bolts/rivets to the chipboard. Then I started the assembly process while I waited for my resin to set up in my gilding flake coated, polymer clay window frames.
After all my pipes were in place I gave them a coating of clear gesso so I’d be able to add my paints to create the illusion of depth with shadows.
Now it was finally time to add my patterned paper panels! I also added the pink band, and I created the inside band using the half-sheet of paper from the pack that looks like leather. I finished adding all my clay pieces to the underside of the rim and added them to the outer edge of the brim.
So now I had all of the pieces of the hat together – except the windows – and started my work on filling any gaps and smoothing it all out. I used a mix of gold Stencil Butter, gold Beads In A Bottle, and 3D Matte Gel to smooth along the edge of the brim with all the layers, and to fill in any spaces that I thought needed it. To prepare for the addition of the windows, I added a ring of Beads In A Bottle around the circles on the hat brim and top.
While my hat sat off to let that gold mix dry, I got to work on putting the focal point of the hat together. I grabbed up some mould pieces and used 3D Matte Gel to hold them in place, and after adding my gesso, I started adding the first layers of paint. While the gears and heart were setting up, I put my pipe pieces together and added the first layers of paint to them. I added the heart and gears to the pipes using more 3D Matte Gel, and set it off to let it set up while I added my lace bits and gilding flakes to my hat base. Before I got too much further along, I added a coat of Workable Fixatif so when the time came to add my final paints there would be a layer of protection on the patterned paper that would keep the wet from just soaking right in.
I laid my hat on its side, using whatever I had on hand to hold it in place and prop it up so the side I wanted to add the heart and pipes to was, at least mostly, level. I made sure to do this close to bedtime, so the 3D Matte Gel I used to hold the resin pieces in place had time to set up – without me becoming impatient and checking it too soon! I also started adding some art stones to the areas I could get at with the hat on its side.
Now it was finally time to add on the windows in preparation for the final layers of paint, art stones, and waxes.
I added more paint to my resin pieces, being careful when I was near my windows so they wouldn’t get splatter on them, and then just started working my way down from the top of the hat with more art stones and my paints. I let all the paint dry before flipping my hat over and adding some paint to the underside of the brim.
The final touches on this Shabby-Steampunk Top Hat were the addition of a few Finnabair waxes to the top, sides, art stones, lace, and the top and underside of the brim.
Thank you for joining me here in my corner! I hope you enjoyed my Shabby-Steampunk, mood board inspired, Top Hat and it gave you some ideas and inspiration for how you can use this month’s Scrapbooking Kit and/or find inspiration for your own mood board project!
Stay Crafty, Friends
Did you get a kit? Share what you made in our Facebook Group!
Since I did Mother’s Day Cards at the beginning of the month, I decided to do some Father’s Day Coupon’s and gift envelopes as my final May project using the May 2022 Cards, Tags, & More Kit from Tres Jolie Kit Club. I created a few different designs to use as examples and have some example phrases to use with your coupon book. There are links to free PDFs for the different coupons throughout the blog, and over at CornerScrapsStudio you can get the PDFs, STUDIO3, and PNG files from my Etsy shop. I never “fully” completed a coupon book – the closest is my “Unlimited” tags – because I don’t have a personal use for Father’s Day coupons, and all our kids are old enough to worry about it themselves! (by old enough, I mean they no longer have any age restrictions on any purchases )
Check out my video to check out all the different ideas I cover for envelopes and coupons!
Video:
First up are my “Vintage Gold” coupons. I designed these coupons to look as though they are on old paper with gold font and trim. These examples are printed on some HP Premium Choice LaserJet Paper; a type of high-resolution paper designed for business documents that need clear, crisp images. You can get the “Vintage Gold” PDF on DropBox (for personal use only, please!) if you would like to print them out. (**NOTE: All PDF files offered throughout this post are not offered, created, or owned by Tres Jolie Kit Club. I am the creator and owner of the files and offer the PDFs for your personal use.)
The envelope for these coupons is a hand-folded sheet of the 6×6 patterned paper. I just eyeballed the center and eyeballed where I wanted the folds. Then for a little decoration on the front, I added a couple of the leftover hearts from my Mother’s Day Cards and one of the Prima flowers.
This next coupon design I have dubbed “Modern,” not for any particular reason, it is just what came to me when I needed some names to distinguish between the different designs! I printed my “Modern” coupons on some blue cardstock using my regular color InkJet printer. I don’t know if it’s just my particular brand of printer or the ink, but I didn’t have a bleeding problem on my prints. However, a few years ago I had a different printer that did like to bleed. A lot. So I came up with something to help keep that from happening! I discovered that if I spray the side I will be printing on with some Krylon Workable Fixatif and let it dry before printing, my bleeding, for the most part, was gone! I was actually able to print on shipping label sticker paper using this method and all of my images and fonts stayed clear! (Just remember to spray in a well-ventilated area!). If you would like to see all the coupons, you can swing by and pick up the “Modern” PDF on DropBox (for personal use only).
I have a couple of different envelope examples for these coupons. One I made to have a tie closure, so I never sealed any of the flaps. I added an eyelet in the bottom flap and attached one of the flair from the kit to the top flap, then ran a piece of twine through the eyelet to tie the envelope closed. The second envelope I made I left open. I folded the top flap back and glued it in place so the coupons would be able to stick out the top.
I made a couple of mini envelopes to hold some Father’s Day Tokens. The tokens have all the same tasks but in an itty bitty size! I thought there were a couple of ways to use the tokens – you could print them out on sticker paper and make a full coordinating sheet to go with so the stickers could be placed as they get used, or you could print them out on regular paper, cut them into squares, staple the stack together if you want, and put them in the envelope (or staple them to the envelope). You can go grab the “Tokens” PDF on DropBox if you’re interested! (For personal use only)
Here is the final style of the full set of coupons I created. For this example, I printed them on some glossy photo paper and decided to make a little booklet. My photo paper doesn’t slide very well, so instead of trying to get them in and out of an envelope, I thought a booklet would work better. A couple ideas of for securing your booklet are to use brads if they are long enough, or some twine/ribbon ran through a couple of holes. Here is the link for the “Square ‘Stamp’ Edge” PDF on DropBox, if you are interested. (For personal use only)
In addition to the “single-use” coupons, I thought making “Unlimited” coupons would be a nice addition. I have some that are sized to fit the tags from this month’s kit – Unlimited Bear Hugs, Game of Catch, and Spending The Day Together – and I turned them into sketches in Silhouette Studio, but you can also print the “Unlimited Tags” PDF on DropBox if you would like (For Personal Use Only). I have a little envelope I made for them with the top flap folded back and glued open, and a hole with an eyelet so the tags can be tied to the envelope, to keep everything together.
My final example is another “Unlimited” coupon in the form of an ATC. Making an ATC allows some personalized artwork to also be part of the gift! For my ATC I cut a piece of the patterned paper to size, added some of the lattice-ish bits I had left from my Mother’s Day Cards, used some of the Finnabair micas from this month’s Mixed Media Kit, popped on some Say-It-In-Crystals and a flower, then printed out my phrase and glued it on.
For the envelope, I made an ATC-sized pocket. It is an expandable pocket I saw a lady make using the We R Memory Keepers Envelope Punch Board a few (5+) years ago on YouTube. I made myself a little note to tape to my punch board with the measurements, so now I don’t know who I originally saw!
Measurements & (Original) Instructions (6”x6” paper size):
At the 2-1/4” mark, punch & score
Move over to the 3-1/4”, punch & score
Turn
Line up with marker, punch & score
Line up next line marker, punch – NO score (**In my video, I score here, then used my scoreboard to add another scoreline between the two made on the punch board so I had an accordion fold envelope.)
Turn
Repeat 1-5
Using scissors, cut the little sections where your score lines … ummm … overhang … so you can fold your flaps (I hope this made sense!)
This will give you an envelope that is 2-3/4”x3-1/4”. If you’d like some examples for Father’s Day phrases you can get the Father’s Day Phrases PDF on DropBox or just check out this photo for ideas!
Thank you for joining me here in my corner, I hope you enjoyed these little coupon book ideas and they gave you some inspiration for making your own coupon books – whether they be for Father’s Day and the individual filling the father role, your partner for an anniversary, a birthday, or anytime!
Did you get a kit? Share what you made in our Facebook Group!
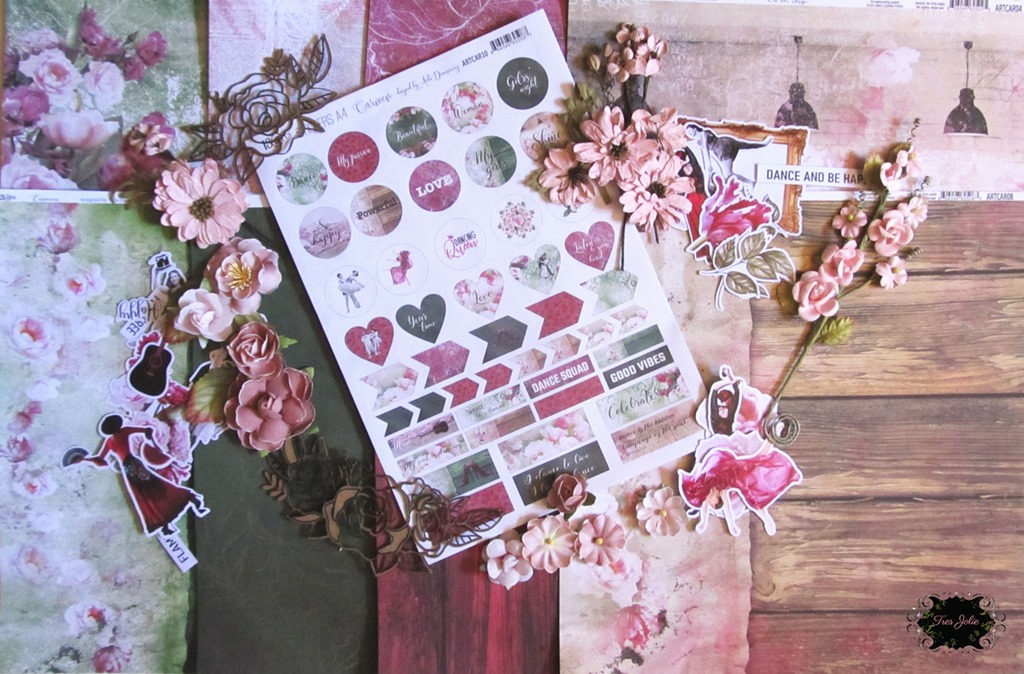
This week I have my Tres Jolie Kit Club mood board inspired project for you – a junk journal using this month’s Scrapbooking Kit! I had an old book cover that I had altered a while ago, just waiting for the right papers to come along to make a junk journal, and the “Carmen” line from 13@rts (13 Arts) was the perfect fit! I really love the combination of the dark pink with the deep green that is in these papers.
I didn’t make a “How to make a Junk Journal” video for this project—there are tons of how-to videos to be found on YouTube already—I just go over what I’m doing to help give you some ideas of how this month’s kit can be used. Check out my video to see my thought process!
Check out this month’s Mood Board! Isn’t it fabulous? The twist this month is “Cabaret Life” – grab up your papers and glues and join in! Place your entries in the February 2022 challenge folder on Tres Jolie Kit Club Café Facebook page. This challenge ends February 28, 2022 at 11:59 pm CST. All entries must be in this folder to be eligible for the prize (to have everyone eligible to win, we are limited the same winner to once every 3 months).
Challenge Rules:
You can create any type of project for the challenge.
You MUST say what you were inspired by.
You MUST include the twist in your design.
We would love to see you USE AT LEAST 1 of Tres Jolie’s products on your projects but it isn’t required to play along.
It MUST be a new project.
I mixed up four different embossing powders (check the product list at the end of the post!) and added that mixture to the Tres Jolie Chipboard from the kit. I then added it as little tuck spots on the back cover and front page of the journal.
The spine of this cover was in pretty sad shape when I originally decided to do the alterations. I had to layer up some linen hinging tape and book binding tape to hold everything together again, and the outer layer still wanted to peel off – by the fabric and canvas layers I added to my junk journal gave this cover new life.
In addition to the “Carmen” papers, I have some printables I created and some tea dyed papers I made in here. That music fabric in the above photo has one of the printables printed on it!
Some of the pages in my journal are dyed with various pink inks/sprays. I have stitching throughout, along with little tuck spots made from corners or layers of paper and fabric/lace. If I wasn’t using bits of the ephemera pack in stitched clusters, I layered them up on a page to add some interest and detail.
In addition to the ephemera pack for bits of detail, I used the cut apart page from the “Carmen” paper pad. After I cut out the piece I used, I distressed the edges with scissors and added some “Frayed Burlap” Distress Ink. I think one of my favorite things about junk journals is the freedom they give to the creative process. A lot of the time I would just grab up some of the bits and pieces and just start layering them up – without trying to think if it looked “right.” More often than not, NOT overthinking created easy and wonderful results!
Although I love the creative process of creating junk journals, they are journals! So I also make sure to leave lots of room for journaling – blank pages, tags, and lots of tucks and folds to hold loose bits.
Thank you for joining me here in my corner, I hope you enjoyed this project and it gave you some ideas of what you can make using this month’s Scrapbooking Kit!
*StudioLight Rice Paper (RICEJMA22); *Lindy’s Gang: “Terra Cotta Rust” & *“Bougainvillea Red Teal” Embossing Powders; *Prima “Blossom Bud” Fluid Chalk Ink; Ranger Antiquities “Frosted Crystal” Embossing Powder; Finnabair: *Elementals Resist Canvas (Prima Item# 960698), “Manuscript” & “Ornate Lace” Stencils, “Rusty Red” Matte Wax, & “Red Wine” Metallique Paint; *P13 “The Four Seasons: Spring” Stamp Set (this month’s Cards, Tags, & More Kit; in video, not actually used in journal); StazOn “Jet Black” (in video, not actually used in journal), Shimmerz: “Ruby” Spritz & “Pink Stilettos” Coloringz; Plain Jane Simply Sheer “Taupe;” Dylusions “Funky Fuchsia” Ink Spray; Tim Holtz “Tea Dye” Distress Oxide Spray, “Kitsch Flamingo” Distress Embossing Glaze, “Frayed Burlap” Distress Ink, Jute Sting, & “Symphony” Tissue Tape; Scotch: Expressions “Pink” Tape & ATG; Fabri-Tac; Art Glitter Glue; Simon Says Stamp Clear Embossing Ink; *DecoArt “Black” Gesso; We R Memory Keepers: Corner Chomper, Crop-A-Dile, & Crop-A-Dile II; book binding cloth; book binding tape, double-sided tape; Linen Hinging Tape; old book cover; Liquitex Matte Super Heavy Gel; tea dyed papers; printables created by me; piano roll paper; old news paper; old book pages; Recollections Blank Cards & Envelopes; various fabrics and trims from my plethora of fabrics and trims!; pink sewing thread; white book binding thread; large needle; awl; We R Memory Keepers Foam Mat (or something to use as a “cushion” for your awl—stack of paper, phone book, folded towel, etc.); chain; *Charm (this month’s Cards, Tags, & More Kit); pink threads; black thread