Tres Jolie Kit Club–Slimline Cards-September Cards, Tags, & More Kit

Hey, all! Welcome back to my corner!

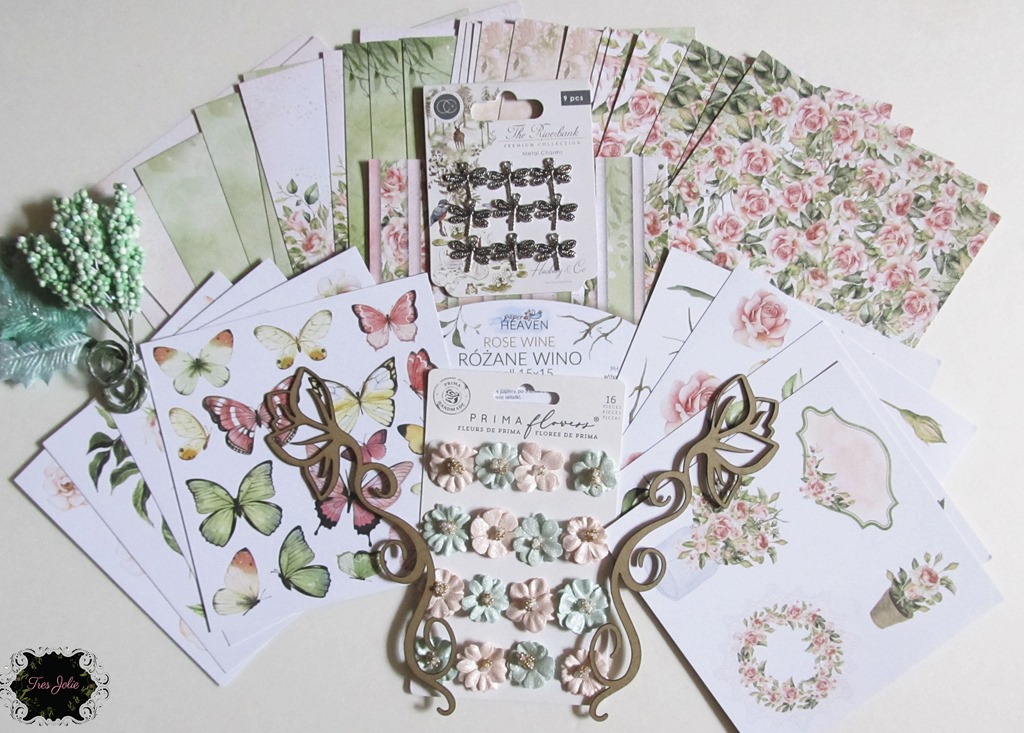
This week I’m bring you some slimline cards I made using the September Cards, Tags, & More Kit from Tres Jolie Kit Club, plus some items from my stash—most are from previous Tres Jolie Kits! (Tres Jolie Kits are a great way to add to your stash!) Check out my video to see how I did these slimlines!

FRAMED-20210819_113620


Video:


Slimline’s are (were? LOL) originally intended to be created to fit in a standard (No. 10) letter envelope. All of my slimlines this week would easily fit into that size, although in the U.S. if the weight is over 1oz, or if the item is particularly rigid, postage beyond a single stamp may be necessary. If in doubt, go to your local post office and ask! Check out my photos below of each individual card:

FRAMED-20210819_114445

“Congratulations”: Layered doily die cuts over the negative cuts in the background paper, on top of my mixed media layer with clear beads circling the solid center of the doily from the Buttons Galore cube in the kit.

FRAMED-20210819_114527

“Hello!”: Since I had done my mixed media layers all at once, this card was really very quick to finish up. I added my papers, then realized it needed some of the stencil butter on it, spread that on and set if off to the side to dry. Once dry I added my doily with the “Hello!” stamped directly on it and finished it off with three clear sequins.

FRAMED-20210819_114459

“Thinking of You”: This one is super simple assembly! I just added some of the patterned paper on top of my mixed media background and some thin strips that I had left over from my ATC project (Sept. 2nd video); I tucked in a few of the fussy cut flowers under the sentiment and added some sequins!

FRAMED-20210819_114542

“With Love”: Once again I needed to add some of the stencil butter so I just randomly stenciled it on in three random area. I fussy cut the banner & sentiment out after they were embossed, stuck it down, and added some light pink sequins to the areas of stencil butter.

FRAMED-20210819_114512

“You’re Amazing”: Again I needed to add some of the stencil butter since I hadn’t added any to the mixed media background I used, so I tried very carefully to keep it at the center of the doilies. Unfortunately I only thought of the stencil butter after I had attached to doilies to the card, so it was a little difficult! I stamped and fussy cut the sentiment, tucked in some of the fussy cut flowers, and made three groups of the sequins.

FRAMED-20210819_114357

Thank you for joining me here in my little corner! I hope you enjoyed these slimlines and they gave you some ideas of what can be done with the items found in this month’s Cards, Tags, & More Kit!

Stay Crafty, Friends


Did you get a kit? Share what you made in our Facebook Group!

Thank you for joining us here at Tres Jolie Kits!


Tres Jolie can be found at the following places:

Tres Jolie Facebook

Tres Jolie Instagram

Tres Jolie Website

Tres Jolie Subscriptions

Tres Jolie Blog

Tres Jolie YouTube

Tres Jolie Pinterest


Card kit sept 2021

In addition to the items from this month’s Cards, Tags, & More Kit (*from previous Tres Jolie Kits), I used:

*TCW: “Fuchsia” Stencil Butter; *Gina K Designs: “Turquoise Sea” Glitz Glitter Gel; Lindy’s Gang: *Magical Shaker “Guten Tag Teal,” Starburst Squirt “Emerald Eh?!”, & Embossing Powder “Guten Tag Teal”; Prima *Stencil “Flourish,” Prima/Finnabair *Stencil “Passiflora”; *Bazzill 8.5/11in “White OP” Cardstock; EK Tools Scoreboard; Scrapbook Adhesives: Adhesive Sheets; foam squares; Tonic/Tim Holtz Stamp Platform; Ranger Brayer; Art Glitter Glue; Simon Says Stamp Clear Embossing Ink; Acrylic Blocks

ReneaBouquets Upcycle Challenge-August 2021

Hey, all! Welcome back to my corner!

Over at Scrapbook.com, ReneaBouquet’s hosted an “Upcycle” Challenge, and I decided my newly broken pair of scissors would be the perfect item to upcycle! I grabbed up a 9×12 canvas board, a bunch of mediums, chipboard alphas, some Finnabair Mould pieces, my ReneaBouquet’s and got going!

wm-20210821_123746

Check out my process video to see how everything came about!


Process Video:


Before I got too carried away, I remembered to take a photo of my broken scissors! I had probably owned these scissors 20 years or so, so they had a good run, but they decided to retire themselves! (How do I know how long I’ve owned them? Because I remember their original purpose! They use to be my fabric scissors!)

wm-20210815_142159


In addition to the Finnabair stencil, I added some “Bee Hive” Beautiful Bits to my background for some added texture.

wm-20210821_123506


This project was rather relaxing because I didn’t have a plan. I just started grabbing items, grabbing mediums, and seeing where everything would take me! It took a few layers of mediums to get the look I had originally envisioned, but I enjoyed the process!

wm-20210821_123457

I don’t know if I’ve ever said it, but I am absolutely IN LOVE with Finnabair’s waxes!! The colors, the finishes, the coverage…EVERYTHING!

wm-20210821_123440

You can see how many different Finnabair mould pieces I have on here! And, like her waxes, I love her moulds! I was super excited when she came out with her “dark” line, and I was even more excited when I realized I could get some use out of a few of those “dark” pieces on this canvas!

wm-20210821_123447

wm-20210821_123542

ReneaBouquet roses and Beautiful Beads were the final touch for this canvas. The beads coordinate with the background colors, and those roses are the perfect contrasting color.

wm-20210821_123424

Thank you for joining me in my little corner! I hope you enjoyed today’s project!

Stay Crafty, Friends


Products (*Items I’ve Collected From Tres Jolie Kit Club Kits!):

ReneaBouquets: “Bee Hive” Beautiful Bits, “Bronzed Teal” Beautiful Beads, & “Mini Purple” Mulberry Paper Roses & Leaves Set; Prima/Finnabair: Liquid Acrylic “Burnt Sienna,” Jewel Effect Paste “Crushed Amber,” Metallique Acrylic Paint “Rustic Brown” & *“Soft Satin,” Heavy White Gesso, Matte Wax “Rusty Red,” “Old White,” “Stained Wood,” “Ochre,” & “Patina Green,” Metallic Wax “Firebird,” Moulds “Mechanica,” “Nocturnal Elements,” “Wings & Bones,” “Skull & Bones,” & “Stars & Moons,” and “Bindweed Wallpaper” Stencil; Ranger/Tim Holtz Distress Paint “Picket Fence;” *Ranger/DWM Acrylic Paint “Peacock;” *Lindy’s Gang Magical Shaker “Guten Tag Teal;” Studio Calico Chipboard Alpha, Stampers Anonymous/Tim Holtz “Woodgrain” Stencil; *KaiserCraft “Royal Damask” Mini Designer Template; ProMarine Supply Epoxy; Amazing Cast Resin; Liquitex Matte Super Heavy Gel & Clear Gesso; Unbranded Cabochons ; 9×12 Mont Marte Canvas Panel

Tres Jolie Kit Club-Paperclay & a Tag Booklet-Aug. 2021 Cards, Tags, & More Kit

Hey, all! Welcome back to my corner!

This week I’m bringing you a two part project using the August 2021 Cards, Tags, & More Kit from Tres Jolie Kit Club – part one: paperclay + moulds + paper; part two: tag booklet!

FRAMED-20210721_121034

As I was sitting and looking at the cut-apart sheet from the kit, I couldn’t help but wonder if I could make the wreaths more dimensional. Then it dawned on me – they looked like the would fit in the Stamperia Mould from the July 2021 Mixed Media Kit! Check out my video to see how I used the papers with some different moulds and how I put the quick tag booklet together!


Video:


Now for a few photos. First up, the paperclay pieces I created:

FRAMED-20210721_121457

FRAMED-20210721_121320

The photo on the left shows two wreaths I created using the July Stamperia Mould and papers from this month’s Cards, Tags, and More Kit. The photo on the right shows all the pieces I made using various moulds from my stash!

Next up, the quick little tag booklet:

FRAMED-20210721_120919

FRAMED-20210721_121001

The round wreath was just the right size to add to the front of my tag booklet, and with just a few small embellishments it was all done! Look below for a photo series of making the pockets, plus a link to the original post I got the folding idea from! (*Note: Tag Size: 2-3/8”x3-3/8”)

20210720_111627 20210720_111654
The dashed lines are the folds. The side that is the “back” of the folds is also the side that will show on the front pockets.
20210720_111848 20210720_111825
Add a thin line of clue for to make the

slide-through pocket.

Fold your corners in and add a little glue to

tack them in place.

20210720_111953 20210720_112114
Glue lines if the larger side will be your top

piece.

Glue lines if the smaller side will be your top

piece.

**Original Fabrika Decoru Instagram post where the pocket idea came from! (The 6th slide in the post has a video)

FRAMED-20210720_143958

Thank you for joining me here in my little corner, I hope you enjoyed this project and it gave you some ideas of what you can do with the items found in the August Cards, Tags, & More Kit!

Stay Crafty, Friends


Did you get a kit? Share what you made in our Facebook Group!

Thank you for joining us here at Tres Jolie Kits!


Tres Jolie can be found at the following places:

Tres Jolie Facebook

Tres Jolie Instagram

Tres Jolie Website

Tres Jolie Subscriptions

Tres Jolie Blog

Tres Jolie YouTube

Tres Jolie Pinterest


August 2021 Cards, Tags, & More Kit

In addition to items from this month’s Cards, Tags, & More Kit (*from previous Tres Jolie Kits), I used:

*Stamperia Frames Maximould; *Little Birdie “Aqua Sheen” Metallic Wax; Prima/Finnabair Moulds: “Skull & Bones,” “Birds & Bats,” “Nocturnal Elements,” & *“Fairy Garden;” Creative Paperclay; LineCo PVA Glue & Linen Hinging Tape (1.25”); Art Glitter Glue; Liquitex Matte Super Heavy Gel; X-Acto Knife; We R Memory Keepers Crop-A-Dile & Crop-A-Dile Corner Chomper; EK Tools Score Board; Tim Holtz Tiny Attacher; sheer ribbon; *Lace

Art Journal-Hero & Paint-June MTW Challenge

Hey, all! Welcome back to my corner!

Today I have an Art Journal spread I created for the June More Than Words Challenge “Hero & Paint.”

WM-20210622_201758

I wasn’t sure if I’d come up with something this month for the MTW Challenge, I wasn’t feeling very layout-ish, and I wasn’t able to really narrow down a personal hero. One day I just pulled out my DWM Journal and grabbed a few brighter paints. Then I sat there staring! I think things finally came together when I got a “picture” in my mind of some stenciling. I didn’t have anything like what I was picturing, so I cut one out of some heavy cardstock.


Video:


June 2021 Main


I suppose, if you wanted to really get down to the nitty-gritty, I think I had problems thinking of a hero because I tend to lean to a “I’ll do it myself” attitude. I’m not saying I won’t let people do things for me, I just find doing it myself faster! LOL!


Some close-ups of the spread:

WM-20210622_201853

The silver on the background is from sheets of Prima Run-On Foils. I used my homemade stencil with some Finnabair “Gold Dust” Jewel Effect Paste, and then freehanded some paint highlights!

WM-20210622_201840 WM-20210622_201903 WM-20210622_201944

I used some DWM “Eggplant” & “Lemon” that I had from the October 2020 Tres Jolie Kit Club Mixed Media Kit, and some Vicki Boutin “Juicy Pear.”

WM-20210622_201949

All of the papers have been in my “scraps” pile for ages, and none of them had the border with the manufacturer on them anymore, so I couldn’t even begin to guess where they came from now!

WM-20210622_201910 WM-20210622_201935

I just tore a bit of corrugated cardboard from a box, coated it in some DWM Gesso I’ve had since the April 2019 Tres Jolie Mixed Media Kit (I had an open container way back then already, and with black gesso, I’ve learned a little bit goes a long way!); I then layered my stamped papers, punched circles, and label on top of the cardboard.

WM-20210622_202023

I hope you enjoyed this project. I love getting my Art Journal out because I gives me a chance to do a project without always having to plan ahead or prepare too much! With just a little guideline, “Hero & Paint” I was able to do a project and relax!

Stay Crafty, Friends

Red heart C.J.


Products:

Dina Wakley Media: Journal, Black Gesso, “Eggplant” & “Lemon” Acrylic Paint, “Essential Silhouettes” Stamp + Stencil Set; Prima Rub-On Foils; Finnabair Jewel Effect Paste “Golden Dust;” Vicki Boutin: “Juicy Pear” Paint & “All The Good Things” Watercolor Stickers; Recollections 2.5” Circle Punch; Fiskars 1.5” & 1” Circle Punches; Ranger Heat-It Tool; Staedtler Black Permanent Super Fine Tip; ArtPen: black glitter pen; Sakura: GellyRoll Moonlight 10 (dark pink), Soufflé XPGB# 920 (light pink); KaiserCraft Glitter Gel Pen (pink glitter); Tim Holtz Tiny Attacher; StazOn “Jet Black;” Liquitex Gloss Gel; Various paper scraps; homemade stencil

Tres Jolie Kit Club-June 2021 Moodboard-Scrapbooking & Mixed Media Kits Combo

Hey, all! Welcome back to my little corner!

Today I’m bringing you my moodboard inspired project using both the June Mixed Media Kit and Scrapbooking Kit from Tres Jolie Kit Club!

FRAMED-20210610_101240

I love steampunk! It is in my top three list of themes I could play with all day long! Check out my video to see how I put this together.


Video:


moodboard


Now a few close-ups:

FRAMED-20210610_101311

On my metal pieces I used some clear gesso from my stash and added some color using the Starburst Squirts—Hockey Puck Black & Polite People Purple—from this month’s Mixed Media Kit. (Note: I forgot to mention the Polite People Purple in my video, Sorry!!)

On the wooden gear I adhered some of the metallic flakes and then aged them with more of the Starburst Squirts and clear gesso!

FRAMED-20210610_101330 FRAMED-20210610_101349

These black chipboard arrows are from this month’s Scrapbooking Kit, and I absolutely love them! I love them so much I ordered two more sets to keep on hand (Tres Jolie Chipboard).

FRAMED-20210610_101359

First I used some foam squares to raise the car up a bit, then to add more depth I used the Maple Syrup Bronze Starburst Squirt to create a shadow effect behind the car.

FRAMED-0210610_101251

I used a few of the transfers from the Mixed Media Kit, added some color with more of the Starburst Squirts, and layered them with the car. As a final touch, I grabbed up a few of the flowers and one of the butterflies from the Scrapbooking Kit and added them to my piece!

FRAMED-20210610_101322

I hope you enjoyed this project and it gave you some ideas of what you can do using this month’s kits and the moodboard!

Stay Crafty, Friends


Did you get a kit? Share what you made in our Facebook Group!

Thank you for joining us here at Tres Jolie Kits!


Tres Jolie can be found at the following places:

Tres Jolie Facebook

Tres Jolie Instagram

Tres Jolie Website

Tres Jolie Subscriptions

Tres Jolie Blog

Tres Jolie YouTube

Tres Jolie Pinterest


June Mixed Media Kit

June Scrapbooking Kit

In addition to items from the Mixed Media & Scrapbooking Kits (*from previous Tres Jolie Kits) I used:

*Prima-Finnabair Clear Gesso, *Ranger-Dina Wakley Black Gesso, Liquitex Matte & Gloss Gel, Liquitex Super Heavy Matte Gel, Art Glitter Glue, E6000

Tres Jolie Kit Club-June 2021 Cards, Tags, & More Kit-Art Journal

Hey, all! Welcome back to my little corner!

This week I’m bringing you an art journal I created for the Tres Jolie Kit Club using some of the papers and chipboard gears from this month’s Cards, Tags, & More Kit along with papers, some embellishments, and mediums from my stash.

20210504_100134-FRAMED

I absolutely loved the Sir Vagabond line from Stamperia, and I knew I’d have to make Sir Vagabond himself part of a cover as soon as I saw the paper pack! Check out my video to see how I put this art journal together.


Video:


20210504_100222-FRAMED 20210504_100254-FRAMED

For my pages I used some homemade tea dyed papers and some printed papers I’ve had for who knows how long! I also splattered the pages with some “Salvaged Patina” & “Aged Mahogany” Distress Oxide Sprays.

20210504_100242-FRAMED 20210504_100312-FRAMED

My art journal isn’t very think, so I only have two signatures in it. However, each signature has one sheet of the Stamperia paper included! The outer sheet for the first signature, and the center for the second signature.

20210504_100358-FRAMED

20210504_100345-FRAMED

20210504_100333-FRAMED

On the front and back covers I used some heavy gel with two stencils for texture, added my Tres Jolie chipboard gears that I painted with “Steampunk Copper” Prima paint, and some roman numeral before adding the “Salvaged Patina” Distress Paint & some splatters. I backed Sir Vagabond with some chipboard and gave him a “new” moustache before adding him to the cover.

20210504_100201-FRAMED

I hope you enjoyed this project and it gave you some ideas of what you can do with items found in this month’s Cards, Tags, and More Kit!

Stay Crafty, Friends!


Did you get a kit? Share what you made in our Facebook Group!

Thank you for joining us here at Tres Jolie Kits!


Tres Jolie can be found at the following places:

Tres Jolie Facebook

Tres Jolie Instagram

Tres Jolie Website

Tres Jolie Subscriptions

Tres Jolie Blog

Tres Jolie YouTube

Tres Jolie Pinterest


June 2021 Cards, Tags, & More Kit:

In addition to items found it this months Cards, Tags, & More Kit (*from previous Tres Jolie Kits), I used:

Creative Embellishments: “Rivet” Stencil & “Clock” Stencil; Prima: Wire Thread “Cyan,” & *“Vintage Trinkets;” Prima/Finnabair: *Clear Gesso, *Metallique Paint “Steampunk Copper,” *Mechanicals “Roman Numerals,” & *Mechanicals “Winged;” Ranger/Tim Holtz: Distress Oxide Sprays “Salvaged Patina” & “Aged Mahogany,” Distress Paint “Salvaged Patina,” & Distress Oxide Inks “Salvaged Patina” & “Aged Mahogany;” DCWV: “The Fun In The Sun Summer Stack;” Krylon Workable Fixatif, LineCo PVA Glue, Liquitex Matte Super Heavy Gel, Ranger Heat-It Craft Tool, Ranger Brayer, We R Memory Keepers Crop-A-Dile, Crop-A-Dile II, & Craft Knife, idea-ology/Tim Holtz Sanding Block & paper, Recollection Value Pack Cards & Envelopes “Kraft,” an old book cover, Unknown/Unbranded Eyelets (3/16”), Beige Herringbone (1/2”), 2” Book Binding/Repair Tape, chipboard, tea dyed papers, printed scrapbooking paper, awl, brad

Your eyes are a reflection of your spirit-MTW May 2021 Mini

Hey, all! Today I have the tag I made for the More Than Words May 2021 Mini Challenge, “Eyes.” As you can see in the photos, lighting can change how this project looks!

The word “eyes” has to appear on the project, so I went looking for quotes that could inspire me. It just so happened that I had my (new) Finnabair Moulds sitting out at the same time. By my bead drawer. And a plan started to formulate!

20210525_083356-wm 20210525_083647-wm

Process video:


May Mini EYES


You will see how lighting and flash vs no-flash change the appearance of the mediums, especially with the shine from the paints!

20210525_083707-wm

I started with a Julie Nutting tag. Not for the pattern, but because I like the size and the weight of it.

20210525_083601-wm

I used a Heidi Swapp stencil, some random filigree, and Ingvild Bolme “Nail Heads” to build my background.

20210525_083418-wm

I added some paper straws, a metal butterfly, and a key under my skull.

20210525_083616-wm

Another “Nail Head” in one eye and a rose in the other.

20210525_083548-wm 20210525_083627-wm

Another comparison of how lighting (or a flash) can change the appearance.

20210525_083720-wm

I had so much fun with this project! I love getting out my paints and pastes and getting messy! I hope you enjoyed this tag as much as I enjoyed putting it together.

Stay Crafty, Friends

Red heart C.J.


Products:

Lindy’s Gang: Starburst Squirts “Polite People Purple,” Tres Jolie Kit Club: Paper Straws, Heidi Swapp: “Square Lattice” Stencil, Prima-Ingvild Bolme: “Nail Heads” Tiny Junkyard Findings, Prima-Julie Nutting: “Hancock” Tag Pad, Prima-Finnabair: “Skull & Bones” Mould, “Rusty Red” Matte Wax, “Burnt Sienna” Liquid Acrylic, “Purple” & “Lavender” Rust Effect Paste, Mega Art Stones, Art Stones, & Mini Art Stones, “Violet-Gold” & “Violet-Green” Opal Magic Acrylic Paint, Jacquard: “Halo Violet Gold” Lumiere Acrylic Paint, Ranger-Dina Wakely: Black Gesso, TCW: Light & Fluffy Modeling Paste, Liquitex Matte Super Heavy Gel, JudiKins Diamond Glaze, Tonic-Tim Holtz Edge Distresser, Unknown: rose, filigree, mask, butterfly, key, & chain

Faces of You-May 2021 More Than Words Challenge

Hey, all! Welcome back to my little corner!

Today I am bringing you a (redone) layout. I originally did “Faces of You” 10+ years ago, and of all the layouts I’ve done, this is one I remembered! (Seriously, when looking for the layout I came across too many layouts I have no recollection of!) Anyhow, when I saw that this month’s More Than Words Challenge was “Faces & Kraft,” I knew I’d (finally) redo “Faces of You.” (I have grand plans to redo most of my layouts from when I first started scrapbooking.)

20210523_111810-wm


Process video:


May2021MTWMain


Here is my original layout. I thought I was really getting fancy by adding stitching & ribbon! And, my goodness, there is almost some pattern going on with the light paper and the circles on that ribbon; I even overlapped the photos some! I remember when I started I was, more or less, afraid of colors and patterns! It was all too new. I didn’t add mediums; I didn’t even own mediums beyond a few to Tim Holtz’s Distress Ink pads, in varying shades of brown! A lot has changed since my early days.

20210516_131835-wm


And now, I have layers, embellishments of all kinds, mediums, and colors galore! Instead of being “afraid” of using “too much” I try to use as much as I can so I can work through my stash!

20210523_135201-wm


20210523_111821-wm

So many layers! I have my photos on foam, and the torn papers lifted with foam so the frame wouldn’t leave a weird lump.

20210523_111855-wm

I discovered long ago that I really LOVE cutting frames apart and having them look bigger than they actually are. It turns out, scissors are my friend, and I don’t have to be nervous about altering items!

20210523_111951-wm

I just used some white texture paste with my Fabrika Decoru stencil and used some Distress Oxide sprays as my paint!

20210523_111909-wm

I went through my stash, pulled out a lot of different choices, and eventually worked out what I wanted to add to this layout!

Thank you for joining me here, I hope you enjoyed this remake of one of my original layouts and it inspires you to be more daring with colors and mediums or to redo something!

Stay Crafty, Friends

Red heart C.J.


Products:

Project Life “Kraft Edition,” The Paper Studio “Everyday Kraft,” Ranger-Tim Holtz Distress Oxide Sprays “Evergreen Bough,” “Pine Needles,” “Candied Apple,” & “Wild Honey,” Fabrika Decoru “Leaves” Stencil (FDTR 162), Maggie Holmes “Chasing Dreams” Ephemera, Maggie Holmes “Willow Lane” Frame, Pretty Little Studio “Sunny Memories” Fresh Phrases, Echo Park “The Story of Fall” Enamel Dots, AC Shimelle “Box of Crayons” Stickers/Folder, Teresa Collins “Summer Stories” Die Cut Borders, Pink Fresh Studio “Life Noted” Puffy Alpha Stickers, Pink Fresh Studio “Escape the Ordinary” Chipboard Stickers, Fancy Pants Designs “Off to School” Sticker Sheet, Queen & Co Alphabits “Orange,” Hip Kit Club Stickers, Prima-Finnabair Clear Gesso, TCW Light & Fluffy Modeling Paste, Fabri-Tac, Art Glitter Glue, Variegated Thread, Unknown Red “XOXO” Frame

Fairy House-MMP April Challenge

Hey, all! Welcome back to my little corner!

I am bringing you a little project I put together, inspired by the Mixed Media Place’s April Challenge. I don’t often work with pinks, but I really loved the mood board this month, and decided it was a good time to pull out my pink paints!

20210519_120715-WM 20210519_120431-WM

Video:


moodboard-mmp-4-2021

Aren’t the colors for the April Challenge absolutely wonderful? I couldn’t help but want to make something pink!


Now, how about a few close-ups?

20210519_120450-WM 20210519_120611-WM

The fairy’s house is actually a repurposed bed riser! My youngest moved from his dorm to an apartment and didn’t need them anymore, so he gave them to me! My family has learned I will take anything and repurpose it into a craft project!

20210519_120504-WM 20210519_120519-WM

My little door is from Creative Embellishments, coated in Vintage Gold wax with some ReneaBouquet’s glitter glass as the window. I used a variety of random pieces for my foliage: Christmas berries and leaves from JoAnn’s that I’ve had a couple of years, and some Styrofoam “shapers” with some wire that I thought would look interesting!

20210519_120528-WM 20210519_120554-WM 20210519_120540-WM

The figurines I found a couple of years ago at Dollar Tree and picked them up to have when the right project presented itself!

I hope you enjoyed this project! I had fun putting it all together, even if I did make a massive mess!


Products:

Creative Embellishments Fairy Door Set 2, ReneaBouquets Chunky Glitter Glass “Diamond,” 13@rts “Old Gold” XS Microspheres, Shimmerz Paints AcriTonez “Pinkadelic,” AC-Vicki Boutin “Sugared Strawberry” & “Coral Macaroon” Paints, idea-ology-Tim Holtz Sanding Block, Ranger-Tim Holtz “Kitch Flamingo” Distress Paint & Spray Stain, Prima-Finnabair “Paper” Texture Paste, Heavy White Gesso, “Burnt Sienna” Liquid Acrylic, “Green-Gold,” “Aqua-Rose,” & “Rose-Gold” Opal Magic, “Enchanted” Sparks, Waxes: “Vintage Gold,” “Mint Sparkle,” “Turquoise Satin,” “Royal Robes,” “Green Brocade,” “French Lavender,” “Sage Leaves,” & “Shabby Pink,” Liquitex Matte Super Heavy Gel, Mod Podge Stiffy, Unknown “Spider Web” Material, Creative Paper Clay, Unbranded Styrofoam Flower Shaper/Center, Floral Wire, Plastic Leaves, Berries, Teal Sisal, Pink/Bronze Beads, Fairy Garden Figurines, JudiKins Diamond Glaze