Tres Jolie Kit Club–November Mood Board + Mixed Media Kit

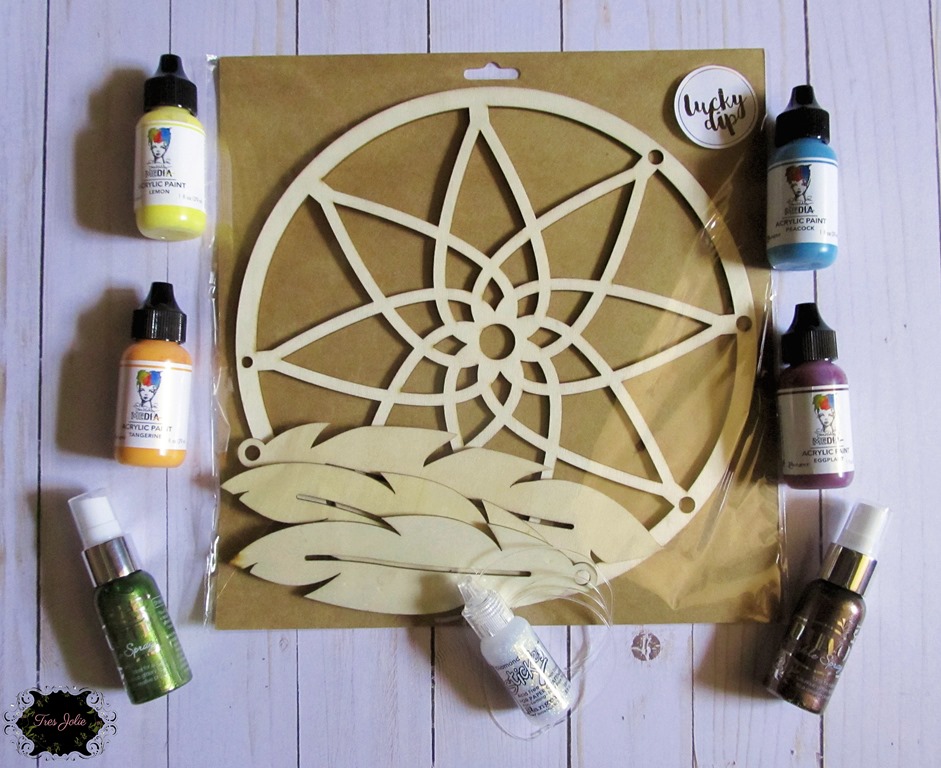
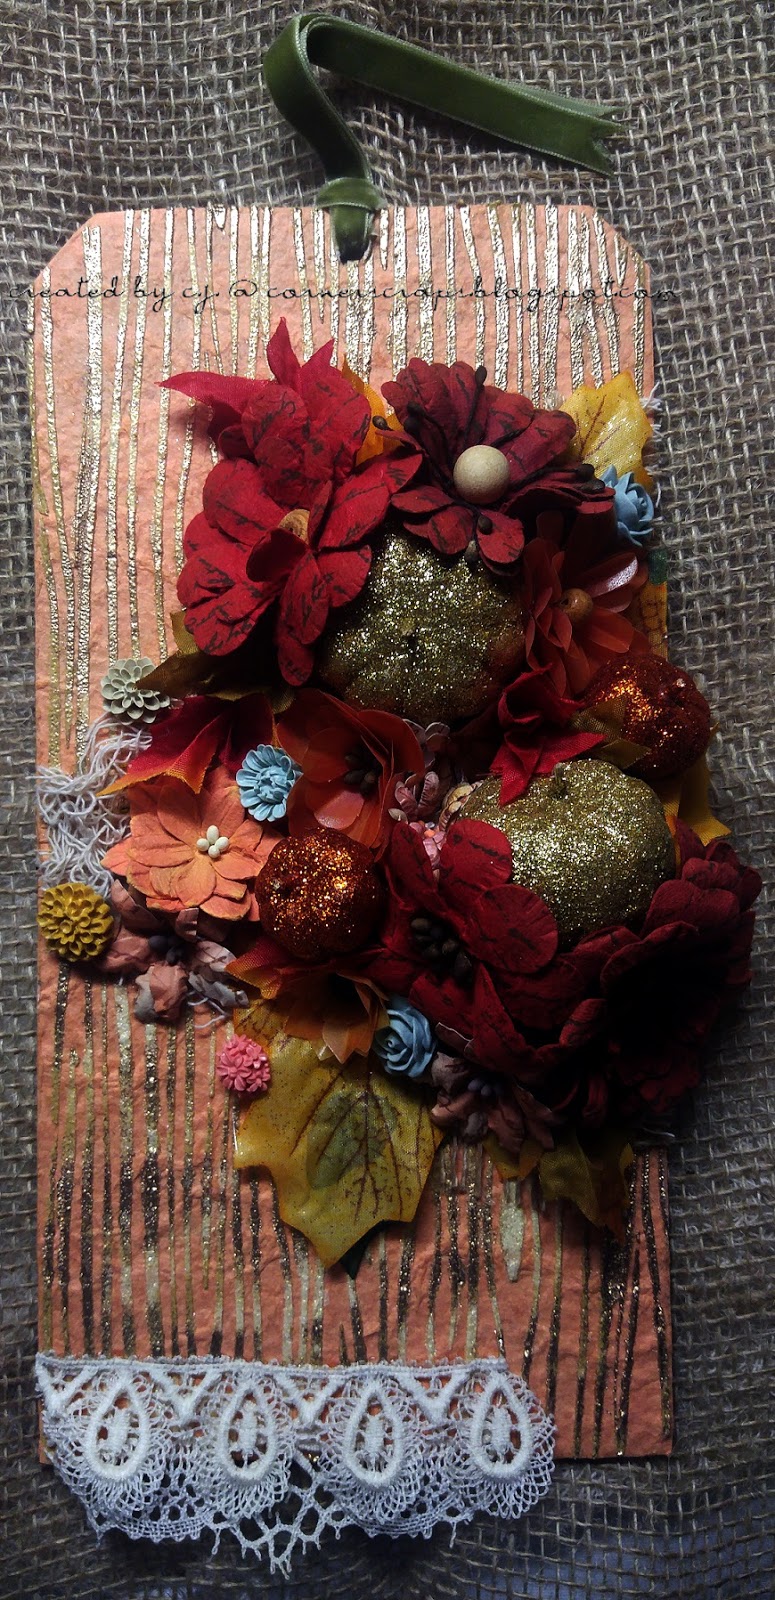
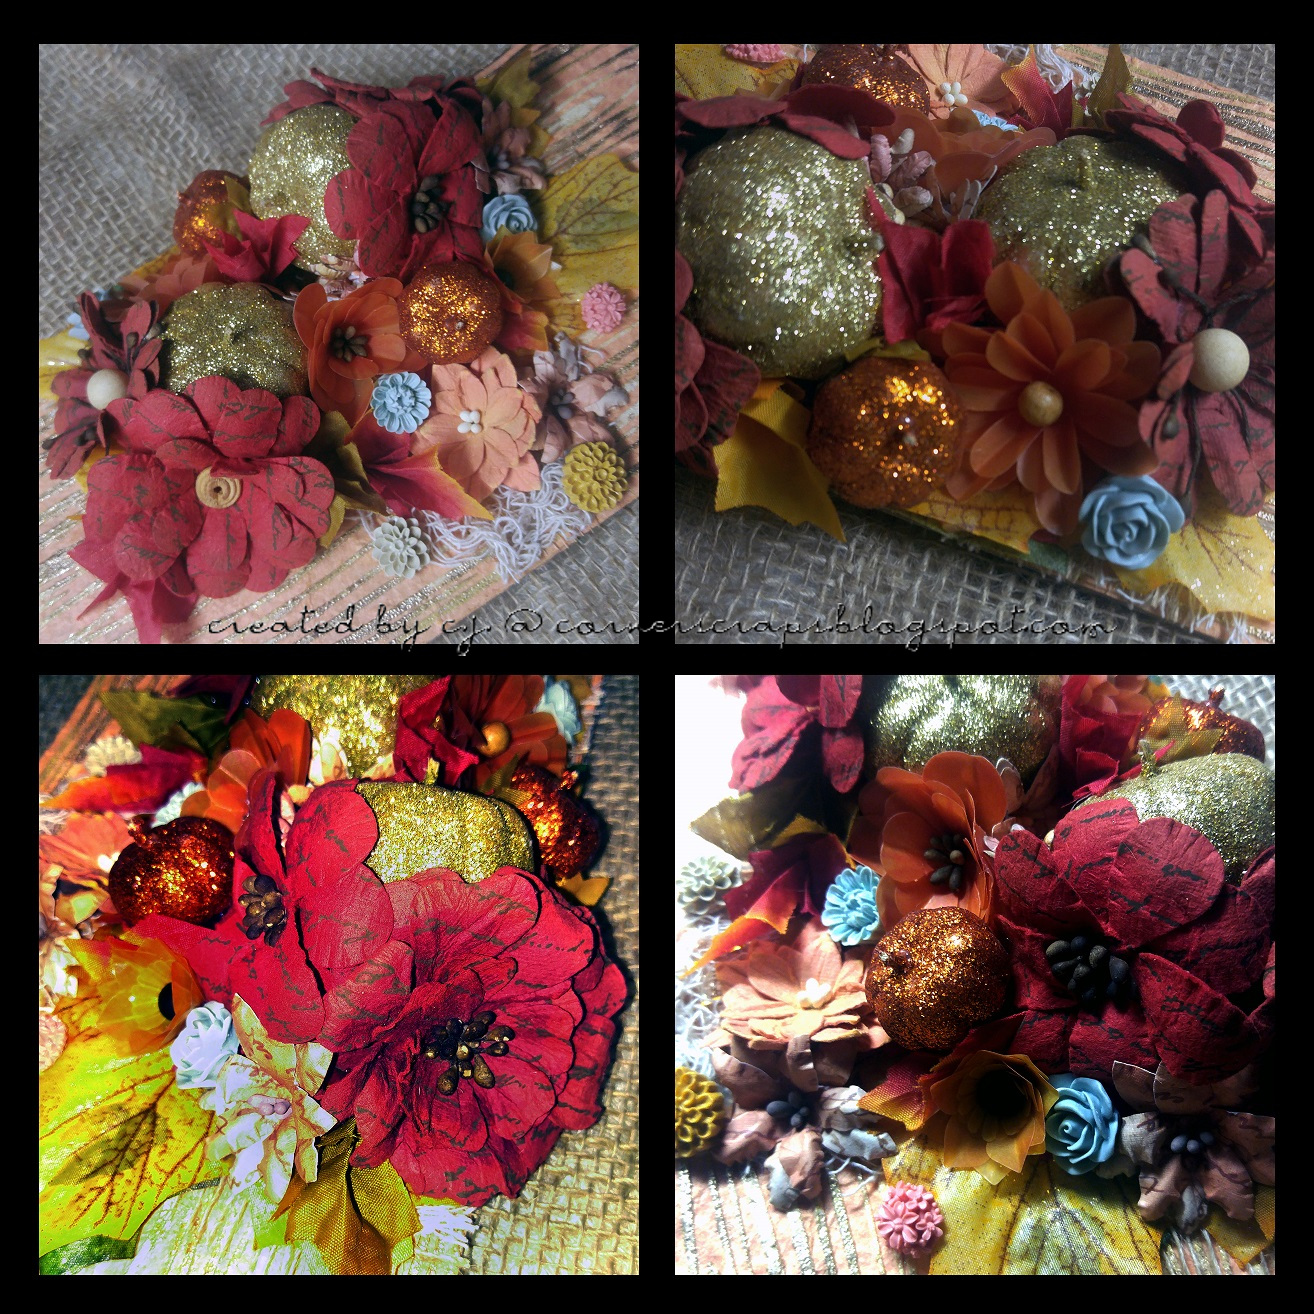
Hey, y’all! This week I grabbed up the Tres Jolie Kit Club November 2022 Mixed Media Kit, the burlap flowers from the Scrapbooking Kit, and a couple items from my stash to create a fabulous fall décor piece!

The only mediums I used for color were the four Stencil Butters that came in the kit – it was all just a matter of how I mixed and layered them to create the different shading.

welcomeCornicopia-01

Make sure you check out the video to catch all the details of what I did to bring my cornucopia to life!


Tres Jolie Mood Board

nov22-moodboard


This project really was rather simple – I let the stencil butter and the texture powder do the heavy lifting for me!

welcomeCornicopia-02

I didn’t use any gesso on the surface because I didn’t want too many layers that may make it more difficult for me to see the laser-cut details on the Tres Jolie cornucopia base. The first thing I did was grab up some artist’s tape and tape off the border between the edge of the filling and the basket, then I brushed a thin coat of the Chocolate Stencil Butter all over the basket. To start getting some detail built up, I mixed some of the Chocolate Stencil Butter with some texture powder and used some small round brushes to create the raised areas of the basket – or the areas that I thought of as raised!

welcomeCornicopia-03

Since I had a little of that mix left, I brushed it onto the lower part of the base then used a baby wipe to clean it up – just leaving some of the color behind to start filling in the areas between all of the foliage and produce.

Once all of the Chocolate Stencil Butter had dried, I started working with the Fern in the same fashion. I mixed in some texture powder and started building up the apple and some of the foliage. Then, to create some variations in shading, I mixed in some of the Eggplant Stencil Butter for the pear, and to create the darkest of the green, I added some of the Terra Cotta and Chocolate. Then I just brushed the Fern Stencil Butter on straight from the jar to add the light areas to the apple and pear and some lighter highlights to the foliage.

I also wanted to add a little more light coloring to the basket, so I brushed on my leftover mix, sprayed it down with water, and wiped up most of what was there – leaving just enough to add a hint of color besides the Chocolate.

welcomeCornicopia-04

The raised areas of the pumpkin are made up of some of the texture powder mixed with the Terra Cotta, and after that had dried, I came back with some of the Terra Cotta straight from the jar and filled in the smaller areas and I used my finger to rub a thin, uneven layer on top of the texture powder mix.

Since I loved the unevenness of using my finger to rub on the Stencil Butter, I decided to add some of the Terra Cotta to the cornucopia basket and rubbed on some of the Chocolate along the edges.

For all of the grapes (berries?) I used a cheap cake piping bag and tip with the Eggplant Stencil Butter and just created all of my “dots”! I think it made the process much quicker than if I had tried to use a brush. I just sprayed the surface of the Stencil Butter with water and made a little puddle to dip my finger in so I could smooth out any areas – so long as either my finger or the surface of the Stencil Butter was kept wet, my finger didn’t get stuck!! To really get those grapes to pop, I grabbed up my heat gun, and (for once) I purposely “overheated” my texture paste/stencil butter to create bubbles!

For the grape stems, I just mixed some texture powder, Eggplant, and Fern together and brushed it on. Then I watered it down and added that green-ish hew to the inside of the basket, and then used up the rest to give my metal “Welcome” a coating. Once again, I didn’t use any gesso, I just brushed my Stencil Butter directly on the surface. After that layer had dried, I used a soft brush and added some of the Eggplant to the upper half (and back) of the metal word.

welcomeCornicopia-05 welcomeCornicopia-07

For my stand, I up-cycled two of the hanging bars from a hanging file folder, bending one around to create the bottom and cutting the second in half to create the two uprights behind the cornucopia. I used some Gorilla Clear Grip to hold the metal in place, then came back with some 3D Matte Gel for extra adhesion and to hold the “Welcome” in place. I mixed some of the Chocolate Stencil Butter with some of the texture powder and some of the 3D Matte Gel for adhesive power, then brushed a layer onto the metal bars. I grabbed my heat gun up so I could get the surface of the mix dry, then added my flowers with some 3D Matte Gel.

After all of my gel had dried, I came back and just added some touch-up areas to the stand and word, then gave a coating of the Chocolate to the back for a more finished appearance.

welcomeCornicopia-06

That was it! It wasn’t a super complicated project, just a matter of mixing colors and trying to keep as much detail as possible! Thank you for joining me here in my corner, I hope you enjoyed this project and it gave you some ideas of what you can do with your Mixed Media Kit this month!

Stay Crafty, Friends


Did you get a kit? Share what you made in our Facebook Group!

Thank you for joining us here at Tres Jolie Kits!


Tres Jolie can also be found at:

Tres Jolie Facebook

Tres Jolie Instagram

Tres Jolie Website

Tres Jolie Subscriptions

Tres Jolie Blog

Tres Jolie YouTube

Tres Jolie Pinterest


Tres Jolie Insta Square Frame

In addition to this month’s Mixed Media Kit and the burlap flowers from this month’s Scrapbooking Kit, I used:

Finnabair 3D Matte Gel , Gorilla Clear Grip , piping bag/tip , Chandler Heat Gun , Crafter’s Square Metal Words , hangers from hanging file folders

Tres Jolie Kit Club–November Memory Dex–October 2022 Cards, Tags, & More Kit

Hey, y’all! For my final project of October for Tres Jolie Kit Club, I have some November Memory Dex Cards for you. I don’t have a card for every day of the month – although I think it is possible with all of the “(Inter)National Day of’s …”. I just picked the more commonly known days – and National Button Day, since we are all crafters here!

The video is a quick watch – most of the project is die cutting, layering, and gluing – so I really spend the majority of the video time with the assembly of the shaker card and I give an overview of what mediums I used.

Oct2022CTM-MemoryDex-04 Oct2022CTM-MemoryDex-01 Oct2022CTM-MemoryDex-05

First, a warning and apology! I am in the process of switching my recording and editing programs, and had to work out which settings were best for these new programs – so the audio for about half the video is … less than ideal. Fortunately, I think I have it worked out now, unfortunately, it is during the shaker assembly. Sorry! It really got down to the wire of working with what I had, or not being done in time!


Oct2022CTM-MemoryDex-14

My shaker card was the most involved card created! I decided what I really “needed” for this project was to create a large, maple leaf shaped Memory Dex card. Over on my Flickr, you can find the full-sized .jpegs of the shaker parts and my little calendar to use in your personal project(s).

mapleLeaf NovemberMemoryDex-calender

I doubled up the card part of the shaker – made using some cardstock from my stash – so it would have a little extra stability when on the Rolodex tracks since it is heavier than a “regular” card. To make my solid cardstock not so solid looking, I inked up the edges with my Frayed Burlap Distress Oxide, gave it a splatter of water, dabbed up the excess, and dried everything before I glued down the solid leaf, cut from some of the patterned paper from the kit and trimmed off the bit of extra stem from the bottom.

To create my spacer ring I cut two of the outline pieces and used some hot glue between them. And honestly, I think I might have found a favorite way to create the space needed for shakers! There is no dry time, no cutting, and scissors work to trim off any parts that seep out. All I had to do is keep moving so I wouldn’t get any piled up, and if a spot got skipped over, it was easy to go back and fill it in.

Oct2022CTM-MemoryDex-02 Oct2022CTM-MemoryDex-03

For the leaf veins and “November,” I first used a gold marker in my Cameo to sketch the outlines, then I switched over to the blade to cut the pieces out. I left everything on my mat so it would be easier to work on when I added some gold foil transfer to them.

After the foil was on, I grabbed up a piece of acetate and stitched the veins and acetate together. To keep the feed-dogs of my sewing machine from marring the acetate, I just ran it through on top of a piece of tissue paper – which tears off from the stitches super easily! Then I glued down the acetate window piece to the spacer ring using some JudiKins Diamond Glaze.

Since I was in a “let’s see what I can use” mindset, wanted to add a little extra to the shaker and wanted to make sure the edges of the leaf vein cut weren’t going to snag on anything, I brushed on some Peeled Paint Stickles around the edge, and then used it to fill in along the hot glue edge to really “clean” it all up. Then the only thing left to do was flip the window over, add my sequins, and glue the base on.

Oct2022CTM-MemoryDex-06

After the shaker card, the rest of the cards were really just a matter of gluing all the die-cut pieces together! Each card has two layers – except the envelopes – one layer of cardstock, and one layer of patterned paper. I added a bit of random stitching and tucked in and layered up die-cuts and pieces from the cut-apart sheets in this month’s kit.

As I noted in the video, this was the day I discovered my printer had decided to retire, so my calendar is only a black-and-white printout, instead of the original design that I shared near the beginning of this post. The “Native American History Month” Card is actually one of the envelope cards, and inside it, I added a couple of little fact sheets printed from the National Congress of American Indians and the U.S. government’s Native American Heritage Month website. And of course, I have a card to remind me that Daylight Savings Time ends on the sixth, and we “Fall Back” an hour.

Oct2022CTM-MemoryDex-09

The eighth is our mid-term elections here in the U.S., and since I believe voting is highly important and something that should be taken seriously, I had to make a card for that day. The eighth is also the first full moon of November, known as the Beaver Moon or Frost Moon. On the eleventh, we have Veteran’s Day (also known as Armistice Day or Remembrance Day), [originally] to commemorate the end of World War I. For my November 13th card, I have another envelope, but I didn’t to say anything on the outside other than “Fun Day” since it is the Ides of November and the Festival of (the Roman God) Jupiter. And of course, as I mentioned at the start of this post, I have my National Button Day card.

Oct2022CTM-MemoryDex-10

For my last two cards, I have one for (American) Thanksgiving – which signals the start of the Holiday shopping season, so I had to make a card for Small Business Saturday! Don’t forget to support small businesses!!

I used a set of Hampton Art Alpha stamps with my Frayed Burlap Distress Oxide or one of my StazOn inks to stamp the titles and dates and sometimes added some gold embossing powder to make areas stand out a bit more.

Oct2022CTM-MemoryDex-07 Oct2022CTM-MemoryDex-12 Oct2022CTM-MemoryDex-11

Thank you for joining me here in my corner! I hope you enjoyed this project and it gave you some ideas of what you can make using this month’s Cards, Tags, & More Kit! Make sure you check back with us on Tuesday when the November Kits are revealed! You’re going to love them!

Stay Crafty, Friends


Did you get a kit? Share what you made in our Facebook Group!

Thank you for joining us here at Tres Jolie Kits!


Tres Jolie can also be found at:

Tres Jolie Facebook

Tres Jolie Instagram

Tres Jolie Website

Tres Jolie Subscriptions

Tres Jolie Blog

Tres Jolie YouTube

Tres Jolie Pinterest


Tres Jolie Insta Square Frame

In addition to this month’s Cards, Tags, & More Kit (*from previous Tres Jolie Kits), I used:

Some (non-Tres Jolie) items may contain an affiliate link, allowing me to earn a small commission at no extra cost to you!

*Gary M. Burlin Co. “Ultrafine Gold” Embossing Powder , BoBunny “Sentiments With Love” Stamp Set , BoBunny “Lovely Leaf” Dies , Prima “Holographic Dreams” Foil , Dress My Craft “Crochet Doily” Die , *Dress My Craft “Classic Doily” Die , Distress Stickles “Peeled Paint” , Distress Oxide “Frayed Burlap” , Tim Holtz “Skeleton Leaves” Thinlits , Tim Holtz “Flower Field” Thinlits , Tim Holtz “Tiny Tattered Florals” Thinlits , Ranger Big Emboss It , Ranger Emboss It Pen , Ranger “Vintage Pearl” Embossing Powder , StazOn “Timber Brown” , StazOn “Royal Purple” , Hampton Art Alphabet Stamp Set , cardstock from my scraps pile , Lucy’s Cards “Warm Golden Glow” Little Things , Lucy’s Cards “Tequila Sunrise” Little Things , Heidi Swapp Memory Dex Dies , unbranded “ –dex” dies , Hampton Art Gold Calligraphy Marker , Recollections 6”x6” Clear Acetate Sheets , We R Memory Keepers 3-Way Corner Punch , We R Memory Keepers Tab Punch , Heidi Swapp Memory Dex Punch , Spellbinders Tool ‘n One , Dear Lizzy Date Stamp , K. Barteski Roller Stamp , unknown sequins , unknown seed beads , hot glue gun (high & low heat) , Gorilla Mini Hot Glue Sticks , JudiKins Diamond Glaze , Art Glitter Glue , Fabri-Tac , Schmetz Super Universal Sewing Machine Needles (Teflon Coated) , McGill Flower Shaping Tools , blending brushes , foam mat

Tres Jolie Kit Club – Autumn Cards – October 2022 Cards, Tags, & More Kit

Hey, y’all! Today I have a couple of quick autumn-themed cards for you using the October Cards, Tags, & More Kit from Tres Jolie Kit Club. I added some of the foil from this month’s Mixed Media kit to a piece of patterned paper, used the positive and negative cuts from a single die from my stash to create the backgrounds, cut some leaves, added a few details, and put them together.

AutumnCards-01

Check out my quick video to see how I put these cards together!


Since these two cards are rather straightforward – and I used the same background die-cut – I’m just going to talk about them side-by-side here.

AutumnCards-02 AutumnCards-05

Both of the cards are 4”x5-1/2”, to fit the A2 die-cut background. The first thing I did was grab up the glue pen and the pieces of the foil transfer sheets (from this month’s Mixed Media Kit) that I had leftover from my Mixed Media Bat and cover a slightly-larger-than A2 piece of the patterned paper from this month’s kit. I used a piece of the patterned paper because I wasn’t sure how much I’d be able to cover with the foil and this way anything uncovered would still match the rest of the card fronts.

I hadn’t originally thought about using the negative cut from the die-cut, but after I saw just how much was left, I decided it would make a fabulous card front too! So I pieced everything back into the die and added a rectangle of adhesive sheet so I could place everything down easier.

For the “Hello” card, I used another piece from the patterned paper from the kit behind the foil-covered leaves die-cut, and on the “Thinking of You” card I used a metallic silver-tan-ish piece of cardstock from my scraps pile – both cut to 3-7/8”x5-3/8”.

AutumnCards-03 AutumnCards-06

I grabbed up my partial pieces of cut patterned paper and a sheet of some gel printed paper I had with a lovely golden paint on it (that I also added a few areas of foil transfer to) and headed over to mass produce as many leaf die-cuts as I could using Tim Holtz’s “Skeleton Leaves,” BoBunny’s “Lovely Leaf,” and a couple of unbranded leaf dies from my stash.

I cut out more leaves than I would need for these two cards, but now I have some already made! Anyhow, I used the gel print leaves for my “Thinking of You” card front, just layering them up in a semi-fanned-out cluster. I glued them down in place, then I added a few of the pumpkins from the fussy cut sheets found in the kit then popped up on some foam squares. Before I added the pumpkins I wanted to give them a little extra color so I added a bit of “Crooked Broomstick” Distress Crayon.

For the “Hello” card front I just used two of the largest cuts from the “Skeleton Leaves” set, layering them with a bit of an offset, and glued them in place. Then, mostly since I had recently been thinking about buttons, I grabbed up my We R Memory Keepers Button Press and the smallest button-making pieces and made the button for the front of the card using a piece from one of the cut-apart sheets.

AutumnCards-04 AutumnCards-07

The only thing left is the sentiments! Both sentiments came from the BoBunny “Sentiments With Love” stamp set and were stamped using a few layers of inks and embossing powder. “Thinking of You” is stamped on a piece of cardstock that matches the cardstock behind the leaf background using clear embossing powder, “Fossilized Amber” Ink and Oxide, and some “Flickering Candle” Distress Crayon. “Hello” is stamped on a piece of green cardstock using “Rustic Wilderness” Ink, Oxide, and Embossing Glaze.

After both card fronts were finished, I just added them to the card bases I had prepared. I used green cardstock for the “Hello” card, and some silver, glitter cardstock (both from my scraps pile!) for “Thinking of You.”

And with that, the cards were done! Once all of the pieces were die-cut that I wanted to use, putting the cards together took no time at all!

AutumnCards-Sneak

Thank you for joining me here in my corner! I hope these two quick cards inspired you and gave you some ideas of what you can make using this month’s Cards, Tags, & More Kit – and a little from the Mixed Media Kit.

Stay Crafty, Friends


Did you get a kit? Share what you made in our Facebook Group!

Thank you for joining us here at Tres Jolie Kits!


Tres Jolie can also be found at:

Tres Jolie Facebook

Tres Jolie Instagram

Tres Jolie Website

Tres Jolie Subscriptions

Tres Jolie Blog

Tres Jolie YouTube

Tres Jolie Pinterest


Tres Jolie Insta Square Frame

In addition to the October 2022 Cards, Tags, & More Kit and the foil from the Mixed Media Kit (*from previous Tres Jolie Kits), I used:

Distress Ink “Fossilized Amber” , Distress Ink “Rustic Wilderness” , Distress Oxide “Rustic Wilderness” , Distress Oxide “Fossilized Amber” , Distress Mica Stain “Crooked Broomstick” , Distress Mica Stain “Flickering Candle” , Distress Crayon “Crooked Broomstick” , Distress Crayon “Flickering Candle” , Tim Holtz “Skeleton Leaves” Thinlits , *BoBunny “Sentiments With Love” Stamp Set , BoBunny “Lovely Leaf” Dies , Momenta “Leaves & Vines” Mat Die , Hampton Art Clear Embossing Powder , Distress Embossing Glaze “Rustic Wilderness” , Spellbinders Tool ‘n One , Tim Holtz Stamp Platform , Sizzix Big Shot Plus , cardstock from my scrap pile , unbranded small oak and maple leaf dies , Fabri-Tac , Art Glitter Glue , foam squares , *Prima Water Brush , *spray bottle

Tres Jolie Kit Club–Autumn Pumpkin Album–October 2022 Cards, Tags, & More Kit

Hey, y’all! Did you see the Tres Jolie Kit Club October Kits yet? Aren’t they all just fabulous?

I must admit, I love pumpkins! As decoration. I won’t eat or drink them, but I love pumpkins and gourds as décor; so I was super excited to see this adorable Tres Jolie Chipboard Pumpkin Mini Album in the October Cards, Tags, & More Kit!

I used the amazing “Autumn Moods” papers from Craft o’ Clock found in the kit, and some beads and mediums from my stash to add some highlights.

Oct-PumpkinAlbum-01

Check out my video to see how easy this album comes together! All you really need are the papers and chipboard found in the kit – and a trusty pair of scissors – the mediums and embellishments are in my “use ‘em if you got ‘em” category! You can easily leave the chipboard plain – which in itself gives a rustic appearance! (Note: If you do use unfinished chipboard, wipe it down with a damp cloth/paper towel, or a baby wipe! The chipboard is laser cut, so there is often some sooty residue!)


There honestly isn’t a lot to describe for this mini album. The first thing I did was get all the cut apart pieces, cut apart. If you have an electronic cutting machine and a scanner (or camera), you may be able to speed up the “fussy cutting” process. (The most common ones I’m aware of is the Silhouette PixScan mats, the Brother Scan-n-Cut, and I don’t know about Cricut, but I would think they would have something.)

The same can be done with the pumpkin shape – you can scan one of the chipboard pieces, double-check the size, and then just cut them out. Or, as I showed in my video, it’s easy enough to trace the shape lightly onto the patterned paper and cut it out.

Oct-PumpkinAlbum-09

To prepare my chipboard, I grabbed up my jar of TCW’s “Marigold” Stencil Butter and brushed it all along the edges of all of the pages and the front of the cover piece.

In addition to the Stencil Butter, I used some Halloween & Holiday Distress Crayons (2021 & 2022 releases) to add a little more shine, color, and highlights to the outside of the cover pieces. For the front cover, before adding the patterned paper, using my water brush, I added  “Crooked Broomstick,” “Decayed,” “Tree Lot,” and “Bubbling Cauldron” to color the leaves and vines, then a little “Burning Ember,” and “Jack-O-Lantern” to add a little shading on top of the Stencil Butter.

With the Crayons added to the front cover, I started the process of gluing all of the patterned paper down to the chipboard – adding my flip-outs and eyelets as I went along. On the front cover, I used some Diamond Glaze – making sure all of the swirls and curls were glued down – because it dries very clear and I knew I’d be coming back later to add a bit more decoration to the front. For every other page, I just used some Art Glitter Glue.

Oct-PumpkinAlbum-10

When I added the eyelet to the front cover, it was a little off-center, which left an edge sticking out. I trimmed off that edge, but I also wanted to cover the sharp metal, so I just dabbed on some 3D Matte Gel. Even though it wasn’t in the original plan, I think adding that little extra bit of texture worked out well, especially after I added some of the Distress Crayons to it!

I also did distress the edges of every page, only the patterned paper on the two cover pieces and the tops of the little pockets from the cut-apart sheets.

Oct-PumpkinAlbum-11 Oct-PumpkinAlbum-12

On a few pages, I wanted to add some little flip-outs, so I traced the shape of the album onto the patterned paper but left off the leaves and vines – just hand drawing the rest of the pumpkin top – and cut a tab at the edge that would be the hinge. I cut the tab to tuck into a slot I had cut using my craft knife before gluing the patterned paper down to the chipboard.

Oct-PumpkinAlbum-13 Oct-PumpkinAlbum-14

As I was working, I decided I wanted to add a little extra reinforcement to the hinging edges of the flip-outs to help keep the paper from weakening and potentially tearing with use. I didn’t use any type of special tape, just regular gift wrapping tape that I aged with some alcohol inks.

For this tape, I used Ranger “Sunshine” and “Eggplant” alcohol inks to go with the autumn colors of the patterned paper, but I have used Ranger’s “Caramel” and “Ginger” to create the more “traditional” aged tape pieces.

Oct-PumpkinAlbum-02 Oct-PumpkinAlbum-03 Oct-PumpkinAlbum-04

For the little pockets, I just used my Art Glitter Glue to hold them down, but for my tuck-in spots, I used my hot glue gun so I would be able to give them a little extra lift off the surface of the page.

Oct-PumpkinAlbum-05 Oct-PumpkinAlbum-06

You can use some of the longer tags, or cut out some stripes to create one or more belly bands for your album if you would like! For the page above, I just tucked the top and bottom of one of the longer tags under and glued them down to the page.

Oct-PumpkinAlbum-15 Oct-PumpkinAlbum-16

I added some of my faux vintage tape to the bends and edges of the envelopes since I decided not to glue their edges closed.

For the tag on the envelope above, I created some faux brad heads using a few small beads and Diamond Glaze.

Oct-PumpkinAlbum-17 Oct-PumpkinAlbum-18

With so many cut-apart pieces to choose from, it’s super easy to create layers in your clusters for some added dimension!

I used the “Decayed” Distress Crayon on the edges of all the cut-apart pieces (fussy cuts) to soften the white of the edges.

Oct-PumpkinAlbum-19 Oct-PumpkinAlbum-20

Now the only thing that is left is adding any photos or ephemera to this adorable pumpkin album!

Oct-PumpkinAlbum-21 Oct-PumpkinAlbum-22

And that was all there was to put the inside of this little pumpkin together!

Oct-PumpkinAlbum-08 Oct-PumpkinAlbum-23

Before I added everything to the book ring I was using, I added the final details to the cover pieces. On the front cover, I used a small paint brush to add some Micro Glaze to the patterned paper to give it a layer of protection so the two purple Distress Crayons (“Hocus Pocus” and “Fortune Teller”) I used wouldn’t just soak in and leave “stains.” After the paper was protected, I added my purple, spread it around some with my water brush, and let it dry. After that had dried, I added a couple different glass beads inside a few areas of the cover using my Diamond Glaze, and after that was set up, I brushed on some more Diamond Glaze and sprinkled on a few microbeads.

For the back cover, I gave the patterned paper a coating of the Micro Glaze, watered down and mixed together the purple Crayons on my mat, and just set the back cover on that mix letting the color go where ever it wanted!

When everything had dried, I added my pages to a book ring and used the same fine jute twine on the tags to tie one of the leaf charms to the ring.

Oct-PumpkinAlbum-07

Thank you for joining me here in my corner! If you haven’t had a chance to start playing with your kit(s) this month, I hope this project will give you some ideas of what you can do with your October Cards, Tags, & More Kit!

Stay Crafty, Friends


Did you get a kit? Share what you made in our Facebook Group!

Thank you for joining us here at Tres Jolie Kits!


Tres Jolie can also be found at:

Tres Jolie Facebook

Tres Jolie Instagram

Tres Jolie Website

Tres Jolie Subscriptions

Tres Jolie Blog

Tres Jolie YouTube

Tres Jolie Pinterest


Tres Jolie Insta Square Frame

In addition to this month’s Cards, Tags, & More Kit (from previous Tres Jolie Kits), I used:

**Disclaimer: Some [non-Tres Jolie] items may contain an affiliate link, allowing me to earn a small commission at no extra cost to you!**

TCW “Marigold” Stencil Butter , Finnabair 3D Matte Gel , Distress Crayon “Jack-O-Lantern” , Distress Crayon “Crooked Broomstick” , Distress Crayon “Decayed” , Distress Crayon “Tree Lot” , Distress Crayon “Bubbling Cauldron” , Distress Crayon “Burning Ember” , Distress Crayon “Fortune Teller” , Distress Crayon “Hocus Pocus” , Tim Holtz “Eggplant” Alcohol Ink , Tim Holtz “Sunshine” Alcohol Ink , Prima Water Brush , ReneaBouquets “Dark Purple” Glass Beautiful Beads , ReneaBouquets “Dark Purple” Glass No Hole Microbeads , Ranger Alcohol Ink Applicator Felt , Ranger Blending Tool , Tim Holtz Tiny Attacher , We R Memory Keepers Crop-A-Dile , We R Memory Keepers Craft Knife , JudiKins Diamond Glaze , JudiKins MicroGlaze , Art Glitter Glue , hot glue gun , Gorilla Mini Hot Glue Sticks , 3/16” eyelets , jute twine , dark purple no hole seed beads , transparent tape (AKA Scotch® Tape)

Reveal Day! Check out the October 2022 Tres Jolie Kits!

Hey, y’all! Welcome to (hopefully!) the crisp, cool days of October and the reveal of this month’s kits!! Make sure to get yours before they’re gone!

Be sure you are following us on all social media platforms (Tres Jolie Kit Club links at end of post; Corner Scraps links to the right) and have joined the Tres Jolie Kit Club Facebook Café so you won’t miss a single announcement or project created with these kits.

Kit Reveal Banner

The October 2022 Scrapbooking Kit is filled with the Rustic Dreams collection pack from the new-to-us company Memory Place. These papers are perfect for building up all of your projects! Fantastic floral, distressed wood, and grungy walls – you’ll find it all in this month’s Scrapbooking Kit! You will find a lovely assortment of patterned papers and perfectly coordinated embellishments.

Who’s ready to get spooky? This month’s Mixed Media Kit has a fabulous Tres Jolie MDF Bat Base ready for you to build your Halloween – or year-round! – décor piece! You’ll find a bottle of FolkArt Purple Glitter Paint, Tim Holtz Crackle Paint, DecoFoil glue pen and foil sheets, and some Lindy’s “Black Hole Black” Magical powder that is perfect for creating a beautiful, deep (DEEP!) black. And the best part? The kits can be used with each other!

In this month’s Cards, Tags, & More Kit, you’ll find a fabulous pumpkin-shaped Tres Jolie Chipboard mini album ready for you to decorate and personalize using the beautiful autumn papers and cut-apart sheets from Craft o’ Clock. There is so much you can do with this kit! After you’ve put your album together, you will still have plenty of material to make some cards, tags, or whatever you can think of! Who doesn’t like being able to create a variety of projects from one kit?

These kits are for the beginner to the advanced; from clean and simple – to mixed media maven. No matter your style, there is something for everyone. We know you are going to love it!


And now (drumroll, please) the October 2022 Kits from Tres Jolie:

Tres Jolie Insta Square Frame

Scrapbooking Kit

Tres Jolie Insta Square Frame

Mixed Media Kit

Tres Jolie Insta Square Frame

Cards, Tags, & More Kit


Don’t forget to stop by the Tres Jolie YouTube channel and see our video reveal for all our kits.

Love them, right?!?! You can still get one of your own (some kits are in very limited quantities). Become a subscriber and you will never miss out on our gorgeous, coordinated kits. Just visit Tres Jolie Subscribe.


The designers at Tres Jolie have created some amazing layouts and projects with this kit. Here is a little tease from me using the Cards, Tags, & More Kit:

Oct-PumpkinAlbum-Sneak

AutumnCards-Sneak

Oct2022CTM-MemoryDex-04

Please stop by the other designer’s blogs (listed below) and check out their sneak peeks:


We have a new mood board challenge for the month, with the following rules and guidelines:

Tres Jolie Mood Board

Tres Jolie Insta Square Frame

Place your entries in the October 2022 challenge folder on the Tres Jolie Kit Club Café Facebook page. This challenge ends on October 31st, 2022 at 11:59 pm CST. All entries must be in this folder to be eligible for the prize (to have everyone eligible to win, we are limiting the same winner to once every 3 months).


Did you get a kit? Share what you made in our Facebook Group!

Thank you for joining us here at Tres Jolie Kits!


Tres Jolie can also be found at:

Tres Jolie Facebook

Tres Jolie Instagram

Tres Jolie Website

Tres Jolie Subscriptions

Tres Jolie Blog

Tres Jolie YouTube

Tres Jolie Pinterest


All the designers will be revealing their projects on the Tres Jolie Blog all month long. Make sure you join us for tons of inspiration, including video and photo tutorials. Also, make sure you check out the newest Tres Jolie Chipboard designs that were just added to the store.

Tres Jolie Kit Club–October 2021 Moodboard–Texture ATCs!

Hey, all! Welcome back to my corner! I’m here today with my project for this month’s Tres Jolie Kit Club moodboard challenge—some ATCs that were inspired by all the yummy textures found on the moodboard! I used items from the October Cards, Tags, & More Kit, Mixed Media Kit, and lots of goodies from previous kits!

FRAMED-20211012_113258

I have some weaving on a couple of the ATCs, some lines inspired by the lines in the sand, and some sisal inspired by the wool! Check out my video to see how I put everything together and keep scrolling down to check out the moodboard, photos of each ATC, and a product list!


Video:


October 2021 Moodboard:

Moodboard-Oct21


Now for some close-ups to show all those textures!

FRAMED-20211012_094319

I didn’t have any plan going into this project, I just knew I wanted to really get some textures on my ATCs! The background of this ATC was created using some “White Sand” Finnabair Texture Paste and a texture tool by Making Memories that I’ve had for Y-E-A-R-S!!

FRAMED-20211012_094336

Here is one of the ATCS that has some weaving for the background and some sisal (in place of wool)! I just used my Lindy’s spray to turn the natural sisal into pink sisal!

FRAMED-20211012_094423

On all the ATCs I added some machine and hand stitching, used a black Stabilo to give some depth to the different layers, and added a Tres Jolie Chipboard button from the Cards, Tags, & More Kit—topped with Finnabair Metallic Flakes—for some shine.

FRAMED-20211012_094355

ATCs don’t have to remain vertical, and I liked a horizontal orientation for this ATC better! This was the ATC I completed in the video, so it had more dry time, which really makes it look like those Art Stones are just sitting on the card!

FRAMED-20211012_094440

I really love this palmistry hand from the Tim Holtz ephemera pack here! The sisal on this ATC was sprayed with the green Lindy’s before being tucked in, and, like all the others I have my stitching, Stabilo, art stones, and button added on.

FRAMED-20211012_094246

Thank you for joining me here in my corner! I hope you enjoyed these ATCs and they gave you some ideas how to use this month’s moodboard and what you can make using items found in the Cards, Tags, & More and Mixed Media Kits.

Stay Crafty, Friends!


Did you get a kit? Share what you made in our Facebook Group!

Thank you for joining us here at Tres Jolie Kits!


Tres Jolie can be found at the following places:

Tres Jolie Facebook

Tres Jolie Instagram

Tres Jolie Website

Tres Jolie Subscriptions

Tres Jolie Blog

Tres Jolie YouTube

Tres Jolie Pinterest


October Cards, Tags, & More and Mixed Media Kits:

cardsKit-Oct21

mmKit-oct21

In addition to items from the Cards, Tags, & More Kit & Mixed Media Kits (*from previous Tres Jolie Kits), I used:

*13@rts: “Rosalie” Ephemera Pack; *49 & Market: “Sage” Washi Strips & “Coral” Washi Strips; *StudioLight Jenine’s Mindful Art Collection Rice Paper RICEJMA22; *idea-ology/Tim Holtz: “Keepsakes” Ephemera Pack; Prima/Finnabair: 3D Matte Gel, *Texture Paste-“White Sand,” *Metallic Flakes-“Steampunk;” Ranger Sticky Embossing Powder; *Ranger/Tim Holtz: Distress Collage Medium “Matte;” *Prima Waterbrush; Simon Says Stamp Clear Embossing Ink; Liquitex Clear Gesso; DMC Embroidery Floss: 209 & 938; Light Purple Thread; Art Glitter Glue; UHU stic; Scotch ATG; Black Stabilo; Krylon Workable Fixatif; *palette knives; Martha Stewart Fringe Scissors; Making Memories Texture Tool

Tres Jolie Kit Club-November Mixed Media Kit-Autumn Cherubs

Hey, all! Welcome back to my corner!

Today I’m bringing you my first project of November using the Mixed Media Kit from Tres Jolie Kit Club and just a few staple items from my stash!

DSC_0025-FRAMED

For this project, I have put together a follow-along video to accompany it. Maybe I should say I have made a video that tracks my thought process since I tend to think about my steps as I go along! I hope it makes sense to you though and inspires you to create your own project!


Video:


DSC_0026-FRAMED

I grabbed up a piece of scrap black cardstock to back the parts of the Decorative Paper I wanted to fussy cut-out, used my gel medium to adhere and coat everything, and added some of the paint for color.

DSC_0031-FRAMED DSC_0027-FRAMED

I used the stencil on the background, first with some heavy gel for texture, then with some of the Matte Black Wax for contrast. I also added a butterfly to the clip and coated it all in the wax. You can also see where I added a final splatter of the Lucky Clover Distress Paint to the background.

DSC_0030-FRAMED DSC_0029-FRAMED

I quickly created some rolled flowers to cut out of the watercolor paper I had added the two Distress Paints to, you’ll find a JPEG below for your own use if you so choose.


Rolled flowers for personal use:

rolledflowers


DSC_0041-FRAMED

I hope you enjoyed this project and it gave you some ideas of what can be done with the items found in this month’s Mixed Media Kit! Be sure to check out Tres Jolie all over social media (links below).

Stay Crafty, Friends!


Did you get a kit? Share what you made in our Facebook Group!

Thank you for joining us here at Tres Jolie Kits!


Tres Jolie can be found at the following places:

Tres Jolie Facebook

Tres Jolie Instagram

Tres Jolie Website

Tres Jolie Subscriptions

Tres Jolie Blog

Tres Jolie YouTube

Tres Jolie Pinterest


November 2020 Mixed Media Kit:

MM kit

In addition to items from this month’s Mixed Media Kit (*from previous Tres Jolie Kits), I used:

*Little Birdie Black Gesso, Liquitex Matte Gel, Super Heavy Matte Gel, and clear gesso, scrap (abt. 5” x 12”) black cardstock, Canson XL Watercolor Paper (9” x 12”, 140 lb / 300 g), hot glue & hot glue gun

Tres Jolie Kit Club-October 2020 Mixed Media Kit-Autumn Centerpiece

Hey, all! Welcome back to my corner!

October is almost over, and here in the United States the leaves are in various stages of turning as we are head into our “holiday season.” For my final October project I decided to create a custom autumn center piece using those beautiful Dina Wakley paints and the Nuvo spray found in the Tres Jolie Kit Club October Mixed Media Kit.

DSC_0004-FRAMED

With a few inexpensive, store-bought gourds, pumpkins, and pinecones I was able to add a bit of paint and create a custom décor piece. Check out my video to see how it all came about!


Video:


On each gourd and pumpkin I blended two of the Dina Wakley paints; Eggplant with Tangerine, and Peacock with Lemon, except the smallest pumpkin, which is Peacock with Tangerine.

DSC_0008-FRAMED DSC_0005-FRAMED
DSC_0013-FRAMED DSC_0012-FRAMED

All-in-all this was a rather easy and straight-forward project. The paints are so easy to work with and blend together beautifully! Plus, there is not “right” or “wrong,” you just add the paint, layering and blending, until you are happy with the results.

DSC_0011-FRAMED

After my Dina Wakley paints dried, I coated all of the stems in some “Vintage Gold” Metallique Wax, then coated all of my gourds and pumpkins in some “Clear Rock Candy” Distress Crackle paint. I really love the frosted look it lends to the pieces.

DSC_0006-FRAMED

I wanted to do “something” with  those little pinecones of mine, and I decided to give them a nice coating of the Nuvo “Cocoa Powder” Sparkle Spray from the kit. It darkened them up and gave them some shine! As a final touch, to set that Sparkle Spray, I coated the pinecones in a layer of Mod Podge Clear Acrylic Gloss Sealer.

To create my finished cluster I used a super heavy gel to hold everything together.

DSC_0007-FRAMED

I hope you enjoyed this project and it gave you some ideas of what you can do with the mediums found in this month’s Mixed Media kit!

Stay Crafty, Friends


Did you get a kit? Share what you made in our Facebook Group!

Thank you for joining us here at Tres Jolie Kits!


Tres Jolie can be found at the following places:

Tres Jolie Facebook

Tres Jolie Instagram

Tres Jolie Website

Tres Jolie Subscriptions

Tres Jolie Blog

Tres Jolie YouTube


October 2020 Mixed Media Kit:

In addition to items from this month’s kit (*from previous Tres Jolie Kits), I used:

Prima/Finnabair Heavy White Gesso & *Metallique Wax “Vintage Gold,” Ranger/Tim Holtz Distress Crackle Paint “Clear Rock Candy,” & Distress Brush, Liquitex Matte Super Heavy Gel, Mod Podge Gloss Clear Acrylic Sealer, Foam Pumpkins & Gourds, small pinecones

Autumn Tag!

Autumn Tag!

Over at scrapbook.com Donna hosted a tag swap for Autumn and/or Halloween themed tags! For this swap I was partnered with Kathy and we did both themes! This is my Autumn tag, and here is the link to my Halloween tag! I’ll also be entering this into the Simon Says Stamp, “Anything Goes,” Wednesday Challenge!

This tag was mostly a matter of choosing where to place all of the flowers, leaves, and pumpkins! But for the background, I used the Echo Park 6×6 Woodgrain stencil with Ranger Texture Paste and randomly sprinkled Ranger’s Gold, Enchanted Gold, and Wendi Vecchi’s Tree Branch embossing powders! (I have no idea the origin of the paper I used!) After the texture paste was dry I used my heat gun on the powders! (If you do it while the paste is wet it will bubble, or so Tim Holtz warned, and I take what Tim says VERY seriously!! 😁)

After the background was created I just started arranging things and gluing them in place than added a bit of ‘vintage’ lace at the bottom and the last bit of my (unknown) velvet ribbon at the top!

Close ups of the cluster!

Products Used:

  • The leaves, the netting looking stuff, and the pumpkins I found in my local 99¢ store!
  • Echo Park 6 x 6 stencil: Woodgrain
  • Little Birdie: Vintage Elements – Symphony Flower Cherry; Vellum Elements – Poinsettia – Lemon; Vellum Boutique Flowers – Sunset Orange
  • Petaloo: Darjelling Collection: Wild Blossoms x 9 Med – Paprika
  • Ranger: Glossy Accents; Texture Paste; Embossing Powers – Gold, Enchanted Gold, & Wendi Vecchi Tree Branch
  • Fancy Pants Resin Flowers: Autumn Hues & Vintage Hues
  • Unknown velvet ribbon & unknown laces!
  • Unknown origin for the paper used on the background!