Hey, y’all! Whew! Made it to the end of July without getting too overheated! I hope you had a fan-tab-u-lous July and are getting ready to catch the August Kit reveals on Tuesday! (Hint: August is filled with beautiful products, just like every month!)
For my final July creation, I have a few –dex cards for you using this month’s Cards, Tags, & More Kit and the Botanical Stains from this month’s Mixed Media Kit. Be sure to check out the video to get the details about my thought process during all this, and to watch how long it takes for me to realize a pen leaked all over me!
To get the process started, I cut one of the white cardstock sheets into two, 4”x11” strips. I didn’t know exactly how tall my finished cards would end up being, so I didn’t want to limit my heights yet. For the patterned paper fronts on the cards, I kept the 3-1/2” width of the paper from the pack – to use as the height – then cut the width of them at 4”.
To start the decorating process, I grabbed up my set of Tim Holtz’s “Floral Trim” Stamps and some permanent inks. I had thought to try “Barely Beige” from Simon Says Stamp, but, as you can see, it really is Barely! So I did all of my stamping with “Chrome Yellow” Archival Ink. The color of the ink didn’t really matter all that much in this case since I was planning on adding embossing, but if I was just going to color in the stampings, using a light ink that is easily disguised tends to work best – unless you want the outlines to show that is!
After the stamping was done, I coated the patterned paper with clear gesso and started using the Botanical Stains as watercolors to fill in the designs. There are two ways I talked about in the video, you can stamp the image, add your color(s), then add your embossing, which would keep your embossing lines “clean.”
The second method is to just start out with your embossed image and then add your color(s). The embossing acts as a resist, and in this case, the botanical stains are easily wiped off, but if I were to do the same thing with more permeant mediums – such as markers or acrylic paint – I would save my embossing for last!
With all of the stamping, embossing, and shading finished, it was only a matter of attaching the ephemera, punching the bottom slots, and figuring out how much – if any – of the white cardstock I wanted to show.
For the card with the Tres Jolie Chipboard Butterfly on it, I first added white embossing powder to the chipboard, then used Glossy Accents to glue it down to the card front. I made sure there were no gaps between the butterfly and the card front so I would be able to fill in the wings with a thin layer of Glossy Accents with a few drops of the Marigold and Woad Blue Botanical Stains added in. Then I just let the colors in the wings mix and air dry before adding the little word snippets.
To create a grungier look and provide a bit of definition around the words and phrases on the “Focus On The Good” card, I started outlining the ephemera with a bit of black Stabilo pencil, then added in some of the “Black Bean” Botanical Stain to help spread it around.
With a little extra pencil around the edges, a spray of water, and some smearing using my fingers, this card was ready to set aside to dry!
I added Glossy Accents to a few of the word snippets or ephemera pieces to create a faux enameled look before adding them to the cards, as you can see on the “Dream” –dex card.
Then, for the top of the “Dream” card, I hand-drew a wavy line on the white cardstock, cut it out, and added a bit of the Woad Blue Botanical Stain. To help the stain spread out, I spritzed on a bit of water and then set the card off to air dry.
For this fourth and final card, I created a little cluster of ephemera, added the tab topper with a few mini staples, and glued down a few of my faux enameled word snippets! No extra mediums were added to the card front on this one!
Thank you for joining me here on the blog today! I hope you enjoyed these –dex cards and they gave you some ideas of what you can make using this month’s Cards, Tags, & More and Mixed Media Kits!
Stay Crafty, Friends
Did you get a kit? Share what you made in our Facebook Group!
Hey, y’all! Yesterday was the first day of winter (Winter Solstice). Today is the 4th-5th day of Hanukkah (the 5th day of Hanukkah will start at sundown tonight if my counting is correct – if I’m wrong, feel free to correct me!), Christmas is on Sunday, Kwanzaa starts Monday, and 2023 is ten days away! It’s been a year I tell ya! Don’t worry though, this isn’t my last project for 2022, I still have one more for you next week!
This week I made some ornaments for you using this month’s Cards, Tags, & More Kit and the Mixed Media Kit. Although, the Mixed Media Kit ornaments took a while to dry and haven’t been 100% completed. They weren’t part of my original plan – I had only planned on the three “double” ornaments made using the papers and cardstock from the Cards Kit. (Check out the video to get the details about all the hows and whys!)
My ornaments are also for the mood board challenge – what is a better holiday tradition than handmade ornaments or décor? For me, Christmas Trees need the ornaments my kiddos made – even if it has been close to a decade since the last one was made!
For the blog, I’m just going to talk about what your seeing in the photos, the video is where you can watch my thought process in action!
All of the clear plastic ornaments are 4 inches, and none of my inner, paper ornaments are over (approximately) 2-5/8-inches in diameter.
For this first ornament, I cut four circles, in each size, out of one of the sheets of patterned paper and one of the cardstock sheets from the kit. After I had them together – not all the way “closed” – I added a touch of embossing powder along the edges, then I glued a hat pin along the centers, using a small bead as separators.
I wanted to add a bit of a frosted look to this ornament, so I grabbed up some Finnabair Crushed Crystal and dabbed it onto the inside, keeping to the outer edges so the center would remain mostly clear, allowing the inner ornament to show. I used a combination of hot glue and 3D Matte Gel to hold my ornament in place – the hot glue to tack it in place long enough for the gel to dry – and after all the mediums had dried, I glued my halves together.
This ornament was my “experiment” with Foundry Wax – I had assumed the plastic would not hold up to the heat needed for the Foundry Wax, but I experimented so you wouldn’t have to! My official stance is – don’t use mediums that need to be heat set!
This second ornament is made up of four circles cut from one of the patterned papers and four circles cut from one of the cardstock sheets. I used a touch of paint along the edges, nothing that stands out, just a bit of White Pearl Metallic Paint. Once again, I didn’t close up my inner ornament until I had glued in what I was using to suspend it within the clear plastic ornament – in this case, a bit of gold (costume jewelry) chain. I added the gold Little Birdie wreaths to the sections that were made of the cardstock, used my hot glue and 3D Matte Gel to start the process of holding everything in place – then decided that wasn’t enough!
As I was looking at this ornament, I decided it need a little something more – not frosted like the first one – but something, so I grabbed up some glitter and added it to the top and bottom of the ornament, trying to create the look that the chain was coming out of the glitter “mound.” After I had the two halves glued together, I still thought there should be more, so I did something rare – I added glitter to the outside of a project! I just used some (regular weight) matte gel since it wouldn’t run the way glue might to hold the glitter in place, and set it off to dry.
For my third and final (actually finished) ornament, I used a small doily die to cut out four pieces of patterned paper and four pieces of cardstock, then glued them together the same way I did all the circles in the other two ornaments. Since this patterned paper is a darker and busier print, I only added a touch of the Bubbly Embossing Powder from this month’s Mixed Media Kit to the edges and wrapped the “Holly” and “Jolly” Tres Jolie Chipboard words around the center. The chipboard words are embossed in a layer of the Bubbly powder, and an extra layer of Lindy’s Holly Berry Red Gold on the bottom half-ish to create a bit of a gradient effect.
I was attempting to create the illusion that the inner ornament was floating within the outer ornament, so I used a length of fishing line to suspend it inside – just adding a few small beads to give it a little “extra.” I didn’t add any mediums to my outer ornament besides the bit of Vintage Gold Finnabair Wax – after adding a light coat of clear gesso – at the top where the hook will go.
Alright, as I stated in the video, I have a photo here for you of the two ornaments that had the Distress Mica Sprays and some glittery mediums in them – that took for-EV-er to dry! They are dry now, but they weren’t dry soon enough to do anything else with – that would also need time to dry! They were unplanned, I just needed something to experiment on before doing “things” to my planned ornaments! I’m hoping that I will finish these unplanned ornaments before next December!
Thank you for joining me here in my corner, I hope you enjoyed these ornaments and they gave you some ideas of what you can make using this month’s kits.
Stay Crafty, Friends
Did you get a kit? Share what you made in our Facebook Group!
Hey, y’all! Holiday gift shopping season officially begins tomorrow with Black Friday, followed by Small Business Saturday, and Cyber Monday! And with all the gifts being given, whether they are handmade or store-bought – or in the case of us crafters and artists, store-bought to be handmade – I have some gift tags made using the Tres Jolie Kit Club November 2022 Cards, Tags, & More Kit for you this week to add to gifts, give as gifts, or use as decoration!
Make sure you swing by and check out the video to catch the process of my tag-making!
When I started this poinsettia tag, I didn’t have any direction in mind to go, I just love poinsettias! I grabbed up my poinsettia embossing folder and a piece of red cardstock and got to work. As I was looking at the embossed image, I decided it need a little extra color, so I started adding embossing powder to the leaves and foliage – until I found myself done and thinking I needed to bring the poinsettia back into focus. So I added embossing powder to the petals and a touch of gold embossing powder to the center. This turned out to be a double-embossed poinsettia tag!
I wanted to mute the background a bit, so I sprayed on some Antique Linen Distress Oxide, trimmed down the edges of the cardstock, and started cutting out the edges of the petals. I had only planned on cutting just enough to give the petals a little curl, but as I went along, I realized if I added a back, I could make a little tuck-in spot – so that’s what this tag is; a tuck-in tag that would be great for a letter or gift card!
This tag is another double-embossed image. After I embossed the snow flurries on the cardstock, I used a water brush and my Salvaged Patina Distress Watercolor pencil to add a touch of color to the raised image. Then I topped it off with some Antiquities Embossing Powder – which, if you don’t know, is a matte finish powder – then added some Aqua Tinsel embossing powder to the (mostly) background around the flurries.
This tag also has some Antique Linen Distress Oxide to age it up, and I used my craft knife and small scissors to cut out the section of flurry so I could tuck the ephemera bit in.
This next tag was an easy-peasy mixed media tag – there’s only one medium on it! I used my candy stipe stencil and some Stickles from my stash to add some shine to the striped paper, roughed up the edge of the green candy paper, glued it in place, and folded the top over. Then I stitched on the gingerbread man tag.
I used all of the leaves and pine needles I had die cut out to create my little wreath for this tag. The lid on my Micro-Glaze jar was just the right size circle to trace so I would have something to follow to help me make sure my wreath stayed round and didn’t inadvertently become an off-center oval! (Which it would have if I had tried to free-style this wreath!!)
I just worked my way around the wreath layering and tucking in the pieces, trying to alternate the patterns so I wouldn’t end up with a lop-sided color scheme, then I glued down the little ornament pieces and set it off to dry.
This tag was created using the “Hello Deer” cut-apart piece from the paper pack, I just cut it up a bit more so I could layer the words up for some dimension and add a bit of extra color with some of the pink and red striped paper peeking out the bottom.
These last three tags are all just pieces stitched together – they also all have the largest rectangles laminated because I had originally planned on using them in my cookbook that was shared on November 3rd.
For all of the stamping, I used some Staz-On so I could stamp on the laminated surfaces as well as the paper. Then I just added some red baker’s twine to the tag holes where there was one and called it done!
I hope you are having/did have a fabulous holiday if you celebrate, if you don’t celebrate I hope you are having/did have a fabulous Thursday!
Make sure you swing by the Tres Jolie shop tomorrow and check out the Tres Jolie Kit Club Black Friday Deals!
Stay Safe & Crafty, Friends
Did you get a kit? Share what you made in our Facebook Group!
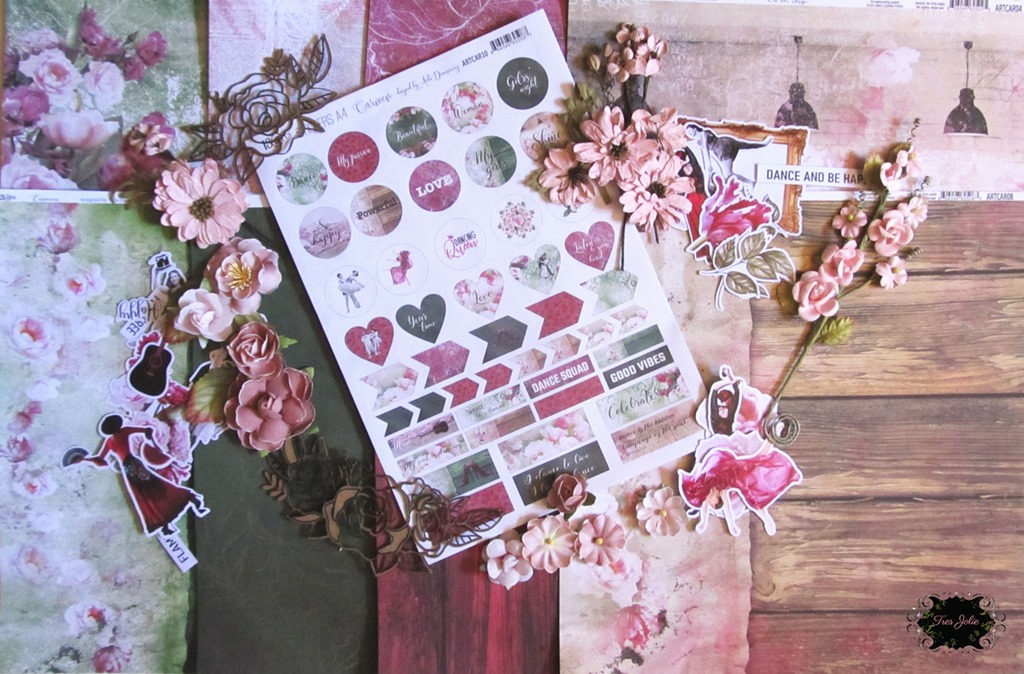
We’re halfway through June, and this week I have some Memory Dex cards for you that I created using items from this month’s Cards, Tags, & More Kit from Tres Jolie Kit Club and items from my stash – quite a few from previous Tres Jolie Kits! Check out my video to see what I did for each of the cards I made – then grab up your supplies and create your own Memory Dex card(s).
I had bought the Heidi Swapp Memory Dex Spinner quite some time ago, and had originally thought of grabbing up some spray paint and changing the color – I might still do that – but I grabbed it up for this project so I’d have someplace to put my cards when they were done, and to make sure I didn’t make them too tall to clear the bottom! Depending on what kind of “–dex” system you have – be it a spinner, a box, something vintage, or something custom made – you can get very creative on how your Memory Dex cards are made! If, for example, you have the Memory Dex Box, you don’t have to worry about height, only width! (After this project was completed I happened to find a vintage Rolodex® system that would allow cards to fit in without any height or width restrictions!! *happy dance*)
Video:
A closer look at the cards I made:
My Concord & 9th “Lucky” Die cuts the three layers – thick line and outline from one die, thin line from another – so I made two lucky cards. The thick line and outline were cut from a half sheet of the white cardstock that I hand-inked up using a variety of Distress Oxides from my stash. The white pieces were from another partial sheet of the KaiserCraft cardstock, and on some of those, like the butterfly, I added some Distress Oxide to give a pop of color. I didn’t have any particular plans when I set out to make my cards, I just cut a lot of pieces and started layering; generally ending with a few of the Eyelet Outlet jewels and/or some of the small Prima butterflies.
I made my “Imagine” card a shaker card by cutting a circle out of the pink striped paper from this month’s kit, adding a sheet of craft foam with a circle cut out as a spacer, and filling it with some of the beads and sequins from the Buttons Galore cube from Septembers (2021) Cards Kit. I just used some plastic from an old package of die cuts – I often save the harder/stiffer plastic packaging for just this reason! – and stitched it in place with some metallic silver thread. My “Imagine” as a layer of the “Gamboge” Stencil Butter on it from the Mixed Media Kit and, while it was still wet, I sprinkled some Lindy’s Magical Powder on and spritzed it with a little water.
These two cards were really a couple of “let’s see how these parts work together” cards! The “grateful” card has a slot cut from the top (the label die from Tim Holtz’s “Stitched Slots”) that I just tucked a couple of large die cuts into after giving them a little color. The flower is just inked with some Distress Oxide, and the leaves have some Lindy’s Magical’s sprinkled on them. I cut the card from my inked KaiserCraft sheet, backed it with some of my leftover handmade paper, and added some stamping, jewels, & butterflies. The “grateful” had originally been stamped, but it didn’t show up very well, so I traced over it with a gel pen.
I wasn’t sure when I cut it if I would use the Bird Branch die, but I added some Magical’s, let it dry, and thought about what I’d do with it while working on other cards. Eventually, it came time to play with it, and I found that I liked how it looked with the oval frame, but the frame needed some color too! So on went some Magical and PearlEx powders. The card is another cut from my inked sheet and has some of the “Grecian Gold” Modeling paste (from the Mixed Media Kit this month!) dabbed on with my finger for a little shine. Then, to add a bit from this month’s Card’s Kit, I popped on a tab punched from one of the papers, added some orange jewels, and a Tim Holtz “Small Talk” sticker from my stash.
These two Memory Dex cards were made from a piece of scrap cardstock that I practiced a couple of mixed media ideas on. I have some texture paste, mica powder, and Magical powder on the base tag/Memory Dex, then I stamped the butterfly from the stamp in this month’s kit, I cut a tag-shaped frame out from my inked paper, layered a couple of more tags vertically, popped in a flower, added my jewels and phrase.
While I was doing all of my cutting, I decided to make a round Memory Dex card, so I used one of my circle dies to cut out the inked stenciling I had done (stencil from this month’s Mixed Media kit!). I stamped on the butterfly and phrase, attached a rectangle bottom, and ran it through my sewing machine a few times. The final touches were some Distress Oxide around the edges and the jewels.
When I first started this card I had thought of just attaching the pocket to another card, but as I was putting it together, I decided that I much preferred the pocket as the card! The top slot is backed by some pink cardstock from my stash, and the rest of the slots are back with white cardstock – what had been the original Memory Dex shaped card. The Tim Holtz “Stitched Slots” die is the perfect size for the spinner, I just punched the slots at the bottom and popped it right on. I used some of the smaller tags, cut with the tag dies from this month’s kit and cut from this month’s papers, to stick on some “Small Talk” phrases and slipped them into the slots. They don’t weigh a lot, so the friction between the papers is enough to hold them in place when they are upside down on the spinner. I then just added some of my die-cut hearts, outlined them with a yellow gel pen, added the label, and another “Small Talk” sticker.
The card with the bicycle stamped on it was probably the fastest to put together because all I did is layer up the different circles I had already cut out! I used the pink striped circle to fill the circle in the card base, then put the layers through my Sizzix using the dot embossing folder that had come with the machine, added that half-circle with some Lindy’s Magical’s stenciled on, and then all of the other plain circles. To add some contrast to all those circles, I popped on one of the smallest tags, then stamped on the bicycle and added the butterfly and phrase.
My “Spring” card was my first of the batch! I trimmed an inch off the width of a 3”x5” index card so it would fit on the spinner, used the stamp from this month to just get the flowers to peek out from behind the tag, and splattered it with some “Lemon” Glossy Spray. The tag is from some pink cardstock I had that was already adhered to an adhesive sheet. I used the thin scraps from my Folio at the beginning of the month, and just randomly layered them on the adhesive. I then cut the tag using the next to largest die in the set, peeled the protective paper the rest of the way off, and brushed on some Finnabair Mica Powder. Then I just finished up the details with some flowers, jewels, a butterfly, and the small tag.
Lastly, my “document” card. The die-cut word was too long to fit on the Memory Dex Spinner, so I cut it where it could be hyphenated, clipped off an end of the cross-mark on the “t” to use as the hyphen, and layered up a couple tags and a tab on the base card. I used some of the “Grecian Gold” Modeling paste on “document,” the stars and diamonds are from my Concord & 9th Lucky Die Set, there’s a little stamping, and a few jewels, and this card was done!
Thank you for joining me here in my corner! I hope you enjoyed seeing these cards and they inspired you to make your own Memory Dex card or two!
Hey, y’all! Welcome back to the Corner Scraps blog!
This week I have a mixed media canvas I made using both the March Mixed Media and Scrapbooking Kits from Tres Jolie Kit Club. The coordination between the micas and the papers was phenomenal! How could I resist using them together?!
I grabbed up a 9” x 12” canvas panel from my stash and started cutting and gluing and embossing! Check out my video to see it all come together.
Video:
Don’t be afraid to use your scissors! Chipboard, flowers, paper…nothing is immune from being cut, altered, and put back together! This project wasn’t too difficult, most of the time spent on it was spent drying or waiting for it to dry.
We have a new mood board challenge for the month. The rules are as follows:
You can create any type of project for the challenge.
You MUST say what you were inspired by.
You MUST include the twist in your design: OLD WORLD ELEGANCE.
We would love to see you USE AT LEAST ONE of Tres Jolie’s products on your projects but it isn’t required to play along.
It MUST be a new project.
Isn’t the mood board this month just beautiful?
Place your entries in the March 2022 challenge folder on Tres Jolie Kit Club Café Facebook page. This challenge ends on March 31st 2022 at 11:59 pm CST. All entries must be in this folder to be eligible for the prize (to have everyone eligible to win, we are limited the same winner to once every 3 months).
Now, some close-ups of the different parts of my canvas:
Here are some images of the mix of embossing powders I made-this month’s Ultrafine Gold, April 2021’s Patina Bronzed Copper, and my Ranger Triple Thick from my stash-put on in two layers, then “cooked” many, many times to (purposely) create some roughness and knock down some shine.
In addition to embossing my chipboard, I added embossing to most of the paper pieces, including the background paper, to give some extra texture and interest to the canvas.
I used the lightest rose mica powder, mixed with the Liquid Color Fluid Medium and watered down, on my background paper. I also used the darkest rose mica, the (I think) next to lightest rose, and both green micas as paints to really make the background flowers and leaves pop as seen in the video.
This main cluster is the biggest reason I am going to wait a week to give my canvas the coat of Triple Thick Clear Glaze. There are so many layers and “globs” of gel mediums and lots of water, and more gel medium! I don’t want moisture getting stuck behind the glaze! I have so many layers of paper and liquid matte medium I don’t know if the moisture would make it out through the back! Better safe than soggy and foggy!!
I didn’t set out to use these beads, I was just digging through my stash when I cam across the piece of costume jewelry and the bags of pearl beads. I don’t even know where everything came from, but I thought it was fortunate that I had those dusty rose colored beads to match the papers and micas! (I forgot to mention it in the video, but I used E6000 on the necklace.)
The Burnt Sienna Liquid Acrylic from last month’s Mixed Media Kit is the perfect color to add some shadowy and vintage effects. Don’t forget, if you decide to use a heat gun to “play” with your pink Prima flowers, they start curling up quickly!
Thank you for joining me here in my corner. I hope you enjoyed this mixed media canvas project gave you some ideas of what you can do with this month’s Mixed Media and Scrapbooking Kits and inspiration for this month’s mood board!
Stay Crafty, Friends
Did you get a kit? Share what you made in our Facebook Group!
Thank you for joining us here at Tres Jolie Kits!
Corner Scraps can be found at the following places:
This week I have my Tres Jolie Kit Club mood board inspired project for you – a junk journal using this month’s Scrapbooking Kit! I had an old book cover that I had altered a while ago, just waiting for the right papers to come along to make a junk journal, and the “Carmen” line from 13@rts (13 Arts) was the perfect fit! I really love the combination of the dark pink with the deep green that is in these papers.
I didn’t make a “How to make a Junk Journal” video for this project—there are tons of how-to videos to be found on YouTube already—I just go over what I’m doing to help give you some ideas of how this month’s kit can be used. Check out my video to see my thought process!
Check out this month’s Mood Board! Isn’t it fabulous? The twist this month is “Cabaret Life” – grab up your papers and glues and join in! Place your entries in the February 2022 challenge folder on Tres Jolie Kit Club Café Facebook page. This challenge ends February 28, 2022 at 11:59 pm CST. All entries must be in this folder to be eligible for the prize (to have everyone eligible to win, we are limited the same winner to once every 3 months).
Challenge Rules:
You can create any type of project for the challenge.
You MUST say what you were inspired by.
You MUST include the twist in your design.
We would love to see you USE AT LEAST 1 of Tres Jolie’s products on your projects but it isn’t required to play along.
It MUST be a new project.
I mixed up four different embossing powders (check the product list at the end of the post!) and added that mixture to the Tres Jolie Chipboard from the kit. I then added it as little tuck spots on the back cover and front page of the journal.
The spine of this cover was in pretty sad shape when I originally decided to do the alterations. I had to layer up some linen hinging tape and book binding tape to hold everything together again, and the outer layer still wanted to peel off – by the fabric and canvas layers I added to my junk journal gave this cover new life.
In addition to the “Carmen” papers, I have some printables I created and some tea dyed papers I made in here. That music fabric in the above photo has one of the printables printed on it!
Some of the pages in my journal are dyed with various pink inks/sprays. I have stitching throughout, along with little tuck spots made from corners or layers of paper and fabric/lace. If I wasn’t using bits of the ephemera pack in stitched clusters, I layered them up on a page to add some interest and detail.
In addition to the ephemera pack for bits of detail, I used the cut apart page from the “Carmen” paper pad. After I cut out the piece I used, I distressed the edges with scissors and added some “Frayed Burlap” Distress Ink. I think one of my favorite things about junk journals is the freedom they give to the creative process. A lot of the time I would just grab up some of the bits and pieces and just start layering them up – without trying to think if it looked “right.” More often than not, NOT overthinking created easy and wonderful results!
Although I love the creative process of creating junk journals, they are journals! So I also make sure to leave lots of room for journaling – blank pages, tags, and lots of tucks and folds to hold loose bits.
Thank you for joining me here in my corner, I hope you enjoyed this project and it gave you some ideas of what you can make using this month’s Scrapbooking Kit!
*StudioLight Rice Paper (RICEJMA22); *Lindy’s Gang: “Terra Cotta Rust” & *“Bougainvillea Red Teal” Embossing Powders; *Prima “Blossom Bud” Fluid Chalk Ink; Ranger Antiquities “Frosted Crystal” Embossing Powder; Finnabair: *Elementals Resist Canvas (Prima Item# 960698), “Manuscript” & “Ornate Lace” Stencils, “Rusty Red” Matte Wax, & “Red Wine” Metallique Paint; *P13 “The Four Seasons: Spring” Stamp Set (this month’s Cards, Tags, & More Kit; in video, not actually used in journal); StazOn “Jet Black” (in video, not actually used in journal), Shimmerz: “Ruby” Spritz & “Pink Stilettos” Coloringz; Plain Jane Simply Sheer “Taupe;” Dylusions “Funky Fuchsia” Ink Spray; Tim Holtz “Tea Dye” Distress Oxide Spray, “Kitsch Flamingo” Distress Embossing Glaze, “Frayed Burlap” Distress Ink, Jute Sting, & “Symphony” Tissue Tape; Scotch: Expressions “Pink” Tape & ATG; Fabri-Tac; Art Glitter Glue; Simon Says Stamp Clear Embossing Ink; *DecoArt “Black” Gesso; We R Memory Keepers: Corner Chomper, Crop-A-Dile, & Crop-A-Dile II; book binding cloth; book binding tape, double-sided tape; Linen Hinging Tape; old book cover; Liquitex Matte Super Heavy Gel; tea dyed papers; printables created by me; piano roll paper; old news paper; old book pages; Recollections Blank Cards & Envelopes; various fabrics and trims from my plethora of fabrics and trims!; pink sewing thread; white book binding thread; large needle; awl; We R Memory Keepers Foam Mat (or something to use as a “cushion” for your awl—stack of paper, phone book, folded towel, etc.); chain; *Charm (this month’s Cards, Tags, & More Kit); pink threads; black thread
Hey, all! For my last January project for Tres Jolie Kit Club, I have some Quick & Easy Cards using this month’s Cards, Tags, & More Kit. A little cutting, layering, and gluing later and viola, a few cards all ready to go! Check out my video to see how easy cards can be!
With the coordinating sticker sheet and layered stickers in this month kit, putting a few cards together didn’t take much time at all.
Video:
I cut the base paper 4.75”x6.25”, attached it to my card bases and started the layering process.
I sorted through all the bit and pieces and played around with different layouts and embellishments until I had the cards together the way I wanted. On the Tres Jolie Chipboard butterflies, I added some “Oakleaf Olive” embossing powder and some “Metallic Black” wax.
Adding some of the layered stickers from the kit is a quick way to give your cards some dimension—and they have some phrases on them to help you get your meaning out!
Using a hot glue gun made assembly go even faster! Even though most of the embellishments were stickers, if I wanted to add a little extra support I put a bit of hot glue down. The stickers go great on the envelope as well — giving it it’s own special touch!
Thank you for joining me here in my little corner! I hope you enjoyed this project and it gave you some ideas of how you can use this month’s kit to make yourself some quick and easy cards to have on hand!
Stay Crafty, Friends
Did you get a kit? Share what you made in our Facebook Group!
These interactive cards were fun to make! I go over the Magic Windows Slider card in my video, but I used this video to help me do it. I did not show the assembly of the Iris Card because the woman who sells the cut file has her own video you get a link to when you purchase the cut file.
Video:
First I’ll go over the few details about the Magic Iris card that I have.
The original size of the cut file can fit all of the parts on one 8.5 x 11 sheet of paper. I enlarged mine to the point where the top ring – the one cut from the Graphic 45 paper – was 6-7/8”. I actually enlarged it “by sight” until the inner circle was large enough for the candy canes to fit in. I do have a tip for people who are cutting this using Silhouette Studio and a Cameo! Make sure of your cut lines before hitting “Send”! On the shutter pieces, I had to select the shutter piece and the two squares that make up the tabs and weld them so they would only cut on three sides as intended! (The owner of the cut file has a video for Cricut users!)
I used the candy cane, Tres Jolie chipboard piece from the kit as my iris center, and kept it simple, just coating it in some embossing powders and setting it on some glitter coated cardstock! I sewed along the reindeer paper with some gold thread, and added the gold trim to cover the little bit of seam on the solid cardstock I pieced together to make my card base. To give a little “oomph” to the tab, I glued down one of the Graphic 45 chipboard pieces. This card is now ready for personalization!
This next card is made using a die I’ve had for a while, and in my video I said I got it from Amazon, but there is no packaging…so maybe I didn’t! I’ve had it a while, but this is the first time I’ve used it!
I just thought it was so awesome being able to change the image on this card! And to really make is show, I made sure to have a lighter paper as my “revealed” image so it really popped out!
Just like with the Magic Iris card, I used a metallic gold thread to stitch the patterned paper to my card base. Then I had to add the bling because I forgot to take into account the movement under the surface! When I went to test the mechanism, it wouldn’t turn! I used a craft knife to slit enough of the stitches to allow clearance, then added the bling as a “cover.” I used a piece of the Graphic 45 chipboard in the center – trimmed down a little – added bling to the “lever” and finished off with adding two gems to the goggles on the chipboard Santa’s hat.
Thank you for joining me here in my corner! I hope you enjoyed these two interactive cards and they gave you some ideas of what you can do using this month’s Cards, Tags, & More Kit.
Stay Crafty, Friends
Did you get a kit? Share what you made in our Facebook Group!
For my final Tres Jolie Kit Club project of October, I’m bringing you an “Anything Book.” I call it an anything book because you could easily use it as a mini-album, mini art journal, mini notebook, etc. Personally, I really wanted a mini art journal with pockets and flip-outs.
My inspiration for this project came from Pinkstrawberryz “No Binding Easy Mini Album.” It was just one of those “You might like” recommendations that randomly popped up on YouTube, so I decided to have a look! As soon as I watched the video I had ideas brewing! Check out my video to see how I put my Anything Book together. (Below the video you will find photos of the inside and the measurements for my pages.)
Video:
Here is a look at some of the pages I started preparing:
After my book was together I used clear and white gessoes to prepare the pages. With my gesso dry, I was then able to start laying down mediums to prepare working backgrounds. I just grabbed up various paints and started laying them down! To make the book cover, I grabbed up some burlap trim, cut it to length, and stitched it in place during assembly.
Some areas have acrylic paint and some have watercolors. I started drawing on a couple of the pages—flowers in some places, and this face above. I also grabbed a few pens and outlined the flowers from the paper pack.
I didn’t always use a brush with my paints, some times I just used a palette knife to scrape it on! I also grabbed up some of my Dina Wakely Scribble Sticks and added some…well…scribbles! I have a short flip-though of my mini art journal (as far as it had been “finished” at the time of filming!) over on my Instagram post for this project.
Measurements (in order of page in book):
In my video, I talk about the process of making the cover using some Amazing Cast Resin and the embossing folder!
Thank you for joining me here in my corner! I hope you enjoyed this project and it gave you some ideas of what you can make using items found in this month’s Cards, Tags, & More Kit!
Stay Crafty, Friends
Did you get a kit? Share what you made in our Facebook Group!