Tres Jolie Kit Club & Clear Scraps Collaboration!

Hey, y’all! Have you heard the news this month? Tres Jolie Kit Club has teamed up with Clear Scraps!! How awesome is that?!?! Have you had a chance to check out the other (Tres Jolie & Clear Scraps) designer’s project this week? If not, go check them out!

Last week you saw a couple of Clear Scraps wooden blanks I used while playing with color, this week is my “main” or “feature” collaboration project – Tres Jolie Scrapbooking & Mixed Media Kits + an acrylic “Wave” album from Clear Scraps! As soon as I opened my package from Clear Scraps, I knew, knew, what I had to do with the album! It was a real test to my ADHD to finish other projects I was working on – that had a time limit – before tearing into the Tres Jolie Scrapbooking Kit and the Clear Scraps Album! Are any other ADHDers out there? You know what I’m talking about, don’t you? Rolling on the floor laughingRolling on the floor laughing

I have a tutorial video for you too! I do my best to explain everything I’m doing and how I’m doing it! Make sure you check it out so you can make your own file-journal-album type thingy! Maybe it was because here in the States it was tax season when I started it – all I know is I really wanted to create something pretty and functional to help me get organized (Rolling on the floor laughing) for next year!

apr2023-collab-waveAlbum-08


I can’t give a “good” answer to why I wanted to add a hidden pocket/faux window to the cover, I just did! Thinking back, I believe it started with the window idea and morphed into not wanting the window to actually show what was inside – so I made a pocket instead of just covering the backside of the front cover.

acrylicAlbum-collab-sneak apr2023-collab-waveAlbum-04

I found a round lid from a container I had been saving, and it was the perfect size for my window! I just traced the lid on a piece of scrap paper to use as a mask while stenciling, and traced the lid onto the section of patterned paper I wanted to use for the “backing.”

To really make sure I had good adhesion, I mixed some 3D Matte Gel from my stash with some of the “White Sand” Texture Paste and “Fairy Wings” Sparks paint from this month’s Mixed Media Kit before adding it to the cover using the Craft o’Clock stencil also found in this month’s Mixed Media Kit.

I used JudiKins Diamond Glaze to attach all of my paper to the acrylic pages throughout the project. Diamond Glaze has a strong hold and it dries clear – well it dries clear unless the paper “soaks” it up! I wasn’t sure exactly how the Diamond Glaze would work with the paper and acrylic, but it was the best I could think of to hold everything together – so I used it and hoped for the best! In the end, I’m happy with my choice! Even though the glue dries clear, it leaves darker, water-stain-ish areas on the paper – and I’m okay with that because it just adds more aging to the entire project!

apr2023-collab-waveAlbum-07 apr2023-collab-waveAlbum-13

I glued the patterned paper circle on first so I could make sure it lined up with the un-stenciled area on the cover, then I added the sheet of patterned paper I had picked to cover the entire inside of the cover. The circle and the floral print are from the same 12×12 sheet, and, shockingly, I had thought this through! With the floral print showing through the cover, the tea-stain look – the same pattern for my window circle – is what shows within the pocket!

After I had my faux window pieces in place, I cut out the piece I wanted to use for the pocket and cut an extra strip of patterned paper out for the (inside) top edge of the pocket to reinforce it. When it came time to attach the pocket, I laid a bone folder in the center of the acrylic cover before adding the pocket. This creates just enough gap to keep the pocket loose enough to remain functional.

To finish off the details on the cover, I added some of the flowers and foliage I had fussy cut from a few of the 6”x6” sheets of “First Kiss” papers in the scrapbooking kit, splattered on some of the “Ginger Magic” Sparks paint from the mixed media kit, and then gave everything a light-medium coating of Krylon Triple-Thick Crystal Clear Glaze for protection. Once the Krylon had dried, I added a few of the 49 & Market Epoxy Stickers – adding some Diamond Glaze for extra adhesion since they are on the cover.

The back cover is far simpler – in fact, all of the other acrylic pages are! For the rest of the acrylic pages, I started out with some light stenciling using the “Ginger Magic” Sparks paint, but as I went along, I wanted to try and add some dimension to the pages, so on the side that was still “plain,” I added random stenciling, reverse stenciling, and/or splotches using the “Fairy Wings” Sparks paint. On the sides that had the “Ginger Magic” stenciling, I sprayed a light coating of Krylon Triple-Thick Crystal Clear Glaze to protect the paint, but I didn’t need to add the Krylon to the “Fairy Wings” side since that would be where my pockets were going to get attached.

apr2023-collab-waveAlbum-02

Besides the vintage feel of the “First Kiss” Collection, the “vintage” tape was why I didn’t mind the “water stains” caused by the Diamond Glaze – I had already planned on making everything “old”!!

I used some Duck Brand Clear Laminate and alcohol inks to create my aged tape – because I have had a roll of Duck Brand Clear Laminate sitting around for about six months! The laminate is self-adhesive, not too thick, and flexible! Plus it is in a 12” wide roll, so I inked up a 6”x12” section, then cut it into four, 1-1/2” wide strips for the bottom edges of the pockets (Packing tape or gift wrapping tape can be used just as easy to create vintage tape!). This gave some reinforcement to the edge of the pocket that the holes went through and the bottom “hinge” of the pocket.

apr2023-collab-waveAlbum-09 apr2023-collab-waveAlbum-12

For the pocket construction, each page is created using one of the 12”x12” sheets. I determined what sections of the pattern I wanted to show, traced the wave edge of the acrylic sheet where it needed to go, made light marks if needed at the straight edge, and added 5” from the straight edge for the pocket front. Where the straight edge of the acrylic page was marked is where my first score line went, then I added a second score line 1/2” over on the front of the pocket. The reason for the two score lines was simple. The first one is the main fold line of the pocket, but because I needed to account for the book ring holes, I added a second one to create the functional part of the pocket.

In that 1/2” section, I added some double-sided tape and glue and sealed it up – leaving me with a nice sturdy edge to punch my holes though!

For the accordion fold edges of the pockets, I cut two, 4-1/2”x2” strips for each pocket – eight in total – scored at 1/2” and 1-1/2”, then added a 1”x5” strip of the laminate (without alcohol ink) between those two score lines. I added the extra 1/2” to the laminate so I could fold it over the top of the accordion edge to give it some extra strength. After the laminate was in place, I added a score line right down the center of the strip, then folded everything at the score lines to create a W.

apr2023-collab-waveAlbum-15

I decided to add a separator to my pockets – to create two sections inside – so all I did is grab up a couple of 8-1/2”x11” pieces of cardstock from my stash and cut them in half. This gave me the four dividers I need for all four pockets. I added a strip of patterned paper to the inside of the front (straight edge) of the pockets and the top, front edge of the divider to reinforce them.

I checked and re-checked that my divider was the right size, attaching one accordion side, doing a dry (glue-less) assembly, and marking how much needed to be shaved off to make sure my divider didn’t buckle in the pocket. Then, after I was sure everything would fit, I added my second accordion side, did another glue-less assembly (because it would be far easier to remove the accordion ends and make a new divider now!), quadruple checked for fit, then finally I glued the divider to the accordion sides and set it off while I worked on the closure.

glue

I have added this quickly-created graphic to show you where the pocket and divider are glued to the accordion sides. The pink-ish lines represent the edges for adhesion – hopefully, this is a far better explanation than I could have ever done trying to use words!!

apr2023-collab-waveAlbum-11 apr2023-collab-waveAlbum-10 apr2023-collab-waveAlbum-01

For my pocket closures, I wrapped a 1-1/2” wide by 5-3/4” or so long strip of patterned paper with some of the laminate – cut in a 4”x3-3/4” square. After getting my magnet in place with a little Fabri-Tac, I add some of my homemade vintage tape, then the 4” width gets wrapped around the latch (1-1/2”+1-1/2”=3” plus an extra inch for overlap), and the edge of the latch (with the rounded corners) lines up with [one of the] the 3-3/4” edges – this leaves about two inches of the paper unwrapped, making it easier to ensure good adhesion when glued into the back of the pocket! Or, at least in my thinking because I find it easier to glue paper to paper than laminate to paper!

Starting about two inches from the edge of the latch with the magnet, I add about 1-1/2” of score lines – my scoreboard has 1/8” spacing, so I made about 12-13 score lines. I had cut the laminate wrapping the closure just long enough to reinforce all the score lines on the latch and to go about 1/2” or so past the last score line. Since some of my score lines are “inside” the pocket, this also ensured that all areas of the latch “outside” the pocket had the laminate protection. Then, all that was left to do is glue the latch in place – center along the back – using some Fabri-Tac because of the laminate, add a couple of clips at the edge to hold it together while the glue dried, and add my paperclip magnet catch to the inside of the front of the pocket.

I used jumbo paperclips and glued them in vertically so that as the pocket got full and expanded, the magnet would be sure to catch on some part of the paperclip!

Once my latch and paperclip were in place, it was finally time to glue the center divider and accordion sides in!

apr2023-collab-waveAlbum-14

Although, for my pockets, the eyelets are both decorative and functional, I consider them only decorative because adding a little glue between the accordion folds would create the same effect – to help create the V shape when the pocket opens. And, honestly, you don’t really need to add glue or eyelets, the pocket isn’t going to not open in a V, but I think it does help to keep the “strain” [of the accordion folds] off the front of the pocket, if that makes sense.

And, for some extra decoration and a way to hold more papers without covering up all the stenciling I did on the acrylic pages, I made up a few hidden or covered paperclips! (You can search YouTube for “covered paperclips” or “hidden paperclips” to get a list of different videos!)

apr2023-collab-waveAlbum-06 apr2023-collab-waveAlbum-17

Thank you for joining Tres Jolie and Clear Scraps this week! We hope you have been enjoying the collaboration projects and they have given you some ideas of what you can create using Tres Jolie’s beautiful kits and fabulous Clear Scraps products!

Stay Crafty, Friends


Did you get a kit? Share what you made in our Facebook Group!

Thank you for joining us here at Tres Jolie Kits!


Tres Jolie can also be found at:

Tres Jolie Facebook

Tres Jolie TikTok

Tres Jolie Instagram

Tres Jolie Website

Tres Jolie Subscriptions

Tres Jolie Blog

Tres Jolie YouTube

Tres Jolie Pinterest


Tres Jolie Insta Square Frame Tres Jolie Insta Square Frame

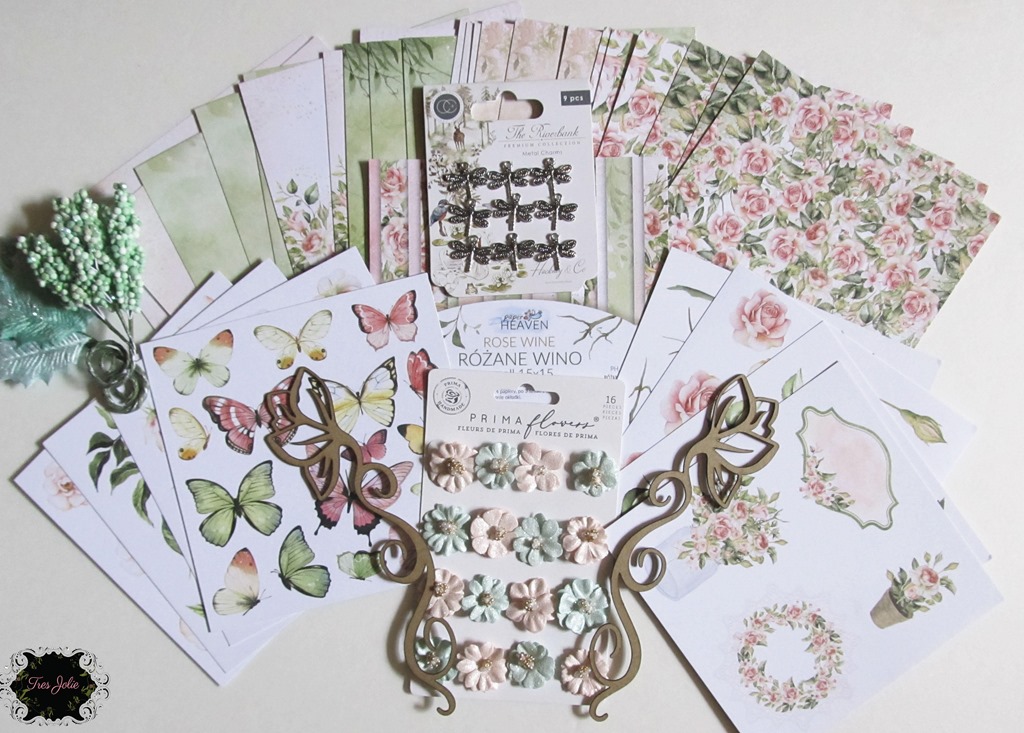
In addition to this month’s Scrapbooking Kit & Mixed Media Kit, I used:

Clear Scraps 5.5” x 11” (approx.) “Wave” Acrylic Album, We R Memory Keepers Crop-A-Dile, We R Memory Keepers 3-way Corner Punch, Ranger Alcohol Ink “Ginger,” “Latte,” & “Caramel,” Ranger Alcohol Ink Blending Solution, Finnabair 3D Matte Gel, Duck Clear Laminate, EK Tools Score Board, double-sided tape, Art Glitter Glue, Fabri-Tac, Krylon Triple-Thick Clear Glaze, eyelets, hole punch, book rings, jumbo and standard paperclips

Reveal Day!–Tres Jolie Kit Club April 2023 Kits!

It’s the first of the month, and you know what that means?!?! It’s Reveal Day! And for April, you will find a wonderful assortment of papers and embellishments ready for you to get your Spring projects going full swing!

Flowers are popping, trees budding, and pollen is in the air – best to stay indoors and craft than go outside and sneeze! Make sure to get your kits before they’re gone! Or, better yet, subscribe to Tres Jolie Kit Club so you will never miss out!

Be sure you follow us on all social media platforms (Tres Jolie Kit Club links at the end of the post; Corner Scraps links to the right) and have joined the Tres Jolie Kit Club Facebook Café so you won’t miss a single announcement or project created with these kits.

Kit Reveal Banner

The April 2023 Scrapbooking Kit is filled with the beautiful 12”x12” First Kiss papers from Paper Heaven, coordinating epoxy coated Mango stickers from 49 & Market, fabulous flowers from Little Birdie Crafts, and a beautiful piece of Tres Jolie Chipboard! As always, these papers will be amazing for all your upcoming projects, whether they are beautiful layouts, junk journals, cards, or anything in between! You will find a lovely assortment of patterned papers and perfectly coordinated embellishments.

In the Mixed Media Kit, you will find a wonderful assortment of Finnabair mediums – paints, paste, and metallic flakes – to create your own beautiful, one-of-a-kind decorations using the Craft o’Clock stencil and ScrapBerry’s wooden blanks! Get this kit, and get ready to have some fun!

In the Cards, Tags, & More Kit, you will find Happiness – and I don’t just mean by getting to play with the kit! This month’s kit has some 8”x8” papers and elements from LemonCraft’s Happiness line! Ink up one of the Kelly Creates sentiment stamps with the Bamboo Leaves Dew Drop ink from Memento and add a flower or two from the ScrapBerry flower packs found in the kit, and you have yourself some fabulous “little” projects! Cards, tags, ATCs, MemoryDex®, etc.! Who doesn’t like creating a variety of projects from one kit?

These kits are for the beginner to the advanced; from clean and simple – to mixed media maven. No matter your style, there is something for everyone. We know you are going to love it!


And now (drumroll, please) the April 2023 Kits from Tres Jolie:

Tres Jolie Insta Square Frame

Scrapbooking Kit

Tres Jolie Insta Square Frame

Mixed Media Kit

Tres Jolie Insta Square Frame

Cards, Tags, & More Kit


Don’t forget to stop by the Tres Jolie YouTube channel and see our video reveal for all our kits.

Love them, right?!?! You can still get one of your own (some kits are in very limited quantities). Become a subscriber and you will never miss out on our gorgeous, coordinated kits. Just visit Tres Jolie Subscribe.


The designers at Tres Jolie have created some amazing layouts and projects with this kit. This month, in addition to a sneak peek of my first project for April using the Cards, Tags, & More Kit, I have a super-duper special sneak for you! Stay tuned to all of the Tres Jolie social media accounts because this month we will be sharing collaboration projects created using the kits and some beautiful Clear Scraps products!

apr2023-easelCards-01 acrylicAlbum-collab-sneak

Please stop by the other designer’s blog to check out their sneak peeks:


We have a new mood board challenge for the month, with the following rules and guidelines:

Tres Jolie Mood Board

moodboard

Place your entries in the April 2023 challenge folder on the Tres Jolie Kit Club Café Facebook page. This challenge ends on April 30th, 2023 at 11:59 pm CDT. All entries must be in this folder to be eligible for the prize (to have everyone eligible to win, we limit the same winner to once every 3 months).


Did you get a kit? Share what you made in our Facebook Group!

Thank you for joining us here at Tres Jolie Kits!


Tres Jolie can also be found at:

Tres Jolie Facebook

Tres Jolie TikTok

Tres Jolie Instagram

Tres Jolie Website

Tres Jolie Subscriptions

Tres Jolie Blog

Tres Jolie YouTube

Tres Jolie Pinterest


All the designers will be revealing their projects on the Tres Jolie Blog all month. Be sure you join us for tons of inspiration, including video and photo tutorials. Also, make sure you check out the newest Tres Jolie Chipboard designs that were just added to the store.

Tres Jolie Kit Club-Paperclay & a Tag Booklet-Aug. 2021 Cards, Tags, & More Kit

Hey, all! Welcome back to my corner!

This week I’m bringing you a two part project using the August 2021 Cards, Tags, & More Kit from Tres Jolie Kit Club – part one: paperclay + moulds + paper; part two: tag booklet!

FRAMED-20210721_121034

As I was sitting and looking at the cut-apart sheet from the kit, I couldn’t help but wonder if I could make the wreaths more dimensional. Then it dawned on me – they looked like the would fit in the Stamperia Mould from the July 2021 Mixed Media Kit! Check out my video to see how I used the papers with some different moulds and how I put the quick tag booklet together!


Video:


Now for a few photos. First up, the paperclay pieces I created:

FRAMED-20210721_121457

FRAMED-20210721_121320

The photo on the left shows two wreaths I created using the July Stamperia Mould and papers from this month’s Cards, Tags, and More Kit. The photo on the right shows all the pieces I made using various moulds from my stash!

Next up, the quick little tag booklet:

FRAMED-20210721_120919

FRAMED-20210721_121001

The round wreath was just the right size to add to the front of my tag booklet, and with just a few small embellishments it was all done! Look below for a photo series of making the pockets, plus a link to the original post I got the folding idea from! (*Note: Tag Size: 2-3/8”x3-3/8”)

20210720_111627 20210720_111654
The dashed lines are the folds. The side that is the “back” of the folds is also the side that will show on the front pockets.
20210720_111848 20210720_111825
Add a thin line of clue for to make the

slide-through pocket.

Fold your corners in and add a little glue to

tack them in place.

20210720_111953 20210720_112114
Glue lines if the larger side will be your top

piece.

Glue lines if the smaller side will be your top

piece.

**Original Fabrika Decoru Instagram post where the pocket idea came from! (The 6th slide in the post has a video)

FRAMED-20210720_143958

Thank you for joining me here in my little corner, I hope you enjoyed this project and it gave you some ideas of what you can do with the items found in the August Cards, Tags, & More Kit!

Stay Crafty, Friends


Did you get a kit? Share what you made in our Facebook Group!

Thank you for joining us here at Tres Jolie Kits!


Tres Jolie can be found at the following places:

Tres Jolie Facebook

Tres Jolie Instagram

Tres Jolie Website

Tres Jolie Subscriptions

Tres Jolie Blog

Tres Jolie YouTube

Tres Jolie Pinterest


August 2021 Cards, Tags, & More Kit

In addition to items from this month’s Cards, Tags, & More Kit (*from previous Tres Jolie Kits), I used:

*Stamperia Frames Maximould; *Little Birdie “Aqua Sheen” Metallic Wax; Prima/Finnabair Moulds: “Skull & Bones,” “Birds & Bats,” “Nocturnal Elements,” & *“Fairy Garden;” Creative Paperclay; LineCo PVA Glue & Linen Hinging Tape (1.25”); Art Glitter Glue; Liquitex Matte Super Heavy Gel; X-Acto Knife; We R Memory Keepers Crop-A-Dile & Crop-A-Dile Corner Chomper; EK Tools Score Board; Tim Holtz Tiny Attacher; sheer ribbon; *Lace

Tres Jolie Kit Club-August 2021 Moodboard Challenge-Shabby Little Notebook

Hey, all! Welcome back to my corner!

Today I’m bringing you my project inspired by this month’s moodboard—a shabby little notebook using the August Cards, Tags, & More Kit from Tres Jolie Kit Club!

I cut the papers in half, used a tab punch, my sewing machine, some lace, and my Mini Cinch to put this little notebook together in couple of hours* (*maybe that long, I got interrupted a few times so I lost track of how long it actually took! The sewing took the longest amount of time though!)

FRAMED-20210806_235947

Check out my video to see how it all came together.


Video:


August 2021 Tres Jolie Moodboard:

moodboard-Aug2021

I love this porch, which made me think of a sunroom where you can get some quiet time to rest and reflect—and maybe jot down a thought or two in a shabby little notebook! The Cards, Tags, & More Kit was already the perfect color combination for this moodboard, I just added the lace and put my pages together.


Here are a few close-ups showing the cover and a couple of the pages:

FRAMED-20210807_000014

Here is a close-up of my cover cluster. I didn’t want to make it too bulky, I just wanted to add some dimension to the floral print on the patterned paper I used.

FRAMED-20210807_000124

FRAMED-20210807_000148

On the pages I added tabs, I just stitched the tab into place, on the pages that have lace, I stitched around the whole page. Since I was going to a shabby feel, I didn’t do everything to match! I have straight and zig zag stitching, my laces are different lengths—some longer than that page, some shorter.

FRAMED-20210807_000210

As you can see, some of the pages may not work for journaling because of the pattern, but they would be perfect for adding photos or other memorabilia to!


20210807_000247

Don’t have a Cinch or other binding machine? Some split rings or book rings will work to hold your pages together too!


FRAMED-20210807_000059

Thank you for joining me here at my little corner, I hope you enjoyed this project and it gave you some ideas for this month’s moodboard and this month’s Cards, Tags, & More Kit!

Stay Crafty, Friends!


Did you get a kit? Share what you made in our Facebook Group!

Thank you for joining us here at Tres Jolie Kits!


Tres Jolie can be found at the following places:

Tres Jolie Facebook

Tres Jolie Instagram

Tres Jolie Website

Tres Jolie Subscriptions

Tres Jolie Blog

Tres Jolie YouTube

Tres Jolie Pinterest


August 2021 Cards, Tags, & More Kit:

In addition to items from this month’s kit (*from previous Tres Jolie Kits), I used:

*All lace; We R Memory Keepers: Tab Punch, Mini Cinch, & Cinch Wire (0.625”) White; Scotch ATG; light weight chipboard; white thread; sewing machine; wire trimmers & pliers (for the cinch wire); hot glue/hot glue gun

Tres Jolie Kit Club-Tags-August 2021 Cards, Tags, & More Kit (+a few staple products!)

Hey, all! Welcome back to my corner! I hope your August is starting out well and you’ve had some craft-tastic time’s so far!

I like to make my first project of the month a “kit only” project as much as possible, and this one is no different! I created these tags using a couple of basic (staple) items from my stash and the rest is all from the August Cards, Tags, & More Kit from Tres Jolie Kit Club!

FRAMED-20210717_181424

I used some corrugated cardboard for one of my tags, and some chipboard for the other. You can use a variety of items from the home to make your tag bases, such as cereal boxes and Styrofoam trays. (Just remember, Styrofoam isn’t going to be able to handle heat!) Check out my video to see how I put these tags together!


Video:


Now for a few close-ups:

FRAMED-20210717_181531

FRAMED-20210717_181606

Here you can see those beautiful pieces of Tres Jolie Chipboard that came in the kit this month! I just grabbed up my Ranger Gold Embossing Powder and Simon Says Stamp Embossing Ink to give them a little shine! I think a nice gold embossing powder is a good staple item to have in your stash, metallics go with all colors and styles and are great at adding a little extra “pop”! You can also see my white gesso splatters sprinkled about, adding a bit more of that shabby feel to these tags.

FRAMED-20210717_181450

FRAMED-20210717_181519

FRAMED-20210717_181554

In the photos above you can see some more details. I used quite a few of my fussy cut pieces to create my clusters, and even cut apart one of the Prima stems to add some extra texture to my tags. It took me a long time to be able to cut apart pre-packaged embellishments, but now that I have become more comfortable with it, I have found it has led to more creativity because I look at items with a “how can I use this” mentality instead of a “how is this supposed to be used” one!

I have a $5 glue gun that has been working well for me for years now. I like to use a low-heat gun most of the time because it allows me to touch the items I’m working with (almost always paper!) and shape it! And that’s what I did for my butterflies and flowers—I shaped them around globs of hot glue!

FRAMED-20210717_181508

FRAMED-20210717_181545

Thank you for joining us here at Tres Jolie, I hope these tags inspired you and gave you some ideas of what you can do with the items found in this month’s Cards, Tags, & More Kit! I’ll see you again next Thursday!

Stay Crafty, Friends!


Did you get a kit? Share what you made in our Facebook Group!

Thank you for joining us here at Tres Jolie Kits!


Tres Jolie can be found at the following places:

Tres Jolie Facebook

Tres Jolie Instagram

Tres Jolie Website

Tres Jolie Subscriptions

Tres Jolie Blog

Tres Jolie YouTube

Tres Jolie Pinterest


My “staple” items: Prima/Finnabair Heavy White Gesso; Ranger “Gold” Embossing Powder; Simon Says Stamp Clear Embossing Ink; hot glue gun; Art Glitter Glue; chipboard; cardboard