It’s the first of the month, and you know what that means?!?! It’s Reveal Day! And once again, Tres Jolie has some FAB-U-LOUS kits for you this month!
It’s March, spring is around the corner, and what better way to celebrate than to do more crafting! Make sure to get your kits before they’re gone! Or, better yet, subscribe to Tres Jolie Kit Club so you will never miss out!
Be sure you follow us on all social media platforms (Tres Jolie Kit Club links at the end of the post; Corner Scraps links to the right) and have joined the Tres Jolie Kit Club Facebook Café so you won’t miss a single announcement or project created with these kits.
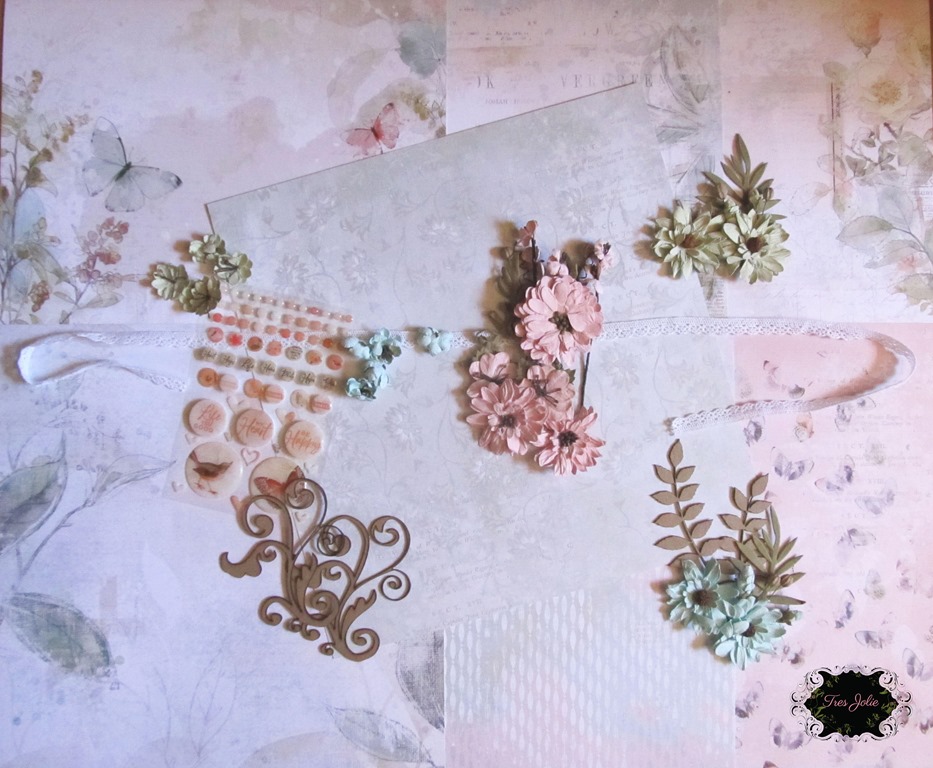
The March 2023 Scrapbooking Kit is filled with beautiful laser cut elements, chipboard elements, and the 12”x12” collection pack from 49 & Market’sTranquility line! And, to complement this fabulous collection, you will find an extra 6”x8” sheet of patterned paper and two wonderful flower packs from 49 & Market, as well as a pack of flowers from Little Birdie, pink paper doilies to add to your projects and some (always fabulous) chipboard from Tres Jolie Chipboard! As always, these papers will be amazing for all your upcoming projects, whether they are beautiful layouts, junk journals, cards, or anything in between! You will find a lovely assortment of patterned papers and perfectly coordinated embellishments.
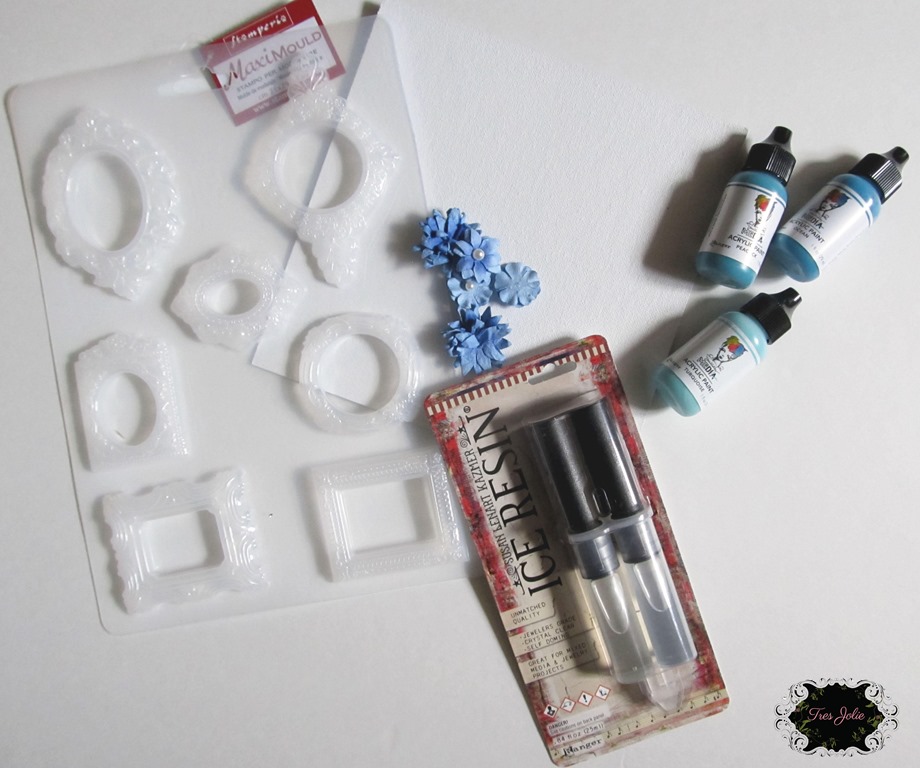
In this month’s Mixed Media Kit, you will find a beautiful, blue flower print sheet of rice paper from Stamperia, a bottle of clear gesso from Dina Wakley Media, a wonderful mask/stencil from StudioLight, coordinating colors from Lindy’s Gang – “Buccaneer Bay Blue” Moon Shadow Mist and “Gleaming Gold” Glitz Magical Powder! There is also a jar of JacquardGum Arabic for you to use with your Lindy’s mediums (Gum Arabic is an emulsifier, binding medium, and film former! In other words, it helps make watercolors “stickier” and holds them “on top” of your paper for a longer work time – here’s an article I found about it)! Get this kit, and get ready to have some fun!
In the Cards, Tags, & More Kit, you will find an ATC Tag Flip/Album from Graphic 45, and what better way to decorate it than with the chipboard die cuts and (6”x6”) patterned paper pad from Stamperia’s beautiful Garden of Promise collection?!?! You will also find a package of 49 & Market flowers, two pieces of Tres Jolie Chipboard, “Pale Brown” Fluid Chalk Ink from Prima, and a length of seam binding! After you’ve decorated your ATC tags, you’ll be ready to move on to your next project! Who doesn’t like creating a variety of projects from one kit?
These kits are for the beginner to the advanced; from clean and simple – to mixed media maven. No matter your style, there is something for everyone. We know you are going to love it!
And now (drumroll, please) the March 2023 Kits from Tres Jolie:
Scrapbooking Kit
Mixed Media Kit
Cards, Tags, & More Kit
Don’t forget to stop by the Tres Jolie YouTube channel and see our video reveal for all our kits.
Love them, right?!?! You can still get one of your own (some kits are in very limited quantities). Become a subscriber and you will never miss out on our gorgeous, coordinated kits. Just visit Tres Jolie Subscribe.
The designers at Tres Jolie have created some amazing layouts and projects with this kit. This month I have a couple of sneak peeks for you! One of my Tag Flip and one project using the Cards, Tags, & More Kit and Mixed Media Kit! Isn’t it wonderful how the kits coordinate with each other!
Please stop by the other designer’s blog to check out their sneak peeks:
We have a new mood board challenge for the month, with the following rules and guidelines:
Place your entries in the March 2023 challenge folder on the Tres Jolie Kit Club Café Facebook page. This challenge ends on March 31st, 2023 at 11:59 pm CST. All entries must be in this folder to be eligible for the prize (to have everyone eligible to win, we limit the same winner to once every 3 months).
Did you get a kit? Share what you made in our Facebook Group!
All the designers will be revealing their projects on the Tres Jolie Blog all month long. Make sure you join us for tons of inspiration, including video and photo tutorials. Also, make sure you check out the newest Tres Jolie Chipboard designs that were just added to the store.
Hey, y’all! I hope you’re having a fabulous February and have had a chance to play with your kits! This week I have a project for you I made using the February Mixed Media Kit! I grabbed up my kit, added some extra mould pieces, mechanicals, and paints from my stash, and created my Mecha Love mixed media piece!
Make sure to check out my video to see what I did!
To start building up some texture, I added some of the sand texture paste using the stencil from the kit onto the canvas board. I didn’t cover the entire surface with stenciling, I just added the stenciling to a few random areas. In the video, you will see that I added black gesso after the sand texture paste had dried, but that was because I hadn’t planned on adding the cheesecloth so soon! If I had thought I would be adding the cheesecloth to fill in the areas without the stenciling I would have waited to add my gesso. Anyhow…I had been rust-staining fabric around the same time I received my February kits, so my cheesecloth got sucked into the process – even if that rust staining doesn’t show much on this canvas – and while I was playing with different ways to build my canvas, I just happened to lay the cheesecloth down in a way that sparked inspiration! I ran with this new inspiration and used some matte gel to adhere some of the cheesecloth to my canvas.
Since my cheesecloth led me on a slightly different path than what I had planned originally, I decided I wasn’t going to add gesso again until I had the majority of my mould pieces in place. I grabbed up a variety of gear mould pieces from my stash – made from a wide range of materials since I tend to pre-create pieces when I have extra resin or clay from a different project or I just need to use up old material – and started layering them up using some 3D Matte Gel. I had some broken bits and pieces in the mix, so I just used them as filler to create some lift under areas they wouldn’t be seen, you could just as easily use scraps of cardboard or chipboard as filler! After I had all my gears in place I added the resin frame from the kit and topped it with the large heart from Finnabair’s “Love Machine” Mould (from my stash). I let the 3D Gel dry overnight, then I came back with my matte gel and some more cheesecloth, adding more to the background and laying it across a few areas of the mould cluster. After the matte gel had dried, I added black gesso to everything.
Now it was finally time to start getting my colors built up! I started with some “Linen” Impasto and a lot of water! All I knew was I wanted to create some type of gradient or ombre effect, so I kept the layer of Impasto heavier on the top half(ish) of the canvas and more watered down on the bottom half(ish).
After the Impasto had dried, I mixed some Tres Jolie “Red” Acrylic Paint and DWM “Fuchsia” Glossy Spray and added this mix to the canvas.
When my paint and glossy spray mix had dried, I came back with more cheesecloth and added it to areas of my resin pieces and canvas. You can see some of the rust-stained cheesecloth on the finished piece still because this final layer of cheesecloth didn’t get completely covered by mediums!
After the matte gel had semi-dried (being fully dry wasn’t necessary!), I returned with some of the Copper and Graphite texture paste from this month’s kit and used them more like paint than paste. I added the copper to a few areas (very few!) of the cheesecloth I had just placed and the gears on the heart, and I added the graphite to the gears. I didn’t want a lot of build-up, I just wanted a bit of color.
After those pastes had dried, I came in with the Platinum Crackle Paste from the kit and added it to the bottom half(ish) of my canvas, then I set everything off to air dry for about 24 hours. When I came back, I had lovely crackles and it was finally time to get the Brown, Red, and Yellow Rust Effect Paste on the (mould) gears, the resin frame from the kit, and slightly spread out onto the canvas.
When I had my rust how I wanted it, I added some “Red Wine” Metallique Paint to my heart and on the top half(ish) of the canvas background. For the background, I really kept the metallique paint watered down, I didn’t want to completely cover what was already there, I just wanted to add a bit of variation.
Once the “Red Wine” was dry, I added some “Vintage Silk” and “Indian Pink” Finnabair waxes to highlight a few areas on the heart. Finally, I grabbed up the (partial) package of Mechanicals from my stash, kept them “as is,” and adhered them to the gears “on” the heart mould using 3D Matte Gel.
Thank you for joining me here today on the blog! I hope this project gave you some inspiration and ideas of what you can do with the items in this month’s Mixed Media Kit! I tried to use the texture pastes in a variety of ways to help you see them in action if you haven’t experienced the joy of crackles and rust effect pastes yet!
Stay Crafty, Friends
Did you get a kit? Share what you made in our Facebook Group!
Hey, y’all! This week, I have a quickie project for you using the adorable 2023 Calendar Kit from InkyStamper that includes a stand made by Tres Jolie! How super is that! Small business supporting small business!
I kept my calendar rather simple, just enjoying the process of coloring in the pre-stamped images. It was a nice change of pace to just work with what I had and not have to do, what I like to call, “heavy thinkin’.” Since I am assuming that the use of Copic Markers will be touched on – and the example images on the 2023 InkyStamper Calendar Class Kit store page appear to be colored with marker – I decided to use some Workable Fixatif and my Distress Watercolor Pencils for my images. You can use whatever you want or have on hand though! Your kid’s crayons? Go for it! Colored pencils? Use them! You don’t need anything fancy or a “professional artist” brand or quality item to color these images!
I have a 15-ish minute video for you to go with my calendar, where I talk about the kit, using watercolor pencils, & why I love Workable Fixatif, make a mess trying to get my stand how I was picturing it in my head, and show the real-life inspiration for my September and October!
Easy-peasy, right? Except for me and my stand – that may have been more comical! Orange mediums EV-ER-Y-WHERE!!
As promised in the video, here is the chart of all the colors I used from [all three sets of] the Tim Holtz Distress Watercolor Pencils. As always, the complete product list can be found at the end of this post.
Thank you for joining me here at Tres Jolie today! I hope I gave you some ideas to color in your InkyStamper Calendar! If you haven’t picked up a kit yet, now’s the time!
Stay Crafty, Friends
Did you get a kit? Share what you made in our Facebook Group!
InkyStamper 2023 Calendar Kit featuring the calendar stand made by Tres Jolie!, Tim Holtz Distress Watercolor Pencils Sets 1, 2 & 3, Ranger Water Brush (Detailer), Krylon Workable Fixatif, Dina Wakley “Tangerine” Acrylic Paint, Dina Wakley “Tangerine” Gloss Spray, Finnabair Liquid Color Fluid Medium, Americana-DecoArt “Bright Orange” Gloss Enamels, Jacquard Gum Arabic, Art Glitter Glue, Black Fine Tip Sharpie, White Sakura Gel Pen
We’re halfway through June, and this week I have some Memory Dex cards for you that I created using items from this month’s Cards, Tags, & More Kit from Tres Jolie Kit Club and items from my stash – quite a few from previous Tres Jolie Kits! Check out my video to see what I did for each of the cards I made – then grab up your supplies and create your own Memory Dex card(s).
I had bought the Heidi Swapp Memory Dex Spinner quite some time ago, and had originally thought of grabbing up some spray paint and changing the color – I might still do that – but I grabbed it up for this project so I’d have someplace to put my cards when they were done, and to make sure I didn’t make them too tall to clear the bottom! Depending on what kind of “–dex” system you have – be it a spinner, a box, something vintage, or something custom made – you can get very creative on how your Memory Dex cards are made! If, for example, you have the Memory Dex Box, you don’t have to worry about height, only width! (After this project was completed I happened to find a vintage Rolodex® system that would allow cards to fit in without any height or width restrictions!! *happy dance*)
Video:
A closer look at the cards I made:
My Concord & 9th “Lucky” Die cuts the three layers – thick line and outline from one die, thin line from another – so I made two lucky cards. The thick line and outline were cut from a half sheet of the white cardstock that I hand-inked up using a variety of Distress Oxides from my stash. The white pieces were from another partial sheet of the KaiserCraft cardstock, and on some of those, like the butterfly, I added some Distress Oxide to give a pop of color. I didn’t have any particular plans when I set out to make my cards, I just cut a lot of pieces and started layering; generally ending with a few of the Eyelet Outlet jewels and/or some of the small Prima butterflies.
I made my “Imagine” card a shaker card by cutting a circle out of the pink striped paper from this month’s kit, adding a sheet of craft foam with a circle cut out as a spacer, and filling it with some of the beads and sequins from the Buttons Galore cube from Septembers (2021) Cards Kit. I just used some plastic from an old package of die cuts – I often save the harder/stiffer plastic packaging for just this reason! – and stitched it in place with some metallic silver thread. My “Imagine” as a layer of the “Gamboge” Stencil Butter on it from the Mixed Media Kit and, while it was still wet, I sprinkled some Lindy’s Magical Powder on and spritzed it with a little water.
These two cards were really a couple of “let’s see how these parts work together” cards! The “grateful” card has a slot cut from the top (the label die from Tim Holtz’s “Stitched Slots”) that I just tucked a couple of large die cuts into after giving them a little color. The flower is just inked with some Distress Oxide, and the leaves have some Lindy’s Magical’s sprinkled on them. I cut the card from my inked KaiserCraft sheet, backed it with some of my leftover handmade paper, and added some stamping, jewels, & butterflies. The “grateful” had originally been stamped, but it didn’t show up very well, so I traced over it with a gel pen.
I wasn’t sure when I cut it if I would use the Bird Branch die, but I added some Magical’s, let it dry, and thought about what I’d do with it while working on other cards. Eventually, it came time to play with it, and I found that I liked how it looked with the oval frame, but the frame needed some color too! So on went some Magical and PearlEx powders. The card is another cut from my inked sheet and has some of the “Grecian Gold” Modeling paste (from the Mixed Media Kit this month!) dabbed on with my finger for a little shine. Then, to add a bit from this month’s Card’s Kit, I popped on a tab punched from one of the papers, added some orange jewels, and a Tim Holtz “Small Talk” sticker from my stash.
These two Memory Dex cards were made from a piece of scrap cardstock that I practiced a couple of mixed media ideas on. I have some texture paste, mica powder, and Magical powder on the base tag/Memory Dex, then I stamped the butterfly from the stamp in this month’s kit, I cut a tag-shaped frame out from my inked paper, layered a couple of more tags vertically, popped in a flower, added my jewels and phrase.
While I was doing all of my cutting, I decided to make a round Memory Dex card, so I used one of my circle dies to cut out the inked stenciling I had done (stencil from this month’s Mixed Media kit!). I stamped on the butterfly and phrase, attached a rectangle bottom, and ran it through my sewing machine a few times. The final touches were some Distress Oxide around the edges and the jewels.
When I first started this card I had thought of just attaching the pocket to another card, but as I was putting it together, I decided that I much preferred the pocket as the card! The top slot is backed by some pink cardstock from my stash, and the rest of the slots are back with white cardstock – what had been the original Memory Dex shaped card. The Tim Holtz “Stitched Slots” die is the perfect size for the spinner, I just punched the slots at the bottom and popped it right on. I used some of the smaller tags, cut with the tag dies from this month’s kit and cut from this month’s papers, to stick on some “Small Talk” phrases and slipped them into the slots. They don’t weigh a lot, so the friction between the papers is enough to hold them in place when they are upside down on the spinner. I then just added some of my die-cut hearts, outlined them with a yellow gel pen, added the label, and another “Small Talk” sticker.
The card with the bicycle stamped on it was probably the fastest to put together because all I did is layer up the different circles I had already cut out! I used the pink striped circle to fill the circle in the card base, then put the layers through my Sizzix using the dot embossing folder that had come with the machine, added that half-circle with some Lindy’s Magical’s stenciled on, and then all of the other plain circles. To add some contrast to all those circles, I popped on one of the smallest tags, then stamped on the bicycle and added the butterfly and phrase.
My “Spring” card was my first of the batch! I trimmed an inch off the width of a 3”x5” index card so it would fit on the spinner, used the stamp from this month to just get the flowers to peek out from behind the tag, and splattered it with some “Lemon” Glossy Spray. The tag is from some pink cardstock I had that was already adhered to an adhesive sheet. I used the thin scraps from my Folio at the beginning of the month, and just randomly layered them on the adhesive. I then cut the tag using the next to largest die in the set, peeled the protective paper the rest of the way off, and brushed on some Finnabair Mica Powder. Then I just finished up the details with some flowers, jewels, a butterfly, and the small tag.
Lastly, my “document” card. The die-cut word was too long to fit on the Memory Dex Spinner, so I cut it where it could be hyphenated, clipped off an end of the cross-mark on the “t” to use as the hyphen, and layered up a couple tags and a tab on the base card. I used some of the “Grecian Gold” Modeling paste on “document,” the stars and diamonds are from my Concord & 9th Lucky Die Set, there’s a little stamping, and a few jewels, and this card was done!
Thank you for joining me here in my corner! I hope you enjoyed seeing these cards and they inspired you to make your own Memory Dex card or two!
Hey, y’all! Welcome back to the Corner Scraps Blog!
For my fourth and final April, Tres Jolie Kit Club project I made a Mini Junk Journal using the Cards and Mixed Media Kits. I love mixing vintage and bright; “old” and “new;” and the muted tones of the 49 & Market Cards, Envelopes, and Tags in this month’s Cards, Tags, & More Kit were the perfect complement to the bright tones of the Dina Wakley Glossy Sprays in the Mixed Media Kit. Check out the video to see how this all went together!
My closure is a few layers of fabric and tulle with four large buttons added on and a section of a headband (unused!) sewn onto one end. I also added some simple hand stitches for a little extra interest.
Video:
I used some lightweight chipboard I found in my stash, the floral print from the packaging of the 49 & Market Card Kit, and some teal burlap-ish trim from my stash to create the cover of the journal. I then decorated it with the Tres Jolie Chipboard from the kit and some of the Dina Wakely Glossy Sprays.
These aren’t all of the pages in the journal – only about half – as examples of techniques I used in creating this project!
I created a few clusters made from bits of fabric and tulle, a tag from the 49 & Market Tag Pack, and a couple of fabric flowers. I used black thread in my sewing machine to stitch the layers together, then added some hand-stitched X’s and hand-stitched the button on. I then glued the clusters along one edge to use as tuck spots. I added a blanket stitch (sewing machine) along the majority of the pages to reinforce the edges and make sure the gel print papers and cardstock backing stayed together! (Even if I did use a lot of glue – I don’t like things coming apart!)
I didn’t close up the three sides of the envelope to make it, well, an envelope; instead, I left it so it could be all the way unfolded. Throughout the journal, I added in some wax seals – some on pages, some on paperclips.
Not every surface has gel printing on it! I did leave a few sides bare, plus the back of all of the tags – but most of the surfaces have glossy sprays on them, so to write in this journal I think a fine tip marker would work best.
On the tags, I used white thread, and instead of punching holes and adding the tag pulls, I crossed two staples from my Tim Holtz Tiny Attacher.
Lots of different patterns in this junk journal, but the bright Glossy Sprays work with their muted counterparts on the 49 & Market cards and envelopes – and to really tie it all together, I stuck to just using black and white thread.
From the front cover to the back cover there is a variety of patterns and colors. The fabric flowers worked fabulously during the gel plate printing process and made their way onto the finished product.
The spine of the journal has some scrap fabric, tulle, fabric flowers, and buttons from my stash on it. Like the other flowers throughout the journal, these flowers also have some Glossy Spray added to them.
Thank you for joining me here in my corner! I hope you enjoyed this project – and all of the projects this month – and they gave you some ideas of what you can do!
Hey, y’all! Welcome back to the Corner Scraps Blog!
This week I am focusing on the Mixed Media Kit from Tres Jolie Kit Club, and while I do make a few sample projects, my focus is really going to be on what a gel plate can do! I find gel printing to be incredibly addictive – I can sit for hours without noticing time passing while I peel paper after paper off.
I do manage to add some mood board inspiration as well. I love citrus, not so much eating or drinking (I don’t care for sour), but for reasons I can’t explain, I love how citrus fruits LOOK – so I made a cut file that finds its way onto the gel plate! Check out my video to see all the ways I used the gel printing plate and the mixed media kit this month.
Video:
April 2022 Moodboard:
April’s mood board challenge rules:
You can create any type of project for the challenge.
You MUST say what you were inspired by.
You MUST include the twist in your design.
The twist for this month is SPRINGTIME MADNESS.
We would love to see you USE AT LEAST 1 of Tres Jolie’s products on your projects but it isn’t required to play along.
It MUST be a new project.
Place your entries in the April 2022 challenge folder on the Tres Jolie Kit Club Cafe Facebook page. This challenge ends on April 30th, 2022 at 11:59 pm CST. All entries must be in this folder to be eligible for the prize (to have everyone eligible to win, we are limited the same winner to once every 3 months).
Papers:
Here are a couple images of some of my finished papers – of course by “finished” I mean from this session! I may or may not decide to add more in the future! You can see my Citrus Cut File (mostly) survived being used over and over again, and I now have some gel plate printed citrus slices!
Easter Eggs:
I just happened to come across a package of four wooden Easter Eggs in Wal-Mart, and decided they would be fun to use with the gel plate! If you saw my December 2021 Mixed Media Kit Project “Sleigh Bells,” then you already know I like to use more than paper on my gel plates! So I did it again, this time with some Easter Eggs.
The egg on the left is just multiple layers from gel printing, tipped off with some splatters from the Dina Wakley Gloss Sprays found in this month’s kit. The Egg on the right also has multiple layers, but I also used the Citrus Cut File on the gel plate and then came in and added some gel pen after it was all dry to really make the slices stand out!
For the “Spring” Egg, I used a flower-filled egg stencil I’ve had for years (no idea where it came from) and my Dina Wakley Spray to give some fun flowers to my gel printed background, then just grabbed a gel pen to add “Spring.” For the egg on the right, after my background layers were dry, I grabbed a white oil pastel to draw on some flowers! Oil pastels make a great resist, so I just added my Dina Wakley Gloss Sprays to color the stems and petals.
Envelopes:
Once your gel prints are dry, you can fold them up and create custom envelopes with your original papers! Well I used a sheet of regular printer paper for my examples, if I had started with envelopes in mind, I would have used some cardstock for my envelope prints, but I don’t always know where I’m headed when I do most projects, and this week was no exception!
I added a bit of the Citrus Cut File and I made some paper Easter Eggs to layer up. Fun to make, and I have some one-of-a-kind envelopes. I also want to add that after they are dry, the Glossy Sprays make great resists!
Backgrounds for my tag and ATC:
For the tag, I started tearing up some of my papers and layered them up, and added some Citrus slices using some Liquitex Matte Medium. After the matte medium was dry, I went back with my gel pens to add some accents to the rinds and scribbled on some flowers. I then came back with my glossy sprays and filled in the citrus slices. I can’t say this tag is “done”, but I wanted to do a little something that showed a few examples for layering and color. For my ATC, I grabbed up my Prima ATC blanks, some bits of the paper I had made, and glued them in place before taking it over to my sewing machine and adding some random “scribble” stitches. Then I came back and popped on a few chipboard pieces from my stash to complete the card.
Thank you for joining me here in my corner! I hope you enjoyed seeing some of the different ways a gel plate can be used for making your own custom prints—half the fun is in the experimentation!
Stay Crafty, Friends
Did you get a kit? Share what you made in our Facebook Group!
It’s April 1st, and that means it’s Reveal Day for Tres Jolie Kit Club! Get yours before they’re gone!
We are starting to implement our new year changes, so make sure you are following us on all Social Media platforms and are a part of the Facebook Cafe that way you won’t miss a single announcement or project created with these kits.
The April 2022 Scrapbooking Kit is filled with gorgeous new papers from 49 & Market in beautiful peaches, pinks, and greens – as always, these papers will be amazing for all your upcoming projects, well beyond the initial spring feel. You will find a lovely assortment of patterned papers and perfectly coordinated embellishments.
Ever wanted to try your hand at gel printing? This month’s Mixed Media Kit contains a gel printing plate, brayer, paint, and sprays to get you going!
Our Cards, Tags, & More Kit is filled with more new papers from 49 & Market and goodness so you can create lovely cards and more. Who doesn’t like creating a variety of projects from one kit?
These kits are for the beginner to the advanced, clean and simple to mixed media maven. No matter your style, there is something for everyone. We know you are going to love it!
*Scrapbook Kit*
*Mixed Media Kit*
*Cards, Tags, and More Kit*
Don’t forget to stop by the Tres Jolie YouTube channel and see our video reveal of all our kits.
Love them, right?! You can still get one of your own (some kits are in very limited quantities). Become a subscriber and you will never miss out on our gorgeous, coordinated kits. Just visit Tres Jolie subscribe.
The designers at Tres Jolie have created some amazing layouts/projects with this kit.
Here is a little tease from me using this month’s Cards, Tags, & More Kit and Mixed Media Kit:
Please stop by the other designers’ blogs and check out their sneak peeks. They are listed below:
We have a new mood board challenge for the month. Here are the rules.
You can create any type of project for the challenge.
You MUST say what you were inspired by.
You MUST include the twist in your design.
The twist for this month is SPRINGTIME MADNESS.
We would love to see you USE AT LEAST 1 of Tres Jolie’s products on your projects but it isn’t required to play along.
It MUST be a new project.
Here is the April 2022 Mood Board:
Place your entries in the April 2022 challenge folder on the Tres Jolie Kit Club Cafe Facebook page. This challenge ends on April 30th, 2022 at 11:59 pm CST. All entries must be in this folder to be eligible for the prize (to have everyone eligible to win, we are limited the same winner to once every 3 months).
Don’t forget that Tres Jolie can be found in the following places:
All the designers will be revealing their projects on the Tres Jolie blog all month long. Make sure you join us for tons of inspiration, including video and photo tutorials. Also, make sure you check out our newest chipboard designs that were just added to the store.
For my final Tres Jolie Kit Club project of October, I’m bringing you an “Anything Book.” I call it an anything book because you could easily use it as a mini-album, mini art journal, mini notebook, etc. Personally, I really wanted a mini art journal with pockets and flip-outs.
My inspiration for this project came from Pinkstrawberryz “No Binding Easy Mini Album.” It was just one of those “You might like” recommendations that randomly popped up on YouTube, so I decided to have a look! As soon as I watched the video I had ideas brewing! Check out my video to see how I put my Anything Book together. (Below the video you will find photos of the inside and the measurements for my pages.)
Video:
Here is a look at some of the pages I started preparing:
After my book was together I used clear and white gessoes to prepare the pages. With my gesso dry, I was then able to start laying down mediums to prepare working backgrounds. I just grabbed up various paints and started laying them down! To make the book cover, I grabbed up some burlap trim, cut it to length, and stitched it in place during assembly.
Some areas have acrylic paint and some have watercolors. I started drawing on a couple of the pages—flowers in some places, and this face above. I also grabbed a few pens and outlined the flowers from the paper pack.
I didn’t always use a brush with my paints, some times I just used a palette knife to scrape it on! I also grabbed up some of my Dina Wakely Scribble Sticks and added some…well…scribbles! I have a short flip-though of my mini art journal (as far as it had been “finished” at the time of filming!) over on my Instagram post for this project.
Measurements (in order of page in book):
In my video, I talk about the process of making the cover using some Amazing Cast Resin and the embossing folder!
Thank you for joining me here in my corner! I hope you enjoyed this project and it gave you some ideas of what you can make using items found in this month’s Cards, Tags, & More Kit!
Stay Crafty, Friends
Did you get a kit? Share what you made in our Facebook Group!
Today I’m bringing you my moodboard inspired project; a mixed media canvas using items from both the July Mixed Media Kit and the July Scrapbooking Kit from Tres Jolie Kit Club! Pink flowers, gold veining, and butterflies were my inspiration from the moodboard, so I gathered my supplies and just went with it!
I love moulds, so I was super excited when I saw that the Mixed Media Kit came with a fabulous Stamperia frames mould! Be sure to check out my video to see how I used the mould and how my canvas came together! (Note: Although I found it unnecessary with the Amazing Cast Resin, you can use various household products to help release the frames from the mold, such as baby powder, corn starch, cooking spray, and mica powder. Personally, I think the cooking spray is best for resins, and powders [would be] best for clays – because the resins absorb powders.)
Video:
July 2021 Moodboard:
Now for some close-ups:
I used the Dina Wakley paints from the Mixed Media kit on my background, baseboard doll, chipboard butterfly, and frame—along with lots of water in some areas to make the paints more translucent! I added just a touch of Vintage Gold wax to the frame details and wing edges.
I brushed some gel medium along the edges of the flowers to hold the gold microbeads in place, adding just a bit of detail and texture to the flowers! Then I dug into my stash and grabbed all three of my art stone bottles (mega, regular, & mini) and started adding them on. I like to sprinkle my art stones in place before adding the Diamond Glaze—that way I can get my placement down before making it permanent.
As my final touch, I used a metallic gold pen from my stash to add some gold “veining” along the edges of my torn paper and to circle the epoxy dots from the kit.
I hope you enjoyed this project and it gave you some ideas of what can be done with items from this month’s Mixed Media and/or Scrapbooking Kits!
Thank-you for joining us here at Tres Jolie, I’ll see you again soon!!
Stay Crafty, Friends
Did you get a kit? Share what you made in our Facebook Group!