Hey, y’all! I hope your August has been going well. Have you had a chance to check out the mood board challenge yet? This week I have a couple of mixed media projects for you that I created for my mood board inspired project! I couldn’t decide if I wanted to do a canvas or a clipboard, so I did both!
Be sure to check out my video to see how they came together!
August 2023 Mood Board:
There aren’t really a lot of details needed to describe the process for my projects – it’s mostly a lot of layering and adhering!
I added black gesso to my clipboard along the edges, the clip, and the back, but since I was wrapping the patterned paper around the canvas, it didn’t need any gesso.
I used a 3”x9” canvas, and after deciding which paper I wanted to use, I cut a 4”x10” section out – keeping the printed flower cluster I had planned to focus on to the top right of the canvas. Since I didn’t want to wrap the flower cluster around the edge of the canvas, that led me to cut a couple of strips of the glittery half-sheet to use as my edge wraps for the top and right edges.
I used the Champagne Stardust Butter to accent the edges of the canvas and coated the surface with the same matte medium I used to glue the paper to the canvas. After the matte medium had dried, I added some of the Lindy’s Moon Shadow Mist from the Mixed Media Kit to grunge my background up a bit, then gave everything a spray of Workable Fixatif.
I coated the die-cut and fussy-cut flowers and leaves I wanted to use with more of the Champagne Stardust Butter, separated the leaves and some of the flower petals so I could give the die-cuts a bit more shape as I was putting everything together, then grabbed up my jar of 3D Matte Gel and started the assembly process.
I used more 3D Matte Gel to attach the Prima flowers, gave them a light coat of matte varnish to help protect them, then brushed on a bit of both Stardust Butters just to blend them in a little with the background.
My final addition was to brush on some art stones and Mini Art Stones using Soft Matte Gel and to attach the sentiment/quote.
The process for the clipboard wasn’t very different from the canvas. I didn’t wrap the patterned paper around the clipboard – instead, I distressed the edges, added a few tears and curls, and backed those tears with pieces of the same glittery paper I used to wrap the top and right edge of the canvas.
I used the Marcasite Stardust Butter on the clipboard’s background – covering the clip and the underside of the curled tears, as well as adding it to the corners and edges – but the rest of the assembly was the same process.
The main reason I decided to create both the canvas and the clipboard was that they weren’t going to be vastly different projects, and since they were both smaller, I could very easily work on them side-by-side!
Thank you for joining me here on the blog today! I hope you enjoyed these two projects and they gave you some ideas and inspiration for your next crafting adventure!
Stay Crafty, Friends
Did you get a kit? Share what you made in our Facebook Group!
Finnabair Heavy Black Gesso, Finnabair 3D Matte Gel, Finnabair Soft Matte Gel, Finnabair Mini Art Stones, art stones, mini clipboard, 3”x9” canvas, Liquitex Professional Matte Medium, Liquitex Basics Matte Varnish
Hey, y’all! Welcome to the end of June! For my final June project, I used this month’s Mixed Media Kit to create a tropical-themed canvas panel. I love oil pastels! They may require a bit of elbow grease at times to blend, but I love working with them!
Be sure to check out my video where I talk about what’s going on, tell you what I’m doing, and show you how everything (eventually!) blended together.
There aren’t any “special” tools you absolutely need to work with oil pastels, but a few that are handy to have around are some small sponges, blending stubs, and baby oil. Items you may have around your house already, such as Q-Tips and paper towels, can also work for blending your pastels. You don’t need any oil either, but it can make moving the pastels around a little easier! And you most definitely don’t need a big bottle, but when I bought mine I couldn’t find a smaller bottle of unscented and I don’t like the baby powder scent!
With all of my tools gathered around, I started the scribbling process! I used the yellow, orange, blue, red, and pink pastels to create my sky. After I had some color down on the canvas, I started the blending process. I only needed to use a blending stub for the yellow and orange sections, but when it came time to create the purple hues I was looking for at the top of the sky, I needed to grab up the baby oil to work – and re-work – the blue, red, and pink.
Once I had my sky in place, I decided to experiment a little! I didn’t know how well – or even if – Workable Fixatif would stick to an oil-coated surface, but I went with it (on a practice canvas seen in the video!) and it worked – or at least worked well enough for my purposes!
Once the Workable Fixatif had dried, I began sketching out my leaves. Originally I started with my two leaves leaning in the same direction, however, after working on filling them in, adding some shading, and starting the holes, I realized I would prefer the back leaf to lean in the opposite direction of the front leaf. And this is where the true test of baby oil and Workable Fixatif took place!
I didn’t know if I could “erase” part of the back leaf enough with the baby oil to change its position while still leaving – or at least mostly leaving – the Workable Fixatif unscathed. I wouldn’t suggest trying to vigorously scrub on top of Workable Fixatif – especially if it is already sitting on oil – but I did manage to remove enough of my old leaf to allow for a reposition.
I did have to go back and fix a bit of the sky that can be seen through the leaf’s holes, but – all in all – the process went very well!
Once my leaves were finished, I added another spray of Workable Fixatif, not because I planned on adding more oil pastels, but because I wasn’t entirely sure how well the “Transfer Me” flowers would stick to the oils. I am happy to report that I had no problems getting the transfers in place!
With the transfers on, the only thing left for me to do to finish my canvas was to add some of the Lindy’s Magical Powder. Using a blending brush, I inked on some clear embossing ink through the stencil, then, without removing the stencil, I gently brushed on some of the Magical Powder. The pattern of the stencil also makes me think of tropical leaves, and the Lindy’s gives them a beautiful shimmer.
I thoroughly enjoyed this canvas – because it was all about grabbing pastels and just coloring – and I highly suggest taking time to see where the colors take you! It is relaxing to just grab some colors and go!
Thank you for joining me here today on the blog! I hope you enjoyed this Oil Pastel Playtime and it gave you some inspiration to grab your pastels up and see what you can create!
Stay Crafty, Friends
Did you get a kit? Share what you made in our Facebook Group!
In addition to this month’s Mixed Media Kit, I used:
Ranger Big Emboss It Clear, Krylon Workable Fixatif, cosmetic sponges, blending stubs, Q-tips®, baby oil
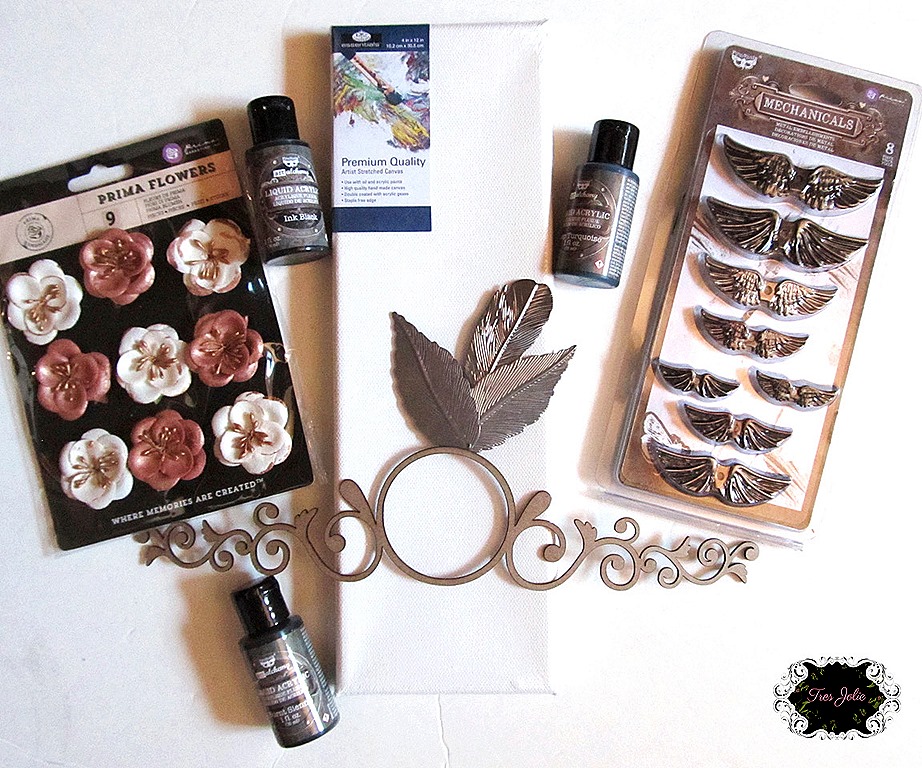
Hey, y’all! I hope you’re having a fabulous February and have had a chance to play with your kits! This week I have a project for you I made using the February Mixed Media Kit! I grabbed up my kit, added some extra mould pieces, mechanicals, and paints from my stash, and created my Mecha Love mixed media piece!
Make sure to check out my video to see what I did!
To start building up some texture, I added some of the sand texture paste using the stencil from the kit onto the canvas board. I didn’t cover the entire surface with stenciling, I just added the stenciling to a few random areas. In the video, you will see that I added black gesso after the sand texture paste had dried, but that was because I hadn’t planned on adding the cheesecloth so soon! If I had thought I would be adding the cheesecloth to fill in the areas without the stenciling I would have waited to add my gesso. Anyhow…I had been rust-staining fabric around the same time I received my February kits, so my cheesecloth got sucked into the process – even if that rust staining doesn’t show much on this canvas – and while I was playing with different ways to build my canvas, I just happened to lay the cheesecloth down in a way that sparked inspiration! I ran with this new inspiration and used some matte gel to adhere some of the cheesecloth to my canvas.
Since my cheesecloth led me on a slightly different path than what I had planned originally, I decided I wasn’t going to add gesso again until I had the majority of my mould pieces in place. I grabbed up a variety of gear mould pieces from my stash – made from a wide range of materials since I tend to pre-create pieces when I have extra resin or clay from a different project or I just need to use up old material – and started layering them up using some 3D Matte Gel. I had some broken bits and pieces in the mix, so I just used them as filler to create some lift under areas they wouldn’t be seen, you could just as easily use scraps of cardboard or chipboard as filler! After I had all my gears in place I added the resin frame from the kit and topped it with the large heart from Finnabair’s “Love Machine” Mould (from my stash). I let the 3D Gel dry overnight, then I came back with my matte gel and some more cheesecloth, adding more to the background and laying it across a few areas of the mould cluster. After the matte gel had dried, I added black gesso to everything.
Now it was finally time to start getting my colors built up! I started with some “Linen” Impasto and a lot of water! All I knew was I wanted to create some type of gradient or ombre effect, so I kept the layer of Impasto heavier on the top half(ish) of the canvas and more watered down on the bottom half(ish).
After the Impasto had dried, I mixed some Tres Jolie “Red” Acrylic Paint and DWM “Fuchsia” Glossy Spray and added this mix to the canvas.
When my paint and glossy spray mix had dried, I came back with more cheesecloth and added it to areas of my resin pieces and canvas. You can see some of the rust-stained cheesecloth on the finished piece still because this final layer of cheesecloth didn’t get completely covered by mediums!
After the matte gel had semi-dried (being fully dry wasn’t necessary!), I returned with some of the Copper and Graphite texture paste from this month’s kit and used them more like paint than paste. I added the copper to a few areas (very few!) of the cheesecloth I had just placed and the gears on the heart, and I added the graphite to the gears. I didn’t want a lot of build-up, I just wanted a bit of color.
After those pastes had dried, I came in with the Platinum Crackle Paste from the kit and added it to the bottom half(ish) of my canvas, then I set everything off to air dry for about 24 hours. When I came back, I had lovely crackles and it was finally time to get the Brown, Red, and Yellow Rust Effect Paste on the (mould) gears, the resin frame from the kit, and slightly spread out onto the canvas.
When I had my rust how I wanted it, I added some “Red Wine” Metallique Paint to my heart and on the top half(ish) of the canvas background. For the background, I really kept the metallique paint watered down, I didn’t want to completely cover what was already there, I just wanted to add a bit of variation.
Once the “Red Wine” was dry, I added some “Vintage Silk” and “Indian Pink” Finnabair waxes to highlight a few areas on the heart. Finally, I grabbed up the (partial) package of Mechanicals from my stash, kept them “as is,” and adhered them to the gears “on” the heart mould using 3D Matte Gel.
Thank you for joining me here today on the blog! I hope this project gave you some inspiration and ideas of what you can do with the items in this month’s Mixed Media Kit! I tried to use the texture pastes in a variety of ways to help you see them in action if you haven’t experienced the joy of crackles and rust effect pastes yet!
Stay Crafty, Friends
Did you get a kit? Share what you made in our Facebook Group!
Hey, y’all! I just love the papers in this month’s Scrapbooking Kit from Tres Jolie Kit Club! The mix of white with a touch of light grey is perfect for building or expanding on.
Now I know, if you’ve seen the mood board you may be wondering how I came to a pink and grey mixed media panel from a mood board filled with autumn colors and décor with a “Vintage Fall” twist (Shabby is a form of “vintage,” right? I’m not the only one that thinks that, am I?). Well, I’ll tell you – it all started with the sweater pillow – and I do have some leaves on here!
I will admit, I love the mix of white and grey – I adore Farm Chic décor – but I don’t usually lean towards pinks. In fact, there are probably people who know me that are very confused right now seeing this pink! However, contrary to popular belief, I don’t hate pink, I just won’t wear it (unless it’s socks!) or decorate with it. (Fun fact: I will put pink in “strange” areas – my phone cases, Kindle cover, wallet, etc.)
Check out my video to see what I did to get this project all put together:
This month’s mood board is filled with beautiful autumn colors and fabulous textures to inspire your project! Mood boards aren’t really meant to be “copied” – they are, as the name suggests, designed to invoke a mood in you. How do they make you feel? What parts catch your eye?
As I mentioned, I saw that cable knit pillow and then just ran with it! I just thought something like that would be a fabulous background. Truthfully, I didn’t even notice that the mood board had some pink flowers on it until after I had finished my panel!
Make sure you join us for the October 2022 challenge! Place your entries in the October 2022 folder on the Tres Jolie Kit Club Café Facebook page before October 31st, 2022, 11:59 pm CST. All entries must be in this folder to be eligible for the prize (to have everyone eligible to win, we are limiting the same winner to once every 3 months).
For my panel, the first thing I did was get the paper I had picked out collaged down to the canvas using some Liquitex Matte Medium – although any collage medium would work such as Mod Podge, Distress Collage, etc. I didn’t trim my paper until after I had it glued down and it had a chance to dry. It is a little less stressful if I am not worrying about every edge being perfectly lined up!
After the matte medium dried and I cut down the edges, I started the stenciling process. I used my “Victorian Tiles” stencil first, with a mix of regular (Ranger Opaque Matte) texture paste, then came back through and added some areas of Distress Crackle Paste. I also grabbed up a leaf stencil and added it to a few areas between and on top of the previous stenciling. Then, and this might be the most important part for me, I let it all dry overnight! It is possible to use a heat gun on texture paste, even crackle paste, but allowing anything “crackle” to dry naturally has always given me the best results. Drying too quickly just doesn’t allow the crackle to crack as much. Then, the next morning, I came in with the leaf stencil again, lined it up on the previous stenciling, and added some extra crackle paste and some “Kitsch Flamingo” Embossing Glaze – then set the panel off to dry and crackle before coming in and melting the glaze.
To finish off preparing the base, I added the two skinnier ScrapBerry column pieces and little “bricks” along the top – cutting one of the columns in half (I used a pair of wire cutters, and with a little squeeze it snapped right apart!). I didn’t want my canvas perfectly symmetrical, so I used one of the halves and one of the bricks on the left, the other half, the whole piece, and the second brick on the right. Then, after the glue had set, I coated the entire background in clear gesso and set it off to dry while I started work on the flowers.
For my flowers, I started by gathering up some white roses and leaves from my stash and dismantling the pink flowers from the kit – separating the green parts from the pink. Then the prep work began!
I started by coating all my white flowers and leaves, along with the two long leafy pieces from the 49 & Market flower pack, with some white gesso. Then I grabbed up a sheet of the paper from the kit to cut out some extra leaves from one section, and I fussy cut a few of the larger pink flowers from the other side of the sheet (it is the second, matching sheet from the pack that I used for the background).
Now things were really about to get messy!
I coated all of the die-cut leaves in Distress Translucent Grit Paste – working carefully with the now wet paper – to crumple, uncrumple, and shape the leaves while placing them on my background where I planned on building up all the flower clusters. I also took this opportunity to add the Translucent paste to the fussy-cut flowers so I could shape them, add a layer of protection, and get them in place.
For all of my green pieces from the flower packs and the white roses and leaves from my stash, I made a mixture of white gesso and opaque matte texture paste to coat them in, placing the long leaf pieces from the 49 & Market pack on my background and setting the rest off to dry.
My next step was to get some extra color on all of my flowers and foliage!
For the fussy-cut flowers on the background, I used a combination of Tattered Rose Distress Oxide and my Kitsch Flamingo and Cocktail Party Distress Crayons – just using a water brush to add a bit of color and definition to the fussy-cut pieces.
Then, to add a bit more depth to the pink flowers from the kit, I made a “puddle” of the Kitsch Flamingo and Cocktail Party Distress Crayons mixed together and brushed them onto the inner edges of the petals. To get the color to feather out a bit, I just gave the flowers a light spray of water and let them air dry.
For the six smaller 49 & Market flowers that I pulled off their stems, I put them in a little palette and let them soak in some Cocktail Party Distress Mica Spray.
To get all of my other pieces various shades of gray, I started coating them in a mix of Grave and Crypt Distress Grit Pastes with some Pumice Stone Distress Oxide Spray thrown in!
After they were all coated with that mixture, I decided they needed more gray – the Pumice Stone has a tan-ish tone – so I sprayed them with a combination of Hickory Smoke and Weathered Wood Spray Stains and Oxides.
Even though a lot of my water-reactive mediums are mixed with texture pastes, the colors on the flowers were not! So I took this opportunity to give everything a coat of Workable Fixatif so I could continue working without worrying about my colors moving.
Now I had to add some color to the 49 & Market leaves I had already attached to the canvas. For those, all I did is make a mix of Hickory Smoke and Weathered Wood Distress Crayons on my mat watered them down and used my water brush to brush the colors on.
After a spray of Workable Fixatif on the canvas, I started the process of getting all of my flowers and foliage in place using some 3D Matte Gel.
While the 3D Matte Gel started drying, I worked on all of my mould pieces. After coating everything in white gesso and letting that dry, I started adding all of the other mediums.
For my large, pink keyhole frame, I started with a base of Tattered Rose Distress Paint, Translucent Grit Paste, and Finnabair Texture Powder for a little extra texture to make up for the watering down of the paste. While that mix dried, I started work on all of my gray pieces, using a mix of Grave and Crypt Distress Grit Pastes, and Finnabair’s Cool Gray Rust Effect Paste. After all those pastes were dry, I coated them in a light layer of Hickory Smoke Distress Paint, gave them a light mist of water, and dabbed off areas of the paint to allow areas of the texture pastes to show through and add some variation of color.
While the paint was drying on the gray pieces, I went back to the pink piece and gave it a light, inconsistent coating of Kitsch Flamingo Distress Paint, some spots of Cocktail Party Distress Mica Spray, and some water. After all of that was dry, I came back with Kitsch Flamingo and Cocktail Party Distress Crayons, adding them directly to the mould piece, and watered them down so the colors could flow where they wanted as they air dried.
To finish up all of the gray mould pieces, I added some Hickory Smoke Distress Spray Stain, mixed it up with some Graphite Texture Paste, spread it around some, then sprayed them all with both Hickory Smoke and Weathered Wood Distress Oxide Sprays before that paste has a chance to dry.
Now it was finally time to get everything on the panel and finish it up!
After all of my mould pieces were in place, I added some areas of DecoArt White Crackle Paint, tucked in some pink sisal, added more crackle paint, got my Ingvild Bolme birds in place, and added a little crackle paint to them.
After the 3D Matte Gel had a chance to set up overnight, I mixed some Payne’s Gray watercolor paint with some water and Liquid Color Fluid Medium and used a pipette to get that mix under all of the flowers and mould pieces. For any areas I wanted to make a little grayer, I mixed the Payne’s Gray with some of the fluid medium and brushed it on, watering it down some if I needed to.
For all of the “shadow” making, it was just a process of adding the mediums, adding water if I needed to, and tilting and turning the panel until I had the colors where I wanted them – drying a little at a time to start getting the color set as I went.
For the cabochon [mould] pieces, I used a mix of white gesso and Tattered Rose Distress Paint as my base coat then added some Kitsch Flamingo Distress Paint before adding them to the canvas. Once on the canvas, I added a thin layer of crackle paint to them, blending it onto the canvas around them.
On top of all the crackle paint I added, I started to give some extra color and definition to all of my pieces using Distress Crayons – Kitsch Flamingo and Cocktail Party on the pink areas, and Hickory Smoke and Weathered Wood on the gray pieces and birds.
To add a little extra sparkle to the flowers, I brushed on some Finnabair Pixie Effect Paste – it has the pink flakes in it to go with the canvas, but it also has some light teal-ish flakes for a bit of contrast.
After everything was dry, it gave me a chance to stand back and take a look to see if there were any areas I wanted to add a bit more Payne’s Gray to.
The last step was to add the final touches with some Finnabair Waxes, and I was finally done!
Thank you for joining me here in my corner. I hope my non-traditional, vintage-shabby-fall, mixed media panel gave you some ideas about how you can interpret the October mood board and what you can do with this month’s Scrapbooking Kit.
Stay Crafty, Friends
Did you get a kit? Share what you made in our Facebook Group!
Hey, y’all! Have you checked out the July Mixed Media Kit from Tres Jolie Kit Club yet? It has some fabulous Finnabair Tissue Paper, heavy black gesso, and Pixie Dust, along with some Lindy’s Magical’s, DecoArt Crackle Paint, Tres Jolie Chipboard, and a canvas board to get you started!
I was fortunate enough to receive the newest Finnabair Moulds in the mail the same day I was starting my project, so I have that fantastic Mecha Moth on here, along with a ton of other Finnabair mould pieces from both old and new designs!
I used a couple of stencils from previous kits with the crackle paint from the kit and some Finnabair “Crushed Crystals” Jewel Effect Paste. Then I loaded up and layered up all my colors using some of the Liquid Acrylic Paints from February’s Mixed Media Kit and the Lindy’s from this month’s kit.
Check my video out to see what I did to put this Mecha Steam Queen together!
Video:
To get my background started, I layered it up with some of the “Bavarian Blue” Lindy’s Magical’s from the kit and (part of) one sheet of the Finnabair tissue paper, using my Liquitex Matte Medium to adhere the paper. After I had my initial layer, I tore the remainder of the sheet of tissue paper into strips and layered them up, only adding the Magical Shaker as the initial bottom layer under all the tissue paper.
After my matte medium was fully dried, I came in with my stencils. I used my “Flourish” stencil with the crackle paint from this month’s kit, and my “Screwed” stencil with some “Crushed Crystal’s” Jewel Effect Paste. I just used my finger to dab on and blend a thin layer of the crackle paint along the edges and in the corners of the canvas and to soften the edges of the stenciling some.
After my “Flourish” stenciling was dry, I added a layer of clear gesso to help protect my crackle paint (it was going to be a wet, messy job!) and to make my subsequent layers of mediums easier to flow and roll around along the top of the stenciling and between the cracks. Because of the nature of the Jewel Effect Paste – when it dries it is more like the matte medium – I didn’t need to add any gesso to it.
With all of my background mediums dry, I come in with the “Bavarian Blue” Lindy’s, sprinkle it on, and really water it down so it will flow between all of the cracks. From here on out, I don’t let my mediums air dry on my background, I use my heat guns to make sure everything stays where I put it!
On all of my various mould pieces, I coated them with black gesso – either the heavy gesso from the kit or my “regular” gesso on the more detailed pieces. If you only have the heavy gesso and want to get it into detailed areas a little easier, you can just mix in a little water to thin it some. After my gesso layers dried, I coated everything in some TCW “Sterling Silver” Modeling Paste. It says “Sterling Silver,” but it is more like sterling silver that has begun to tarnish – and I love it!
I used my 3D Matte Gel to hold my Mecha Steam Queen together before adding her gesso and modeling paste. I can say, all I knew was I really wanted to use the new Mecha Moth, and everything was built around that. I keep a bunch of pre-made mould pieces handy, so I grabbed them up and started playing around when suddenly I saw how fantastic my “Queens of Steam” piece looked on that big moth body! I added another layer of wings from the “Nocturnal Insects” Mould, and gave her a “Clockfaces” crown.
While I let that 3D Matte Gel set up, I went to work on deciding which gears I wanted to use and picked one of the “Baroque Frames” to set behind my Mecha Steam Queen. On my gears, after the modeling paste was dry, I added some “Texture Powder” to rough them up a bit, added some extra color to them using the two Lindy’s Magical’s from the kit, and I added some “Ink Black” Liquid Acrylic Paint. On my mould pieces, I allowed the mediums to air dry to allow everything to mix and flow together naturally. On the frame, I just mixed some of the “Bavarian Blue” Lindy’s with some Liquid Color Fluid Medium to keep it from being able to reactivate after it was dry.
To build up my background, I started with some corrugated cardboard (I just happened to find “hidden” behind a pile of other *stuff* – it must have fallen down some time ago and I forgot to fetch it then!). Anyhow, I used the heavy gesso on it and added some of the crackle paint to it. Then to deepen the black, I added the “Black Hole Black” Magical Powder to it, just using some water to activate the powder and added some of the “Pixie Dust” spray to it. To adhere it to the canvas board, I fully coated the back with some matte gel, placed it where I wanted it and weighed it down to make sure it dried flat. Fully coated the back of that cardboard doesn’t just make sure it is well attached, it seals it up so it won’t become soggy from the back side as I continue working.
Now it was time to start building up all of the mould pieces. I started with the bottom layer of gears, using my 3D Gel to adhere everything and to hold up the edges that extended over the edge of the cardboard so everything would be (relatively) even. I added my frame next and then set everything off to dry.
I hadn’t originally planned on the second layer of gears, but after I had my chain pieces and Mecha Steam Queen already dried in place, I realized it really needed another layer. Fortunately, some of my gears were made from air-dry clay (I often use what I have on hand or need to use up when I decide to get some pieces pre-made) so I was able to break them apart and get them to fit around the corner of the frame (top) and under the wings (bottom right).
With everything finally in place, it came time to start adding the final layers of color, but before I did that, I added a layer of Krylon’s Workable Fixatif, just as a precaution for a little extra protection since it was about to get super wet and messy!
I started with some “Ink Black” Liquid Acrylic Paint and the “Black Hole Black” Lindy’s, and watered it all down, moved the canvas about to get it flowing, and dried as I went. So long as it was still wet, I could reactivate the Lindy’s (and paint) and continue moving it around.
For the wings on my Queen, I used the “Bavarian Blue” powder and some Liquid Color Fluid Medium to hold it in place once it dried.
Because I had to break my second gear up some, it left a few small gaps, so I decided to use it as an opportunity to add a bit more sparkle, and used the “Crushed Crystal’s” paste to fill in the gaps and added a touch to the ends of the wings.
To start bringing up the details of my Queen, I added some of the “Ink Black” paint and the “Black Hole Black” Lindy’s and watered it down so it would flow into all of the details.
To intensify the blue on my gears, wings, and Queen, I added some Liquitex “Phthalocyanine Blue” Acrylic Ink, watered it down a little to help it flow, added some of the blue mica powder from Finnabair’s “Pearls & Crystals” Mica set to add a little bit of variation to the shading, and dried it completely so it would stay put!
With all of my blacks and blues in place, it came time to add the final details. To start I used some “Burnt Sienna” Liquid Acrylic Paint to create my shadow effects. It is an absolutely perfect color to create a vintage effect and fabulous shadows to really give a piece some depth. After all my mediums had dried, I came in and gave the whole piece a coating of the “Pixie Dust” Fixative from this month’s kit.
After the “Pixie Dust” had dried, it was time to add some various waxes to highlight various areas on the piece. After my waxes, the final step was adding my beads. I used some “Midnight Magic” Iridescent Beads from ReneaBouquets along the gears and frame, and some 13@arts “Brown Microspheres” to give the final shadowy detail to the layers of my Queen.
Thank you for joining me here in my corner, I hope you enjoyed the building of my “Mecha Steam Queen” and it gave you some ideas of how you can use the various mediums from not only this month’s kit but previous Tres Jolie Kits as well! That’s what makes Tres Jolie Kits so fabulous – it allows you to build your stash!
Stay Crafty, Friends
Did you get a kit? Share what you made in our Facebook Group!
Hey, y’all! If you’re in the Northern Hemisphere of this rotating blue marble, I hope you’re staying cool! If you’re in the Southern Hemisphere, just know I’m jealous! I am just counting down the days until I can see highs under 100°F (38°C). I am fortunate enough to have some AC though, which I know not everyone has.
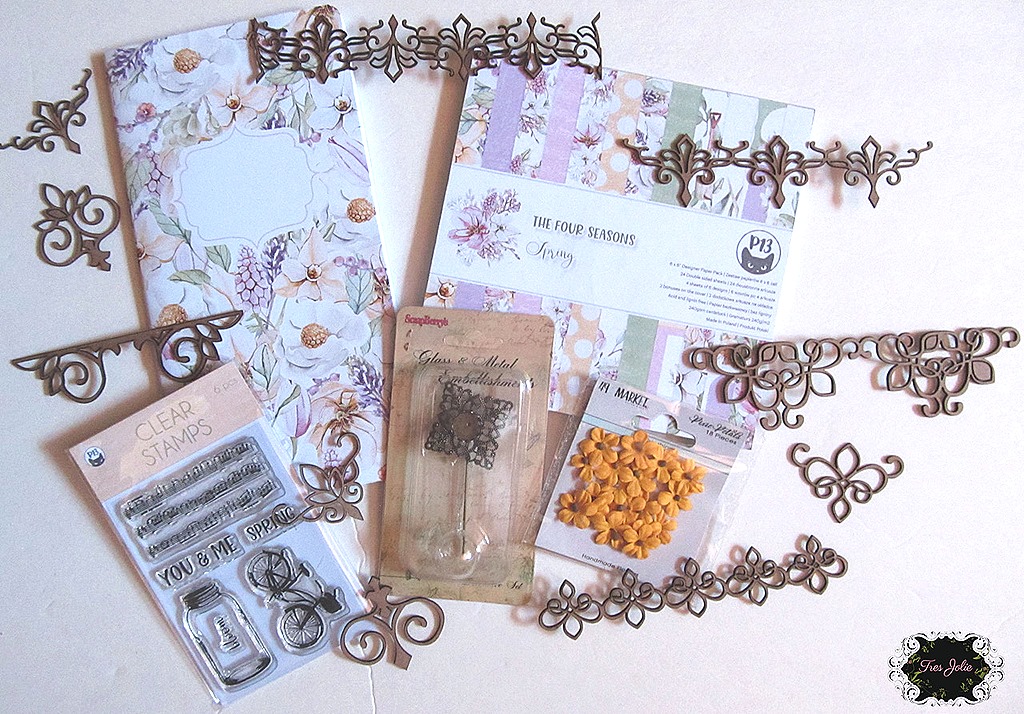
This week I have a “Cottage Life” Décor piece I made using this month’s Cards, Tags, & More Kit, and a deep frame that has existed since sometime in the 80s (the company is no longer in business, that I’m aware of), and some mediums from my stash.
Check out my video to see what I did to put this adorably vintage “Cottage Life” frame together!
Video:
Now, y’all know I love using every part of the kits – packaging, scraps, etc. – and this project was no different! I loved the shapes of the Graphic 45 Chipboard pieces, and thought they would make some fantastic vintage frames – and they did! I, very carefully, cut along the outside of the negative space where the chipboard piece had been, eyeballing my distance, and to strengthen my new frames, and start them on their patinaed copper journey, I used some “Patina Bronzed Copper” embossing powder on them. After they were embossed, I backed them with different pieces of patterned paper.
After my “Cottage Life” Folio (July 7th post), I had quite a few strips of paper, so I got them evened up and made a collage of them on a 5inx7in canvas board to use as the background for my frame.
Aren’t those Tres Jolie Chipboard gnomes adorable? I had to add them to my “garden,” so I did the same to them that I had done to my frames – I embossed them to give them a bit more strength and stability – and to make them copper so they could start their patina journey.
For my frame, I didn’t want it completely rough, but I didn’t want it completely smooth either, so I randomly added some Finnabair “White Sand” texture paste before giving it a coat with some white gesso, “Steampunk Copper” paint, and a touch of “Brass” Patina Effect Paste.
To raise up all of my frame and gnome layers, I used hot glue because it is sturdy, and there is only a cooling time, not a long dry time – plus, when it’s hot it’s “stretchy,” which means I was able to make a pile of it, then use both hands to adjust the frames exactly how I wanted them. I was careful to keep the hot glue away from the embossed areas though because I didn’t want it to reactivate!
You can see I left no surface bare! Since this is an open-front, deep frame, I wanted to make sure I had the inside of the frame matching the outside. After the canvas was together and the paint was dry on the frame I started adding my waxes – some “Rich Copper,” some “Patina Green.”
When it came time to add the frame to the canvas, I used hot glue at the corners to get it in place and to hold the canvas even with the back of the frame so I could turn it over and fill in around the edges with some 3D Gel.
After the 3D Gel had dried, I turned my frame back over and popped on the final, front chipboard piece using more 3D Gel.
Thank you for joining me here in my corner, I hope you enjoyed this “Cottage Life” décor piece and it gave you some ideas of what you can make using this month’s Cards, Tags, & More Kit.
Stay Crafty (and cool & hydrated!), Friends
Did you get a kit? Share what you made in our Facebook Group!
Hey, y’all! I couldn’t help but use this month’s Mixed Media Kit from Tres Jolie Kit Club after I saw the bright, beautiful colors of TCW’s Stencil Butter’s and modeling paste. I actually didn’t even own the moulds I used for the flowers until after I saw the kit, then one day the Magnolia mould showed up in the “you might like” section of my Amazon homepage, and I knew then and there exactly what I was going to do with the kit!
As I noted in the video, I still have to give my project a coating of some Triple-Thick Clear Glaze, but we have had “tropical” conditions here for over a week now, and I still haven’t been able to spray them! I kept waiting, hoping to be able to take photos after the spray had set, but at this rate, it might be October before I get to do that!
Video:
There are not a lot of steps involved in the making of this project, and those fabulous Stencil Butter’s do a lot of the “heavy lifting.”
I used all three of the Mixed Media Boards for the background – pushing them together and stenciling across the seams to create a continuous pattern. I built up the layers using the Stencil Butters, some white texture paste, some 3D Matte Gel, and the modeling paste from the kit this month.
I grabbed up my paperclay and moulds, and set about creating the flowers I wanted to use to span across the Mixed Media boards. I used two of the “Magnolia” pieces (product list at bottom of post) and one set of the “Winter Blooms,” then set to work to create my flower spray. I wrapped some plastic wrap around my boards so I could work on the placement of my flowers without worrying about making a mess, and while still on the plastic wrap, I used my 3D Matte Gel to hold the pieces together.
After the gel had set up, I pulled the plastic wrap off the back and coated the flowers with some white gesso. My first layer of color was a coating of the Gamboge Stencil Butter, followed by a coating of the Grecian Gold Modeling Paste.
When it came time to attach my flowers to the boards, I mixed the Grecian Gold Modeling Paste with some of my 3D Matte Gel and used that – that way it would all blend together!
At this point, the only thing holding my boards together was the flower spray, so I got a 9”x12” MDF board from my stash and cut it down to size. Then I used some wood glue, spread it out evenly, and set the boards in place. I used some book clips, with some cushioning under the front edges, to hold everything together while that glue set up.
Eventually, I will be adding some Krylon Triple-Thick Crystal Clear Glaze to the finished piece, once we get a break in the humidity, and then this will be completely finished!
Thank-you for joining me here in my corner, I hope you enjoyed this project and it gave you some ideas of what you can do with the Stencil Butter’s and Modeling Paste found in this month’s Mixed Media Kit.
Hey, y’all! Welcome back to the Corner Scraps blog!
This week I have a mixed media canvas I made using both the March Mixed Media and Scrapbooking Kits from Tres Jolie Kit Club. The coordination between the micas and the papers was phenomenal! How could I resist using them together?!
I grabbed up a 9” x 12” canvas panel from my stash and started cutting and gluing and embossing! Check out my video to see it all come together.
Video:
Don’t be afraid to use your scissors! Chipboard, flowers, paper…nothing is immune from being cut, altered, and put back together! This project wasn’t too difficult, most of the time spent on it was spent drying or waiting for it to dry.
We have a new mood board challenge for the month. The rules are as follows:
You can create any type of project for the challenge.
You MUST say what you were inspired by.
You MUST include the twist in your design: OLD WORLD ELEGANCE.
We would love to see you USE AT LEAST ONE of Tres Jolie’s products on your projects but it isn’t required to play along.
It MUST be a new project.
Isn’t the mood board this month just beautiful?
Place your entries in the March 2022 challenge folder on Tres Jolie Kit Club Café Facebook page. This challenge ends on March 31st 2022 at 11:59 pm CST. All entries must be in this folder to be eligible for the prize (to have everyone eligible to win, we are limited the same winner to once every 3 months).
Now, some close-ups of the different parts of my canvas:
Here are some images of the mix of embossing powders I made-this month’s Ultrafine Gold, April 2021’s Patina Bronzed Copper, and my Ranger Triple Thick from my stash-put on in two layers, then “cooked” many, many times to (purposely) create some roughness and knock down some shine.
In addition to embossing my chipboard, I added embossing to most of the paper pieces, including the background paper, to give some extra texture and interest to the canvas.
I used the lightest rose mica powder, mixed with the Liquid Color Fluid Medium and watered down, on my background paper. I also used the darkest rose mica, the (I think) next to lightest rose, and both green micas as paints to really make the background flowers and leaves pop as seen in the video.
This main cluster is the biggest reason I am going to wait a week to give my canvas the coat of Triple Thick Clear Glaze. There are so many layers and “globs” of gel mediums and lots of water, and more gel medium! I don’t want moisture getting stuck behind the glaze! I have so many layers of paper and liquid matte medium I don’t know if the moisture would make it out through the back! Better safe than soggy and foggy!!
I didn’t set out to use these beads, I was just digging through my stash when I cam across the piece of costume jewelry and the bags of pearl beads. I don’t even know where everything came from, but I thought it was fortunate that I had those dusty rose colored beads to match the papers and micas! (I forgot to mention it in the video, but I used E6000 on the necklace.)
The Burnt Sienna Liquid Acrylic from last month’s Mixed Media Kit is the perfect color to add some shadowy and vintage effects. Don’t forget, if you decide to use a heat gun to “play” with your pink Prima flowers, they start curling up quickly!
Thank you for joining me here in my corner. I hope you enjoyed this mixed media canvas project gave you some ideas of what you can do with this month’s Mixed Media and Scrapbooking Kits and inspiration for this month’s mood board!
Stay Crafty, Friends
Did you get a kit? Share what you made in our Facebook Group!
Thank you for joining us here at Tres Jolie Kits!
Corner Scraps can be found at the following places:
We are here today to reveal our February 2022 kits. Get yours before they’re gone! We are starting to implement our new year changes, so make sure you are following us on all Social Media platforms and are a part of the Facebook Cafe that way you won’t miss a single announcement or project created with these kits.
Now onto the newest kits.
The February 2022 kit is filled with gorgeous new papers from 13 @rts, an international company that we have featured previously. As always, these papers will be amazing for all your upcoming projects—from a night on the town to a slow Spring stroll. You will find a lovely assortment of patterned papers and perfectly coordinated embellishments.
Our card kit is filled with gorgeous papers from P13 and goodness so you can create a beautiful Traveler’s Notebook and more. Who doesn’t like creating a variety of projects from one kit?
These kits are for the beginner to the advanced, clean and simple to mixed media maven. No matter your style, there is something for everyone. We know you are going to love it!
Presenting the Tres Jolie February 2022 kits:
*Scrapbook Kit*
*Mixed Media Kit*
*Cards, Tags and More Kit*
Don’t forget to stop by the Tres Jolie YouTube channel and see our video reveal of all our kits.
Love them, right!? You can still get one of your own (some kits are in very limited quantities). Become a subscriber and you will never miss out on our gorgeous, coordinated kits. Just visit Tres Jolie subscribe.
The designers at Tres Jolie have created some amazing layouts/projects with this kit.
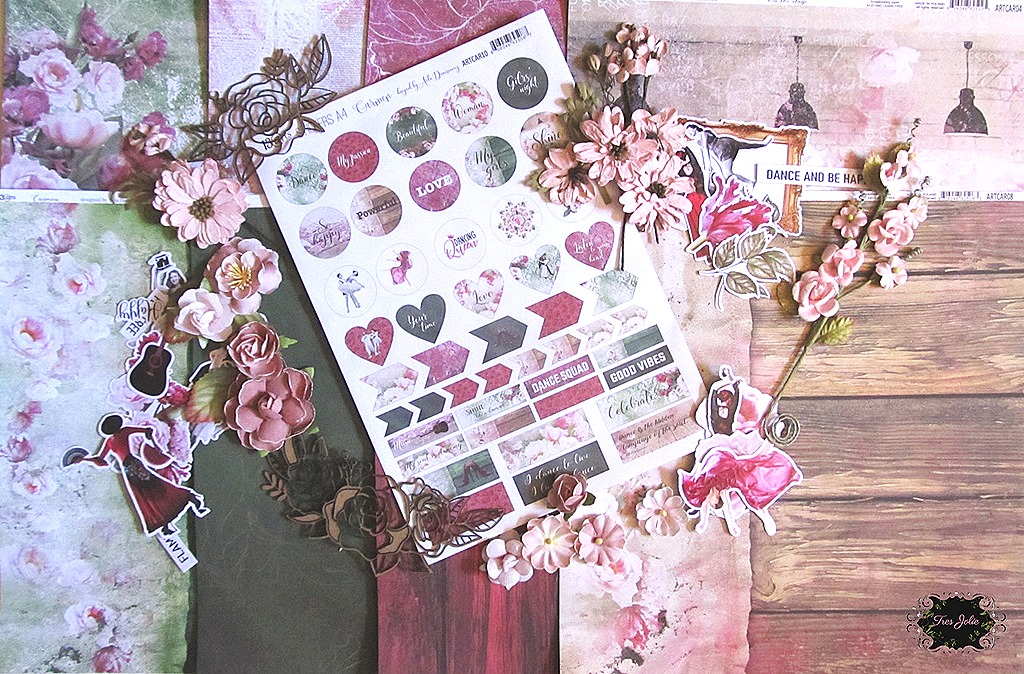
Here is a little tease from me using this month’s Cards, Tags, & More Kit:
Please stop by the other designers blogs and check out their sneak peaks. They are listed below:
We have a new mood board challenge for the month. Here are the rules.
*You can create any type of project for the challenge.
*You MUST say what you were inspired by.
*You MUST include the twist in your design.
*We would love to see you USE AT LEAST 1 of Tres Jolie’s products on your projects but it isn’t required to play along.
It MUST be a new project.
Here is the mood board:
The twist for this month is CABARET LIFE.
Place your entries in the February 2022 challenge folder on Tres Jolie Kit Club Cafe Facebook page. This challenge ends on February 28th 2022 at 11:59 pm CST. All entries must be in this folder to be eligible for the prize (to have everyone eligible to win, we are limited the same winner to once every 3 months).
Don’t forget that Tres Jolie can be found in the following places:
All the designers will be revealing their projects on the Tres Jolie Blog all month long. Make sure you join us for tons of inspiration, including video and photo tutorials. Also make sure you check out our newest chipboard designs that were just added to the store.