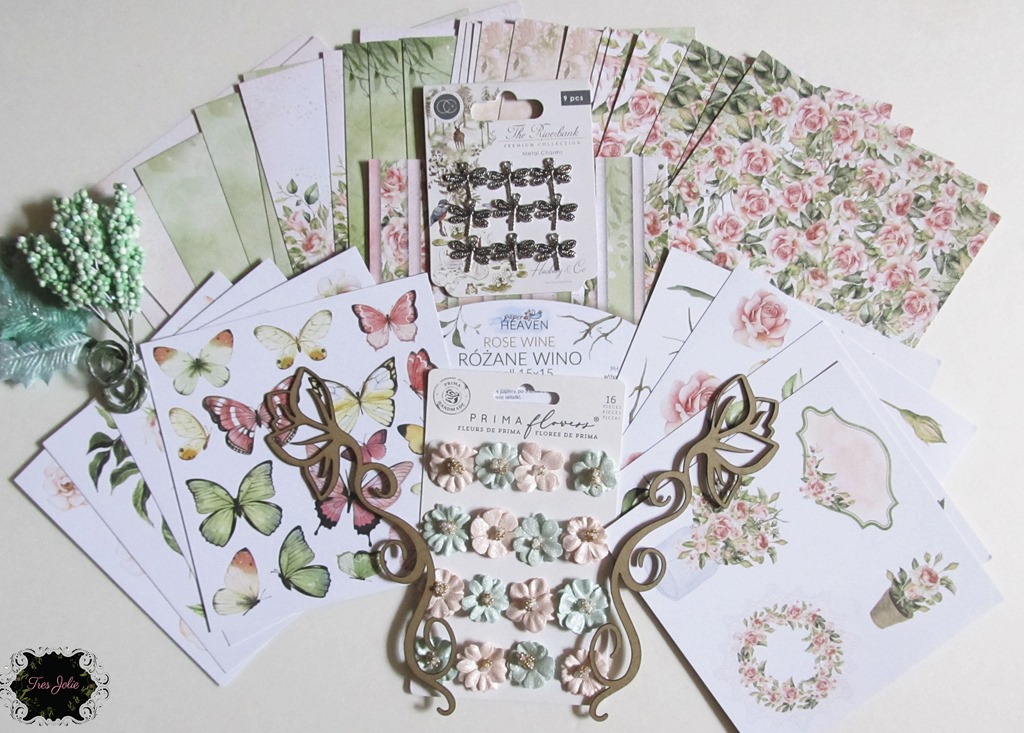
Tres Jolie Kit Club–Tag Flip-March 2023 Cards, Tags, & More Kit!

Hey, y’all!

Welcome to March and new projects using Tres Jolie Kits! Did you get a chance to check out the reveal yesterday? All of March’s Kits are as fabulous as ever! Make sure to swing by the Tres Jolie shop and pick yourself up a kit or three!

For my first March project, I used the Graphic 45 ATC Tag booklet/album … thingy … and the Stamperia “Garden of Promises” papers and chipboard to create a little motivational and/or photo flip-book.

Make sure you check out the video to catch my thought process and see how I put this all together!

mar23-tagFlip-18


mar23-tagFlip-17 mar23-tagFlip-15

I know Graphic 45 has dies that are made to work with their (larger) tags, I’m not sure if there is an ATC Tag one, and even if there is, it wouldn’t have worked for everything I wanted to do! My solution was simple though – I just used some clear plastic packaging, traced two tag shapes on it (side-by-side), and rough-cut it out! Why did I trace two side-by-side? So I would be able to make a few backgrounds with little flip-outs! Then all I had to do is use it to create all of my backgrounds.

template

Not all of my backgrounds are solid pieces, after I had cut into a few of the patterned papers, I decided to straighten up a few edges, grabbed a partial piece of an adhesive sheet I had left from a previous project added some scraps strips of printer paper, peeled the backing off, and started laying down all the various left-over strips and squares! I don’t like having a lot of little pieces laying about and I like the feeling of using up as much as I can, so paper piecing is my go-to move!

mar23-tagFlip-16 mar23-tagFlip-14

I was never concerned about having perfectly straight, neat, and tidy edges because I had planned from the beginning to distress and ink them all – which is exactly what I did! I just used my scissors to distress all of the edges – including inside the ring hole – and used the “Pale Brown” Fluid Chalk Ink for a bit of color.

After I had my bases distressed, inked, and (mostly!!) ready to go, I started the sewing process. I picked one background to stitch directly to the tag, then on the background for the flip-side, I added the stitching first, then glued it to the tag. I decided to do my stitching this way so both sides of the tag would have the top stitching showing. It doesn’t really matter as far as the stitches are concerned, but the side of the paper the needle goes through tends to be a bit rough.

mar23-tagFlip-11 mar23-tagFlip-10 mar23-tagFlip-05

As seen in the photos above, six of my tags have flaps that flip out. Of those six, four were created using a single piece I made using my template (double-width, and scored), and for the other two, I decided to make the flaps separate just because I wanted a little more control over what image was showing and which way the flap was going to flip!

I don’t like leaving folds without some kind of reinforcement when they are in a project that is interactive, and these ATC Tags were no exception – so I just added some of the seam binding from the kit to the insides of all the folds and stitched along each side.

mar23-tagFlip-13 mar23-tagFlip-12 mar23-tagFlip-07

I really loved all of the quotes and phrases found throughout the patterned papers, and I wanted to incorporate them in a variety of ways. One was I did was to use the three bookmark-looking rectangles and create some fold-down, interactive elements – mostly because the paper strips were approximately 4” long, and I didn’t want it dangling out of the bottom!

Again, I had to reinforce all of my bends, except this time I used some linen hinging tape instead of the seam binding. Not for any particular reason beyond that it was a 9” piece I had “misplaced” during a previous project, and since I finally found it, I wanted to use it up! My linen hinging tape, however, is 1-1/4” wide – about 1/4” wider than the stripes – so I trimmed off the excess before attaching it to the backs of my pull-downs.

I added stitching to the sections that were attached to the background and added the three blue chipboard butterflies to use as “handles” (One apparently got edited out from the middle photo above without me noticing! Oops!)

mar23-tagFlip-09 mar23-tagFlip-08 mar23-tagFlip-20

What did I do with a 1/4” wide, 9” strip of linen hinging tape? I cut a couple of pieces off and used them to reinforce the folds on the two fold-out pieces I added using more bits from the cut-apart sheet! And, just like with the pull-down stripes, I stitched the back of the fold-out piece to the background.

mar23-tagFlip-06 mar23-tagFlip-04

I wanted to use some eyelets that I’ve owned for far, far too long, so I grabbed up a few and added them to the pre-punched holes on four of the chipboard pieces, then glued the chipboard where I wanted it. I didn’t use the eyelets to attach the chipboard to the background paper or tags, just because I didn’t! No real reason beyond that there wasn’t a real need to!

On the tag that has the large chipboard flower cluster, I didn’t use any glue, I just stitched it along one edge and the bottom so it could work as a tuck spot.

mar23-tagFlip-03 mar23-tagFlip-01

Thank you for joining me here today on the blog! I hope you enjoyed this little project and it gave you some ideas of what you can do using this month’s Cards, Tags, & More Kit!

Stay Crafty, Friends


Did you get a kit? Share what you made in our Facebook Group!

Thank you for joining us here at Tres Jolie Kits!


Tres Jolie can also be found at:

Tres Jolie Facebook

Tres Jolie Instagram

Tres Jolie Website

Tres Jolie Subscriptions

Tres Jolie Blog

Tres Jolie YouTube

Tres Jolie Pinterest


Tres Jolie Insta Square Frame

In addition to this month’s Cards, Tags, & More Kit, I used:

UHU Stic, Art Glitter Glue, adhesive sheet, double-sided tape, eyelets, We R Memory Keepers Crop-A-Dile, LineCo Linen Hinging Tape, ivory/cream-ish thread

Tres Jolie Kit Club–Gel Plate Printing!!!–April 2022 Mood Board

Hey, y’all! Welcome back to the Corner Scraps Blog!

This week I am focusing on the Mixed Media Kit from Tres Jolie Kit Club, and while I do make a few sample projects, my focus is really going to be on what a gel plate can do! I find gel printing to be incredibly addictive – I can sit for hours without noticing time passing while I peel paper after paper off.

Apr2022-GelPrinting-12

I do manage to add some mood board inspiration as well. I love citrus, not so much eating or drinking (I don’t care for sour), but for reasons I can’t explain, I love how citrus fruits LOOK – so I made a cut file that finds its way onto the gel plate! Check out my video to see all the ways I used the gel printing plate and the mixed media kit this month.


Video:


April 2022 Moodboard:

moodboard

April’s mood board challenge rules:

  • You can create any type of project for the challenge.
  • You MUST say what you were inspired by.
  • You MUST include the twist in your design.
  • The twist for this month is SPRINGTIME MADNESS.
  • We would love to see you USE AT LEAST 1 of Tres Jolie’s products on your projects but it isn’t required to play along.
  • It MUST be a new project.
  • Place your entries in the April 2022 challenge folder on the Tres Jolie Kit Club Cafe Facebook page. This challenge ends on April 30th, 2022 at 11:59 pm CST. All entries must be in this folder to be eligible for the prize (to have everyone eligible to win, we are limited the same winner to once every 3 months).

Papers:

Apr2022-GelPrinting-10 Apr2022-GelPrinting-09

Here are a couple images of some of my finished papers – of course by “finished” I mean from this session! I may or may not decide to add more in the future! You can see my Citrus Cut File (mostly) survived being used over and over again, and I now have some gel plate printed citrus slices!


Easter Eggs:

Apr2022-GelPrinting-03

I just happened to come across a package of four wooden Easter Eggs in Wal-Mart, and decided they would be fun to use with the gel plate! If you saw my December 2021 Mixed Media Kit Project “Sleigh Bells,” then you already know I like to use more than paper on my gel plates! So I did it again, this time with some Easter Eggs.

Apr2022-GelPrinting-02 Apr2022-GelPrinting-06

The egg on the left is just multiple layers from gel printing, tipped off with some splatters from the Dina Wakley Gloss Sprays found in this month’s kit. The Egg on the right also has multiple layers, but I also used the Citrus Cut File on the gel plate and then came in and added some gel pen after it was all dry to really make the slices stand out!

Apr2022-GelPrinting-04 Apr2022-GelPrinting-05

For the “Spring” Egg, I used a flower-filled egg stencil I’ve had for years (no idea where it came from) and my Dina Wakley Spray to give some fun flowers to my gel printed background, then just grabbed a gel pen to add “Spring.” For the egg on the right, after my background layers were dry, I grabbed a white oil pastel to draw on some flowers! Oil pastels make a great resist, so I just added my Dina Wakley Gloss Sprays to color the stems and petals.


Envelopes:

Apr2022-GelPrinting-07 Apr2022-GelPrinting-08

Once your gel prints are dry, you can fold them up and create custom envelopes with your original papers! Well I used a sheet of regular printer paper for my examples, if I had started with envelopes in mind, I would have used some cardstock for my envelope prints, but I don’t always know where I’m headed when I do most projects, and this week was no exception!

I added a bit of the Citrus Cut File and I made some paper Easter Eggs to layer up. Fun to make, and I have some one-of-a-kind envelopes. I also want to add that after they are dry, the Glossy Sprays make great resists!


Backgrounds for my tag and ATC:

Apr2022-GelPrinting-13 Apr2022-GelPrinting-01

For the tag, I started tearing up some of my papers and layered them up, and added some Citrus slices using some Liquitex Matte Medium. After the matte medium was dry, I went back with my gel pens to add some accents to the rinds and scribbled on some flowers. I then came back with my glossy sprays and filled in the citrus slices. I can’t say this tag is “done”, but I wanted to do a little something that showed a few examples for layering and color. For my ATC, I grabbed up my Prima ATC blanks, some bits of the paper I had made, and glued them in place before taking it over to my sewing machine and adding some random “scribble” stitches. Then I came back and popped on a few chipboard pieces from my stash to complete the card.


Apr2022-GelPrinting-11

Thank you for joining me here in my corner! I hope you enjoyed seeing some of the different ways a gel plate can be used for making your own custom prints—half the fun is in the experimentation!

Stay Crafty, Friends


Did you get a kit? Share what you made in our Facebook Group!

Thank you for joining us here at Tres Jolie Kits!


Tres Jolie can be found at the following places:

Tres Jolie Facebook

Tres Jolie Instagram

Tres Jolie Website

Tres Jolie Subscriptions

Tres Jolie Blog

Tres Jolie YouTube

Tres Jolie Pinterest


mm-insta

In addition to this month’s Mixed Media Kit (*from previous Tres Jolie Kits), I used:

Corner Scraps Studio: “Citrus” Cut File; *Jacquard Lumiere “Halo Violet Gold;” Dina Wakley Media: Heavy Body Acrylic Paint “Lemon,” *Acrylic Paint: “Tangerine” & “Lemon;” Vicki Boutin “Juicy Pear” Acrylic Paint; *FolkArt “Silver Sterling” Metallic Acrylic Paint; *DecoArt “Lavender” Acrylic Paint;” Apple Barrel “White” & “Pavement” Matte Acrylic Paint; *Tim Holtz Stencil: THMS117; Acrylic Paint Pens; Gel Press 8×10 & Petites; Ranger Heat-It Tool; We R Memory Keepers Envelope Punch Board; oil pastels; black Stabilo pencil; Sakura Pens (metallic, Moonlight, Soufflé, Glaze); Aen Art Pen (glitter); craft sticks (i.e. popsicle sticks, tongue depressors); cheese cloth; corrugated cardboard; vinyl sink mat; fabric flowers; wooden eggs; *Ranger Craft Tags; *Prima ATC Cards; Simple Stories “Good Vibes” Chipboard Stickers; Bella Blvd Ciao Chip “Adventure;” printer paper; craft foam sheets; string/yarn; hot glue gun & hot glue sticks; UHU Stic; Liquitex Matte Medium

Tres Jolie Kit Club–October 2021 Moodboard–Texture ATCs!

Hey, all! Welcome back to my corner! I’m here today with my project for this month’s Tres Jolie Kit Club moodboard challenge—some ATCs that were inspired by all the yummy textures found on the moodboard! I used items from the October Cards, Tags, & More Kit, Mixed Media Kit, and lots of goodies from previous kits!

FRAMED-20211012_113258

I have some weaving on a couple of the ATCs, some lines inspired by the lines in the sand, and some sisal inspired by the wool! Check out my video to see how I put everything together and keep scrolling down to check out the moodboard, photos of each ATC, and a product list!


Video:


October 2021 Moodboard:

Moodboard-Oct21


Now for some close-ups to show all those textures!

FRAMED-20211012_094319

I didn’t have any plan going into this project, I just knew I wanted to really get some textures on my ATCs! The background of this ATC was created using some “White Sand” Finnabair Texture Paste and a texture tool by Making Memories that I’ve had for Y-E-A-R-S!!

FRAMED-20211012_094336

Here is one of the ATCS that has some weaving for the background and some sisal (in place of wool)! I just used my Lindy’s spray to turn the natural sisal into pink sisal!

FRAMED-20211012_094423

On all the ATCs I added some machine and hand stitching, used a black Stabilo to give some depth to the different layers, and added a Tres Jolie Chipboard button from the Cards, Tags, & More Kit—topped with Finnabair Metallic Flakes—for some shine.

FRAMED-20211012_094355

ATCs don’t have to remain vertical, and I liked a horizontal orientation for this ATC better! This was the ATC I completed in the video, so it had more dry time, which really makes it look like those Art Stones are just sitting on the card!

FRAMED-20211012_094440

I really love this palmistry hand from the Tim Holtz ephemera pack here! The sisal on this ATC was sprayed with the green Lindy’s before being tucked in, and, like all the others I have my stitching, Stabilo, art stones, and button added on.

FRAMED-20211012_094246

Thank you for joining me here in my corner! I hope you enjoyed these ATCs and they gave you some ideas how to use this month’s moodboard and what you can make using items found in the Cards, Tags, & More and Mixed Media Kits.

Stay Crafty, Friends!


Did you get a kit? Share what you made in our Facebook Group!

Thank you for joining us here at Tres Jolie Kits!


Tres Jolie can be found at the following places:

Tres Jolie Facebook

Tres Jolie Instagram

Tres Jolie Website

Tres Jolie Subscriptions

Tres Jolie Blog

Tres Jolie YouTube

Tres Jolie Pinterest


October Cards, Tags, & More and Mixed Media Kits:

cardsKit-Oct21

mmKit-oct21

In addition to items from the Cards, Tags, & More Kit & Mixed Media Kits (*from previous Tres Jolie Kits), I used:

*13@rts: “Rosalie” Ephemera Pack; *49 & Market: “Sage” Washi Strips & “Coral” Washi Strips; *StudioLight Jenine’s Mindful Art Collection Rice Paper RICEJMA22; *idea-ology/Tim Holtz: “Keepsakes” Ephemera Pack; Prima/Finnabair: 3D Matte Gel, *Texture Paste-“White Sand,” *Metallic Flakes-“Steampunk;” Ranger Sticky Embossing Powder; *Ranger/Tim Holtz: Distress Collage Medium “Matte;” *Prima Waterbrush; Simon Says Stamp Clear Embossing Ink; Liquitex Clear Gesso; DMC Embroidery Floss: 209 & 938; Light Purple Thread; Art Glitter Glue; UHU stic; Scotch ATG; Black Stabilo; Krylon Workable Fixatif; *palette knives; Martha Stewart Fringe Scissors; Making Memories Texture Tool

Tres Jolie Kit Club-September Cards, Tags, & More Kit-ATCs

Hey all! Welcome back to my corner!

Whew! Already September?! Living in the South I am truly looking forward to cooler days getting here!

To get us going this month I have a set of ATCs (Artist Trading Cards) I put together using [almost 100% only] of the Cards, Tags, & More Kit from Tres Jolie Kit Club!

FRAMED-20210819_113524

The only non-kit items (besides tools & adhesives) are the ink I stamped with and some basic white thread. These ATCs went together quick and easy! The lonest process I had was fussy cutting; something that can be done while watching T.V. or a movie. Which makes it easier for me, because otherwise I tend to get bored doing all that cutting! (I have a love/hate relationship with fussy cutting, I love the results, the process—not so much LOL!) Check out my video to see how these ATCs came together!


Video:


FRAMED-20210819_114139

FRAMED-20210819_114156

After I had my bases ready, assembly went quick and easy thanks to my hot glue gun! Hot glue can be so versatile and handy because you can use it to quickly build up and support your embellishments—and as soon as it’s cooled, you’re good to go! No dry time needed!

For some extra texture I added some “nests” of regular thread—the same one I used to stitch the edges—it was a little trick I picked up from Missy Whidden a few years ago (she does it to her layouts quiet often).

I used some Prima Fluid Chalk Ink from my stash to stamp the banners and words, then just fussy cut them out and used some hot glue to help hold the curve and attach them to the ATCs.

FRAMED-20210819_114208 FRAMED-20210819_114224

The only wet glue I used for these ATCs was some heavy gel medium that I randomly brushed on to hold my sequins and beads in place, and that didn’t take long to dry since it wasn’t thick. Plus, it dries clear, so now those sequins and beads look like they are just sitting there!

FRAMED-20210819_114041

Thank you for joining us here in my corner! I hope you enjoyed these ATCs and they gave you some ideas of what can be done with the items found in this month’s Cards, Tags, & More Kit!

Stay Crafty, Friends


Did you get a kit? Share what you made in our Facebook Group!

Thank you for joining us here at Tres Jolie Kits!


Tres Jolie can be found at the following places:

Tres Jolie Facebook

Tres Jolie Instagram

Tres Jolie Website

Tres Jolie Subscriptions

Tres Jolie Blog

Tres Jolie YouTube

Tres Jolie Pinterest


September 2021 Cards, Tags, & More Kit:

Card kit sept 2021

In addition to this month’s Cards, Tags, & More Kit (*from previous Tres Jolie Kits), I used:

*Prima/Ingvild Bolme “Blossom Red” Quick Dry Fluid Chalk Ink, Liquitex Super Heavy Matte Gel, Hot Glue Gun/Hot Glue Sticks, Scotch ATG, white thread, Sizzix Big Shot Plus & Cutting Mats

Tres Jolie Kit Club-Paperclay & a Tag Booklet-Aug. 2021 Cards, Tags, & More Kit

Hey, all! Welcome back to my corner!

This week I’m bringing you a two part project using the August 2021 Cards, Tags, & More Kit from Tres Jolie Kit Club – part one: paperclay + moulds + paper; part two: tag booklet!

FRAMED-20210721_121034

As I was sitting and looking at the cut-apart sheet from the kit, I couldn’t help but wonder if I could make the wreaths more dimensional. Then it dawned on me – they looked like the would fit in the Stamperia Mould from the July 2021 Mixed Media Kit! Check out my video to see how I used the papers with some different moulds and how I put the quick tag booklet together!


Video:


Now for a few photos. First up, the paperclay pieces I created:

FRAMED-20210721_121457

FRAMED-20210721_121320

The photo on the left shows two wreaths I created using the July Stamperia Mould and papers from this month’s Cards, Tags, and More Kit. The photo on the right shows all the pieces I made using various moulds from my stash!

Next up, the quick little tag booklet:

FRAMED-20210721_120919

FRAMED-20210721_121001

The round wreath was just the right size to add to the front of my tag booklet, and with just a few small embellishments it was all done! Look below for a photo series of making the pockets, plus a link to the original post I got the folding idea from! (*Note: Tag Size: 2-3/8”x3-3/8”)

20210720_111627 20210720_111654
The dashed lines are the folds. The side that is the “back” of the folds is also the side that will show on the front pockets.
20210720_111848 20210720_111825
Add a thin line of clue for to make the

slide-through pocket.

Fold your corners in and add a little glue to

tack them in place.

20210720_111953 20210720_112114
Glue lines if the larger side will be your top

piece.

Glue lines if the smaller side will be your top

piece.

**Original Fabrika Decoru Instagram post where the pocket idea came from! (The 6th slide in the post has a video)

FRAMED-20210720_143958

Thank you for joining me here in my little corner, I hope you enjoyed this project and it gave you some ideas of what you can do with the items found in the August Cards, Tags, & More Kit!

Stay Crafty, Friends


Did you get a kit? Share what you made in our Facebook Group!

Thank you for joining us here at Tres Jolie Kits!


Tres Jolie can be found at the following places:

Tres Jolie Facebook

Tres Jolie Instagram

Tres Jolie Website

Tres Jolie Subscriptions

Tres Jolie Blog

Tres Jolie YouTube

Tres Jolie Pinterest


August 2021 Cards, Tags, & More Kit

In addition to items from this month’s Cards, Tags, & More Kit (*from previous Tres Jolie Kits), I used:

*Stamperia Frames Maximould; *Little Birdie “Aqua Sheen” Metallic Wax; Prima/Finnabair Moulds: “Skull & Bones,” “Birds & Bats,” “Nocturnal Elements,” & *“Fairy Garden;” Creative Paperclay; LineCo PVA Glue & Linen Hinging Tape (1.25”); Art Glitter Glue; Liquitex Matte Super Heavy Gel; X-Acto Knife; We R Memory Keepers Crop-A-Dile & Crop-A-Dile Corner Chomper; EK Tools Score Board; Tim Holtz Tiny Attacher; sheer ribbon; *Lace

Tres Jolie Kit Club-June 2021 Cards, Tags, & More Kit-Samples!-ATCs, Memorydex, and a Card & Envelope

Hey, all! Welcome back to my little corner!

Today I’m bringing you my third (and final) project this month using the June Cards, Tags, & More Kit from Tres Jolie Kit Club; a sampler of smaller projects—ATCs, Memorydex®, and a notecard & envelope.

20210507_190148-FRAMED

With my three projects this month, I used up every little bit of the June Cards, Tags, & More Kit, and had a fabulously fun time doing it! Check out my video below to see how my samples came together!


Video:


First up, my ATCs:

20210507_185257-FRAMED

I used Tim Holtz’s “Crackling Campfire” and “Salvaged Patina” for the color scheme of my ATCs. The bases are Prima ATCs, dyed some white tulle with Distress Oxide Stain, and I used the clockfaces, butterflies, phrases, and flowers (my flowers were different!) from the kit to top them.

Here are some close-ups of each ATC:

20210507_185314-FREAMED

20210507_185321-FRAMED

20210507_185327-FRAMED


Next, my Memorydex cards:

20210507_185542-FRAMED

Since these cards are meant to go onto a Memorydex®, I kept them a bit flatter than the ATCs. Three of the card’s color scheme are Tim Holtz’s “Blueprint Sketch” & “Mustard Seed” and three are the same as the ATCs, “Salvaged Patina” & “Crackling Campfire.” I grabbed up some sisal for four of the cards and actually just used my wax seals to hold it in place! I used my last butterfly and gears from the kit and added some cut out pieces from the Stamperia paper pack. (Note: At the time I didn’t have the June Mixed Media Kit yet, so I used some Nuvo Gilding Flakes from my stash. As a reminder, the June Mixed Media Kit comes with a jar of Finnabair’s “Steampunk” Metallic Flakes!)

Close-ups of the individual Memorydex® cards:

20210507_185642-FRAMED

20210507_185652-FRAMED

20210507_185700-FRAMED

20210507_185710-FRAMED

20210507_185718FRAMED

20210507_185735-FRAMED


And finally, my notecard and envelope:

20210507_185849-FRAMED

For my envelope I was 100% inspired by Nathifa (Pronounced: na-tee-fa) from Juicy Christians Studios (in my video I only refer to her Instagram handle because I hadn’t heard her say her name or read the pronunciation yet, and I didn’t want to pronounce it wrong!). I am completely obsessed with watching her make envelopes! When I got down to having only pieces from the cut apart sheet left, I figured I’d try my hand at making an envelope.

I used some Kraft paper from my stash, turned a stencil into a stamp, cut out Every. Last. Piece. of the cut apart sheet, and layered things up—using my black Stabilo to create my shadows! I wrote my name on the back flap, to show where a return address would go, and used a silver marker to create the recipient’s address box. Now I may have finally found a use for all the cut apart sheets I’ve collected over the years! (Fussy cutting isn’t my most favorite activity!)

Here are close-up of the front and back of the envelope:

20210507_185922-FRAMED 20210507_190024-FRAMED

Thank you for joining me today! I hope you enjoyed these sample projects and they give you some ideas of what can be done with items from this month’s Cards, Tags, & More Kit!

Stay Crafty, Friends!


Did you get a kit? Share what you made in our Facebook Group!

Thank you for joining us here at Tres Jolie Kits!


Tres Jolie can be found at the following places:

Tres Jolie Facebook

Tres Jolie Instagram

Tres Jolie Website

Tres Jolie Subscriptions

Tres Jolie Blog

Tres Jolie YouTube

Tres Jolie Pinterest


In addition to items from this month’s Cards, Tags, & More Kit (*from previous Tres Jolie Kits), I used:

*Creative Embellishments “Crackled Brick” Stencil, Fabrika Decoru “Rings” Stencil, Ranger-Tim Holtz Distress Paint “Salvaged Patina” & *”Crackling Campfire,” Distress Spray Stain “Salvaged Patina” & “Crackling Campfire,” Distress Oxide Spray “Salvaged Patina” & “Crackling Campfire,” “Blueprint Sketch,” & “Mustard Seed,” Distress Embossing Glaze “Salvaged Patina” & “Crackling Campfire,” Distress Oxide “Salvaged Patina” & “Crackling Campfire,” Ranger Emboss It Reinker, *Ranger-Dina Wakley Black Gesso, Ranger Archival Ink “Jet Black,” StazOn “Jet Black,” Prima-Finnabair *Clear Gesso, *Opal Magic Wax “Turquoise Satin, Metallique Wax “Vintage Gold,” “Old Paperwork” Cling Stamps, *Prima ATC Cards, The Paper Studio Everyday Kraft Paper Stack, *TCW Mini Specimens Stencil, Nuvo Gilding Flakes “Silver Bullion,” “Sunkissed Copper,” & “Radiant Gold,” Liquitex Matte Super Heavy Gel, *Darice Embossing Essentials “Oblong Frames,” idea-ology-Tim Holtz Tiny Attacher, Heidi Swapp Memory Dex Dies, Bic Mark-it “Woodsy Brown,” STA Metallic Color Pen “Silver,” Ranger Heat-It Tool, Ranger Brayer, Miluakeee Heat Gun, We R Memory Keepers 3-Way Corner Punch & Envelope Punch Board, Unbranded Rolodex Dies (4), Unbranded Sisal, Yoption Amazon Store For the Wax Seal Stamps, Anezus (Amazon) Sealing Wax Kit, Gel Press 8×10 Gel Plate, Unbranded Address Guide, Black Stabilo

Tres Jolie Kit Club-June 2021 Cards, Tags, & More Kit-G45 ATC Tag Album

Hey, all! Welcome back to my little corner! Today I’m bringing you my first project for the Tres Jolie Kit Club using the June Cards, Tags, & More Kit!

This project is a “kit only” project, using the Graphic 45 ATC Tag Album, Stamperia Papers, and one of the resin clocks from this month’s kit.

20210504_095922-FRAMED


Video:


This project is rather easy-peasy! For all the pages and the cover, I just cut the paper to size and glued it down. I created a custom-fit piece for the spine, using my Silhouette Cameo to cut the bracket shape in the piece of paper I was using.


Here are the measurements I used and the JPEG or, if you choose, the SVG for the tag and spine.

JPEG of the spine & tag cuts.

(Below is a link to my Dropbox for a SVG.)

Measurements I used for the Stamperia paper.

albumSpine&tag-cutfile PhotoRoom-20210505_113652
Link to SVG in my Dropbox

(not a Tres Jolie Dropbox!)


A few close-ups:

20210504_095912-FRAMED

I really wanted to keep the cover simple so the album could be carried around easy while traveling, so I made sure my cut-out pieces were glued down good and I used some Liquitex Super Heavy Gel to make sure that resin clock was attached nicely!

20210504_100043-FRAMED

I cut the lined sheet of paper from the Stamperia pack in half and turned it into a couple of fold-out pages for taking notes.

20210504_100027-FRAMED

For some of my pages I did some paper piecing to create the background!

20210504_100013-FRAMED

I had originally thought I might cover the tags with the Stamperia paper as well, but then I decided to leave them blank for notes and/or photos.

20210504_100109-FRAMED

I picked one of the phrases from the cut apart sheet to put in the bracket. You could also make a custom label describing what the theme of your album is!

20210504_095944-FRAMED

This Graphic 45 ATC-Tag Album is so adorable and just the right size to make a little memory book; paired with the Sir Vagabond Papers from Stamperia, and you have a handy place to record a little vacay!

Thank you for joining us here at Tres Jolie, I hope you enjoyed this project and it gave you some inspiration to create your own little album!

Stay Crafty, Friends

Red heart C.J.


Did you get a kit? Share what you made in our Facebook Group!

Thank you for joining us here at Tres Jolie Kits!


Tres Jolie can be found at the following places:

Tres Jolie Facebook

Tres Jolie Instagram

Tres Jolie Website

Tres Jolie Subscriptions

Tres Jolie Blog

Tres Jolie YouTube

Tres Jolie Pinterest


June 2021, Tres Jolie Kit Club, Cards, Tags, & More Kit:

Adhesives used: Art Glitter Glue & Liquitex Matte Super Heavy Gel

Tres Jolie Kit Club-September Mixed Media Kit-ATCs

Hello, all! Welcome back to my corner!

This week I am bringing you my project using the Prima “Alphabet Cards” ATC pack that came in this month’s Mixed Media Kit (the cards are not shown in the kit photo) from the Tres Jolie Kit Club.

DSC_0008-FRAMED

To start, I haphazardly brushed on some clear gesso to all of the cards, sprayed them with the Lindy’s Gang Moon Shadow Mist from the kit, then started building up my layers. Check out the video to see how it all came about!


DSC_0011-FRAMED

I dug into my collections of mediums (many of which came from previous Tres Jolie kits), and just started decorating my cards! I added some stenciling using the gel medium and glitter from this month’s kit, and topped it with some stamping. I then added some quick flower sketches to some of the ATCs, some (more) stenciling, and some painting. Then I just grabbed up some black gesso and traced over the printed letters on the cards to bring those alphabet back to the front!

I really didn’t have any rhyme or reason when I put these cards together, I just went with what I was feeling like using at the time!

DSC_0010-FRAMED

DSC_0009-FRAMED

I hope you enjoyed this project and it gave you some ideas of what you can do with the ATC pack that came in this month’s Mixed Media Kit!

DSC_0007-FRAMED

Thank you for joining us here at Tres Jolie!

Stay Crafty, Friends!


Did you get a kit? Share what you made in our Facebook Group!

Thank you for joining us here at Tres Jolie Kits!


Tres Jolie can be found at the following places:

Tres Jolie Facebook

Tres Jolie Instagram

Tres Jolie Website

Tres Jolie Subscriptions

Tres Jolie Blog

Tres Jolie YouTube


Products:

Mixed media kit

In addition to items from this month’s kit (*from previous Tres Jolie kits), I used:

Prima/Finnabair  *Wax Cire Cera “Peacock,” *Opal Magic Wax “Turquoise Satin,” *Opal Magic Wax “Vintage Silk,” *Metallique Wax “Vintage Gold,” *“Passiflora” Stencil, “Flourish” Stencil, *Elementals Stamp “Messy,” Clear Stamps *“Secret Notes” & *“Love Potion,” *Prima Clear Stamp “Rosarian,” Prima/Art Philosophy *“Metallic Pastel Accents,” *Prima Waterbrush, *Stampers Anonymous/Tim Holtz Mini Layered Stencils Set# 39, *Cosmic Shimmer Metallic Gilding Polish “Silver Hessian,” StazOn “Olive Green,” Dina Wakley Media Scribble Stickes Set 1 & Set 2, *Little Birdie Black Gesso, Liquitex Clear Gesso

Under the Sea-ATCoins-Creative Embellishments August 2020 Challenge

Hey, all! Welcome back to my corner!

Today I’m bringing you an ATC Coin set I created for the August 2020 Creative Embellishments Challenge.

DSC_0022-wm

I have a quick process video to go along with this project, if you’d like to see how I put these together.


Process Video (potentially still uploading):


Here is the inspiration graphic from Creative Embellishments. I saw the challenge on the first of the month, and I just remembered “Mermaids” until I was finally able to get a project together! I love all things fantasy, so I knew I had to participate this month!

aug-chal


All-in-all I had about two hours of “work” put into the making of these (not including any air dry time), and I am very happy with how they came out!

I layered some gilding flakes on top of some homemade texture paste using Ranger’s Sticky Embossing Powder, added the “Mermaid Artist Trading Coins” to the base, glued down some shells, used some of Finnabair’s wonderful waxes, and added some 13 @rts microspheres as a finishing touch.

DSC_0023-wm DSC_0024-wm
DSC_0025-wm DSC_0026-wm

To me my Artist Trading Coins looked like they very well could have been coins sitting on the ocean floor!

Thank you for joining me in my little corner for this rather quick project! I hope you enjoyed it and I’ll see you again soon!

Stay Crafty!


Products:

Creative Embellishments Artist Trading Coins, Mermaid Artist Trading Coins, & Seaweed Stencil, 13 @rts “Old Gold” XS Microspheres, Prima/Finnabair Heavy White Gesso, “Burnt Sienna” Liquid Acrylic Paint, “Ancient Coin” Metallique Paint, “Yellow-Blue” Opal Magic Paint, “Bronze Age” Metallique Wax, and “Patina Blue” & “Patina Green” Matte Wax, Ranger Sticky Embossing Powder, Tonic-Nuvo Gilding Flakes “Radient Gold,” “Silved Bullion,” and “Sunkissed Copper,” Simon Says Stamp Clear Embossing Ink, Liquitex Gloss Gel & Gloss Super Heavy Gel, Ranger Heat It Craft Tool, Decor Sand & Shells,

*The texture paste I used was made quite a few months ago and has a lot of different products in it.